8 Steps to Build an Effective User Onboarding Flow [+ Examples]

![8 Steps to Build an Effective User Onboarding Flow [+ Examples] cover](https://blog-static.userpilot.com/blog/wp-content/uploads/2024/05/8-steps-to-build-an-effective-user-onboarding-flow_b217f40dfb390cd8369870defd8c02b9_2000-1024x670.png)

The right user onboarding flow won’t only ensure more users understand how to use your product, but it will also keep them engaged.
But how’s the process for building an effective flow that guarantees success?
Let’s explore 8 steps for designing the best onboarding process, and share examples from other companies using onboarding software to apply the top strategies.
Summary of user onboarding flow
- The benefits of an effective onboarding process include enhanced user experience, increased adoption rates, boosted retention, and reduced support costs.
- Here are 8 steps to building a user onboarding flow that retains and delights users:
- Determine the goal of your onboarding process: Use a SMART framework to set clear, measurable, and time-bound goals.
- Identify key onboarding process steps: Break down the customer journey into detailed tasks and create a journey map.
- Create guidance flows for each onboarding step: Analyze steps that need guidance and develop specific flows to assist users.
- Add content to your onboarding guidance flows: Incorporate different content formats and integrate them effectively into the user interface.
- Set goals and triggering conditions for your onboarding flow: Configure triggers for your flows to deliver targeted messages at optimal times.
- Group your onboarding steps using a checklist: Use a checklist to guide users through the onboarding process, ensuring they reach activation.
- Customize and style your onboarding checklist: Design an engaging and visually appealing checklist that matches your product’s design.
- Analyze onboarding flow performance and iterate: Review the effectiveness of your onboarding flows and make data-driven improvements.
- Let’s go over five examples of companies with effective user onboarding flows:
- Attention Insights: Uses an interactive walkthrough with a checklist and hotspots to guide users through core features.
- Groupize: Introduces a gamified interactive assistant to enhance user engagement and support.
- Figma: Provides a personalized onboarding experience based on user input during the welcome message.
- Miro: Incorporates gamification and animations in their onboarding to enhance engagement and ease of learning.
- Grammarly: Offers a demo with pulsing hotspots and tooltips to teach users about features subtly and engagingly.
- Instead of relying on the dev team to implement in-app experiences the way you want, why not try a Userpilot demo to see how you can quickly create in-app flows?
Benefits of an effective onboarding process
Onboarding maximizes the potential of your product. It enhances the user experience and contributes significantly to a product’s success in the market.
The benefits of implementing the right user onboarding flow are many, and they include:
- Enhanced user experience: Well-designed onboarding processes simplify the learning curve for new users, making the product more accessible and enjoyable.
- Higher product adoption rates: By clearly demonstrating the value and functionalities of the product, onboarding can lead to higher adoption rates among target users.
- Increased user retention: Effective onboarding increases the likelihood that users will stick with the product long-term, reducing churn rates.
- Reduced support costs: When users understand how to use a product from the beginning, there’s less need for extensive support, saving resources for the company.
This guide focuses on designing and implementing a user onboarding flow. If you’re looking for a broader overview of user onboarding strategy, best practices, and tools, see our complete guide to user onboarding.
How to design new user onboarding flows
Let’s go over 8 steps to building user onboarding flows that get users to take action.
#1 Determine the goal of your onboarding process
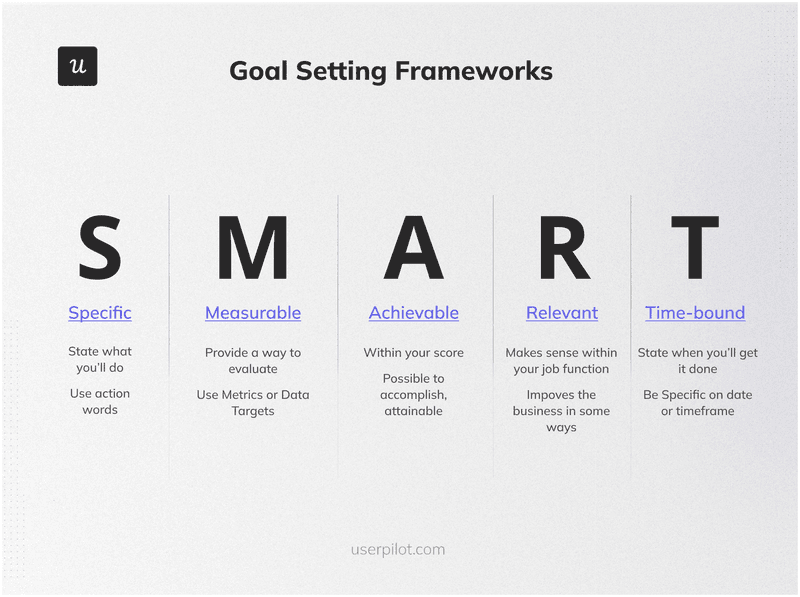
Follow a goal-setting framework like SMART to align your goals with the results your business needs.
In the case of SMART, it includes goals that are:
- Specific. It’s clearly defined with percentages, numbers, and actions.
- Measurable. It can be tracked so you can know how much progress you’ve made.
- Achievable. You can attain it.
- Relevant. It’s aligned with what your company wants to achieve.
- Time-bound. It’s set within a time frame.
For example, a SMART onboarding goal could be: “Increase activation rate by 25% over the next quarter by implementing personalized in-app guidance.”
#2 Identify key steps of your onboarding process
Once you have a clear goal, you need to break down the entire customer journey during the onboarding process—including every task and touchpoint in it.
For this:
- Draw out the different steps in the onboarding process, starting from the moment they sign up until they fully adopt your product.
- Identify the tasks that existing users need to complete to achieve activation.
- Define the process to complete each task, including the channel (website, app, support, etc.) and the element they engage with (feature, an agent, etc.).
- Pull the user journey together into a map document.
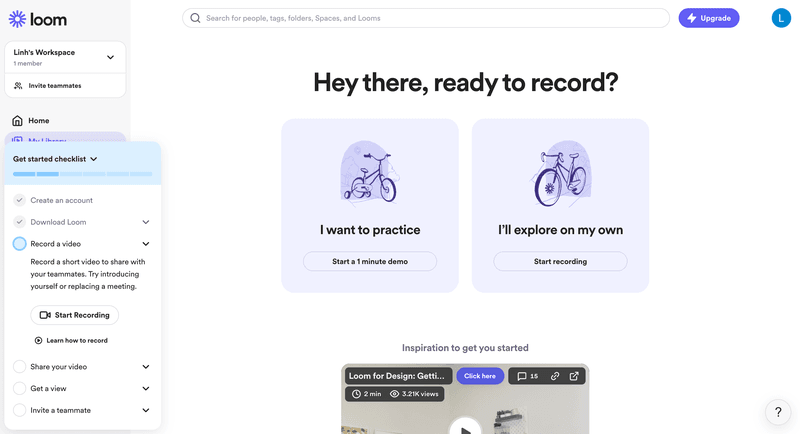
For example, Loom’s onboarding process involves setting goals for new users including downloading a Chrome extension, recording your first video, sharing the video link, getting a view, and inviting a teammate.
#3 Create guidance flows for each onboarding step
After the steps are outlined throughout the onboarding process, it’s a good time to start pointing out the steps that will require guidance.
For this, break down the onboarding process, analyze what steps require guidance, and then create guidance flows based on the result users need to achieve.
An example could be prompting the user to invite teammates before they engage with a core feature (so they can experience the full value of it).
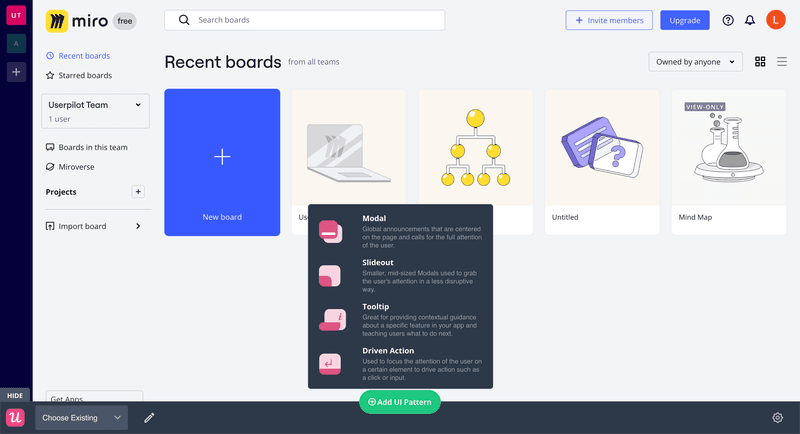
#4 Add content to your onboarding guidance flows
During the creation of your user onboarding flow, decide the content format.
Whether it is a video tutorial, a GIF, or an interactive walkthrough, make sure to choose a UI pattern that enables users to take action and progress toward your primary goal (e.g. activation checklist).
Also iterate the placement, the message, and the style of your flows so:
- It fits your product’s UI.
- Doesn’t disrupt the user onboarding experience.
- It’s attractive enough for users to pay attention to.
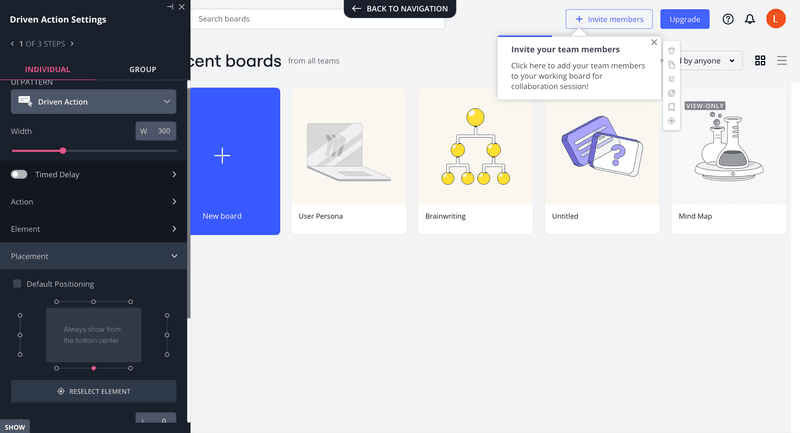
For instance, you can design an interactive walkthrough to handhold users through the basics of your product’s features:
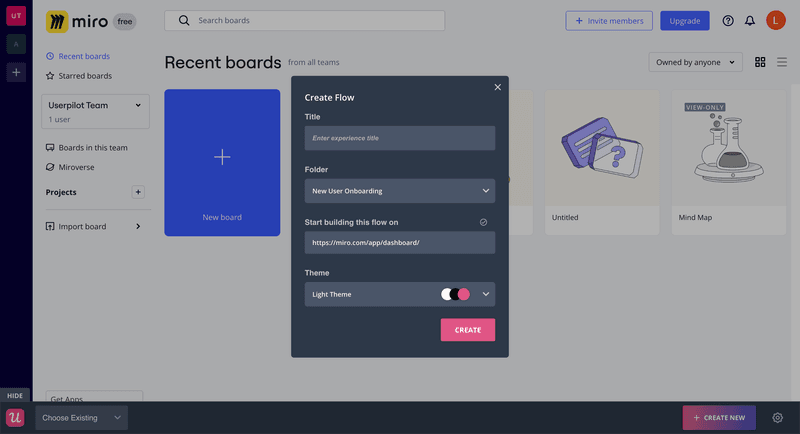
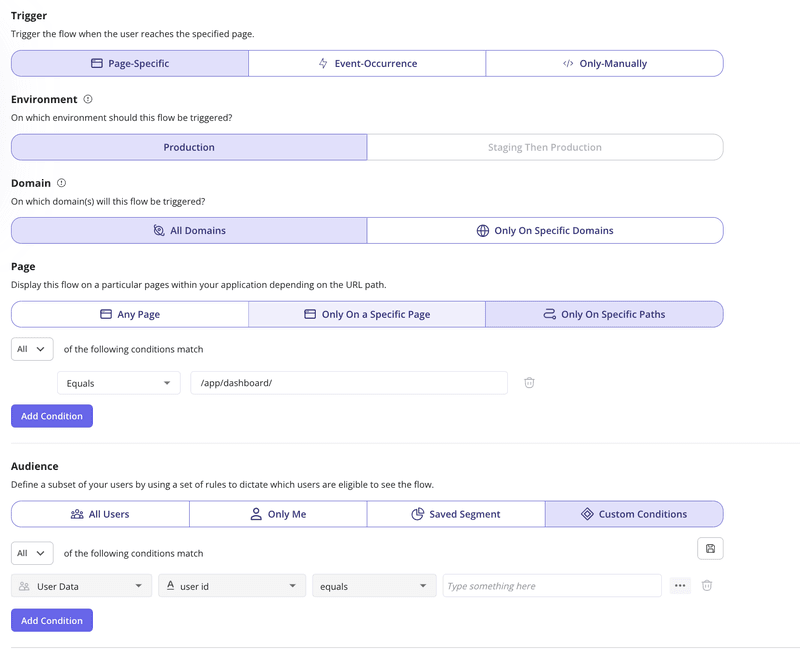
#5 Set goals and triggering conditions for your onboarding flow
To continue, you must configure your flows so they trigger the right message at the right time and to the right user.
For this:
- Set up your flow to trigger on a specific page or after a particular event has occurred.
- Define the audience to whom this flow will trigger.
- Make sure that the content of your flow matches the needs and use cases of the specific audience.
This way, you’ll multiply your chances of creating an onboarding flow that users don’t skip.
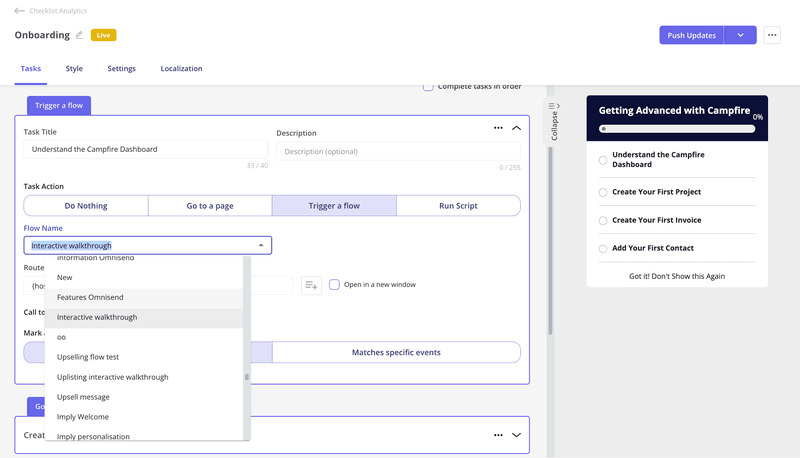
#6 Group your onboarding steps using a checklist
A checklist will guide users through the onboarding process so they can achieve the activation stage as easily as possible.
For this, take the onboarding steps you already outline and add them to the checklist. These are the high-level steps that serve as milestones within the process.
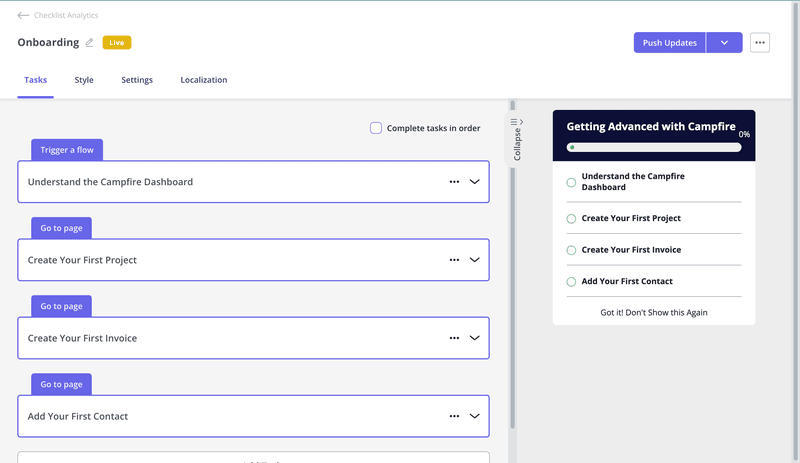
Then, go over each step and select what’s going to happen when the user clicks it. It can involve going to a page or triggering a specific flow you just created. Make sure to explain the specifics of the task and everything it entails.
Pro tip: Also add pre-checked dummy tasks like “signing up” to encourage users to finish the checklist.
#7 Customize and style your onboarding checklist
With a fully set onboarding process, the next step is to customize your onboarding checklist.
For this, you can use a color palette that matches your product, add a header that catches the user’s attention, add a progress bar, and even include your icon.
The goal is to make your onboarding checklist as engaging as possible so users experience less friction.

#8 Analyze onboarding flow performance and iterate
To complete your onboarding process, you need to review your flow performance.
Here, you can see how many users complete the tasks and filter the results by periods, user segments, and company accounts.
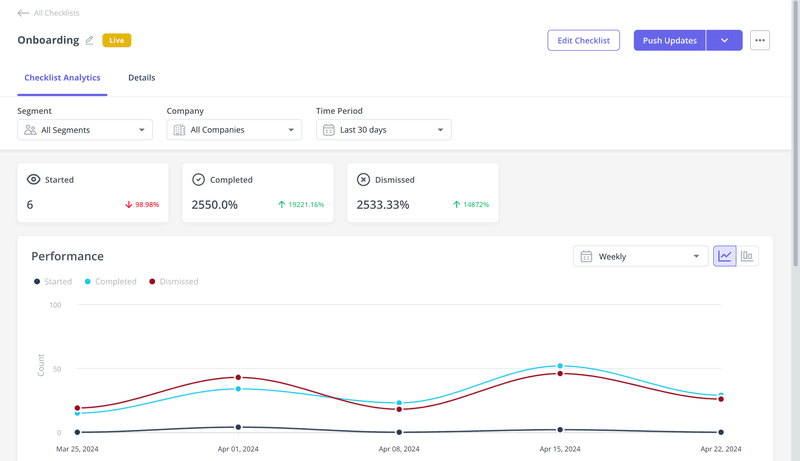
This way, you can get a full breakdown of your flows and see which steps are more skipped, iterate your onboarding content, and make data-driven decisions.

Examples of great onboarding experience for new users
Now, let’s go over five user onboarding examples of other companies implementing effective user onboarding flows:
Attention Insights utilizes interactive walkthroughs
Attention Insight shows an onboarding checklist the moment a user signs up.
Here, the user can click on each step of the checklist to go to the relevant page and trigger an interactive walkthrough. Then, users are handheld throughout the core features with hotspots (so there’s no way to miss them).
This makes their onboarding process seamless and frictionless. Also, the fact that it groups all the interactive walkthroughs in one checklist provides users with a centralized hub where they can access all the guidance they need to get value from the product.
What makes it a great user onboarding flow?
- Triggers an interactive walkthrough when the user clicks a step of the checklist.
- Walkthroughs are completely interactive, meaning that you learn by actually using the product.
- Includes hotspots, drawing attention to less obvious UI elements.
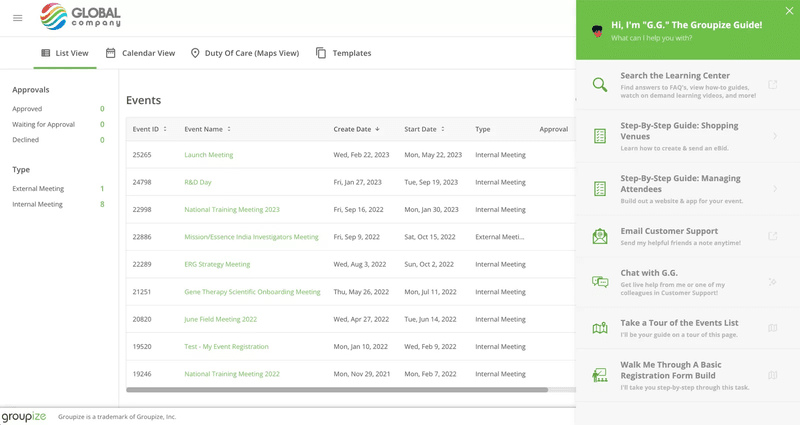
Groupize creates an interactive onboarding assistant
Groupize is a meetings management platform that needed to revamp its onboarding process.
For this, they used Userpilot to gamify their onboarding by creating a Groupize Interactive Assistant—G.G.—ready to help Groupize users through the app’s interactive elements.
G.G. offers help through onboarding tours, step-by-step checklists, as well as live chat, LinkedIn page, and email.

And even though you can dismiss it anytime you want, you can always reactivate her in their in-app resource center.
What makes it a great user onboarding flow?
- Employs gamification to engage users.
- Leverages AI to provide proactive onboarding.
- It’s entirely optional, so users can skip it if they don’t like it.
- The assistant has an omni-channel presence on the app, email, and socials.
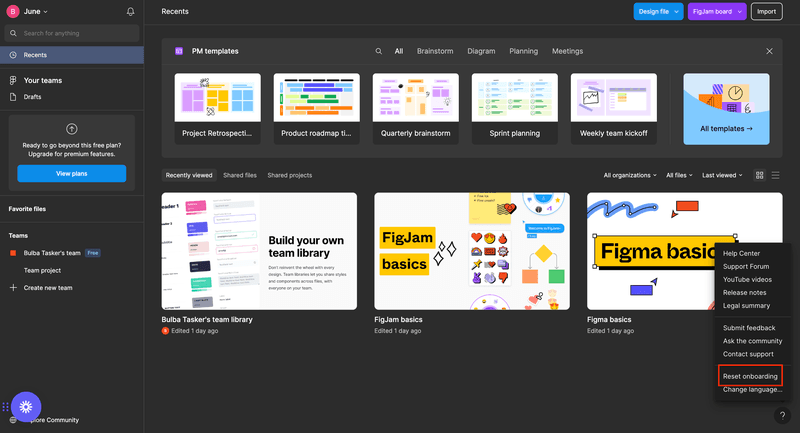
Figma enables onboarding replay
Figma’s onboarding process starts by asking you about your use case during their welcome message (e.g. brainstorming, projects, learning design, etc.).
Then, it uses your answer to trigger a personalized interactive walkthrough based on your needs and JTBDs—introducing the most relevant features to you.
Plus, Figma gives you the option to reset the onboarding flow via the help center, in case you need to revisit one of their tools:
What makes it a great user onboarding flow?
- Shows a welcome message to collect basic data.
- Triggers a personalized walkthrough based on your use case.
- Gives users the option to skip and reset later if they want to.
Miro incorporates gamification
Miro offers a thorough onboarding process that includes multiple elements:
- A frictionless signup process (with SSO).
- Onboarding surveys where they get to learn about your needs, segment you, and collect valuable data.
- It takes new users to interact with a relevant template the moment they start.
- Appealing in-app guidance that includes gamification elements and animations that make the learning experience more engaging and easier.
So instead of adding some tooltips or quick tours to the app, Miro reshapes the whole product experience when onboarding users—making it unlikely that users will skip or ignore it.

What makes it a great user onboarding flow?
- Adds gamification elements to show users how to use the tool.
- Includes an onboarding survey to trigger the most relevant onboarding flow.
- Walkthroughs are interactive and full of animations for an easier learning experience.
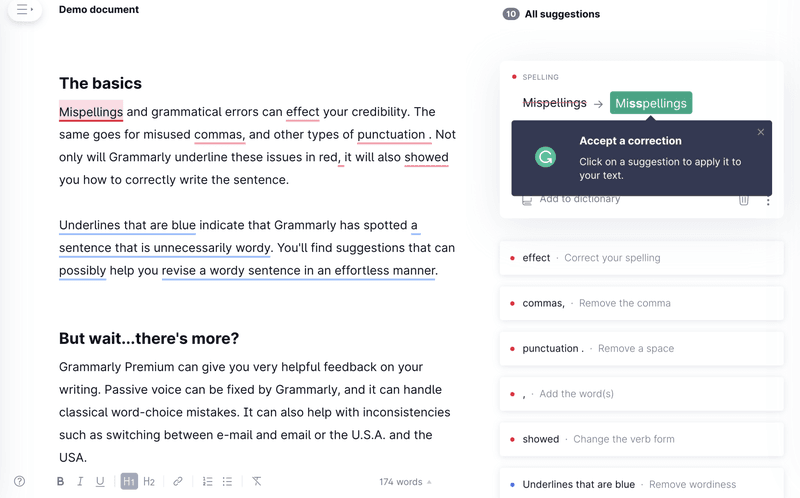
Grammarly provides demo data
Grammarly invites new users to a short demo. Here, it triggers different UI patterns that guide users and smooth the onboarding experience.
This includes pulsing hotspots that highlight each feature—just subtle enough not to obscure the interface, but eye-catching enough to engage users. Clicking on the hotspots reveals tooltips describing the feature in more detail.
The uniqueness of Grammarly’s onboarding lies in the fact that it is often used as an extension rather than its own platform. Because of the tool’s nature, supposedly in-app onboarding experiences often occur outside of the platform.
What makes it a great user onboarding flow?
- Teaches users by practicing.
- Since Grammarly is mainly used as an extension, their demo brings users to their platform so they can learn how to use it too.
- Uses pulse hotspots to catch users’ attention without overloading them with information, and incentivize them to go through each step.
Conclusion
In SaaS, creating an effective user onboarding flow is as important as acquiring new customers.
With this guide, you can hopefully implement the steps we explained to build an onboarding flow that retains users and grows your business.
So, instead of relying on the dev team to implement in-app experiences the way you want, why not try a Userpilot demo to see how you can quickly create in-app flows?
About the author