Before we dive into how to onboard invited users, let us ask you a question…
Do you remember how you joined Facebook?
Chances are this is ancient history for you and you don’t – but if you joined around the years 2006-2008, your relationship with Facebook probably started from an email with the following subject line:
[Name of your friend] invited you to join Facebook!
A lot of digital products rely on network effects – meaning that the more people in someone’s network use them, the more valuable the product becomes to the user. Hence, they allow their current users to invite friends and often incentivize such invitation – as in the case of Dropbox:
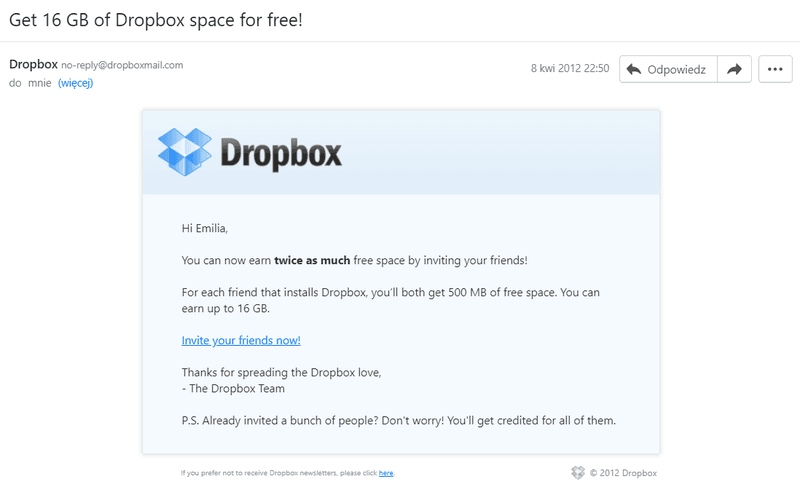
No wonder user-invitations are so popular in SaaS: people are 4x more likely to purchase a product when it’s been recommended by someone they know.
On the other end of the spectrum: a lot of SaaS products are designed to foster collaboration and teamwork. As a result – your target end-user may be an entire team – rather than an individual:
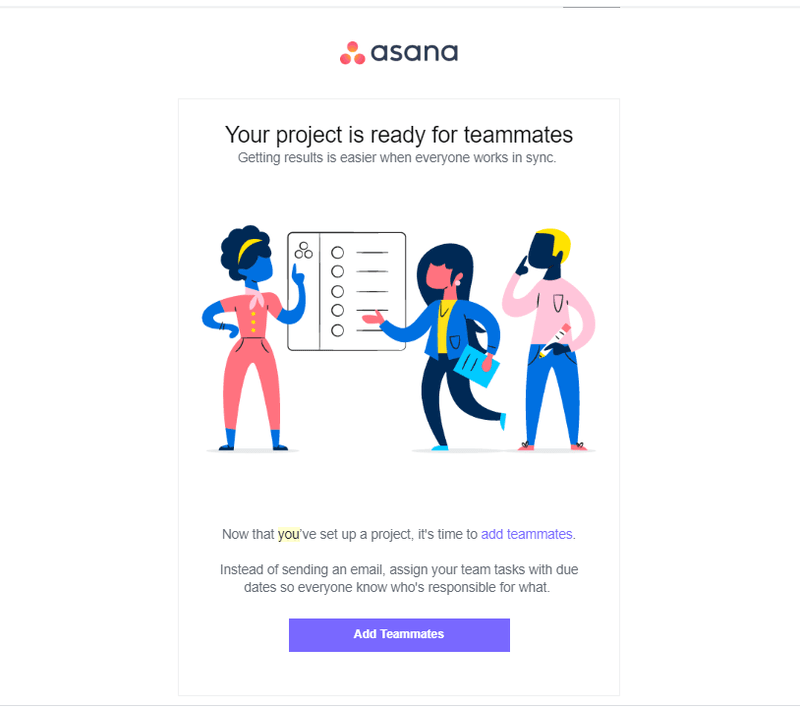
For instance – StoryChief – a collaborative content creation workspace – allows you to invite copywriters and editors to your team so you can work on the content together:
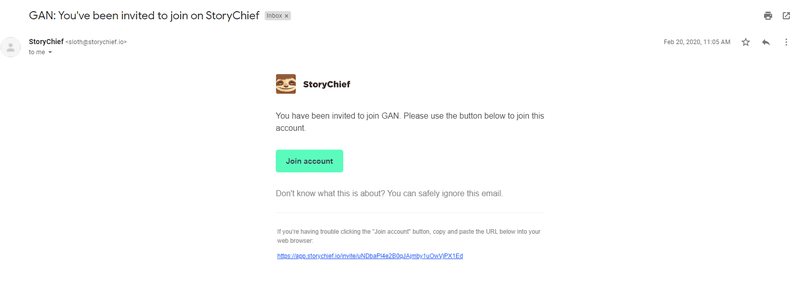
In that case, the success of your product actually lies in the success of the entire team – not a just the admin. Leaving the invited user out can lead to a lack of adoption across the organization, and ultimately it means customers may churn to find a better alternative. Unfortunately, a lot of apps focus on the initial onboarding for the main admin role, but then forget about the other team members who are invited in.
In conclusion: it’s crucial that you onboard every single user, even those who have been invited in.
In this article, we’re going to look at the two cases when SaaS businesses may acquire invited users.
First, we will look at some examples of products that don’t onboard invited users, and see how that makes the product difficult to use.
Then, we’ll look at some examples of how to onboard invited users effectively.
Finally, we’ll show you some techniques you can use to onboard invited users.
Try Userpilot Now
See Why 1,000+ Teams Choose Userpilot
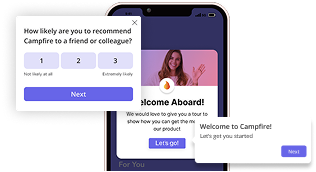
The two types of invited user – referral vs. team member.
As we already hinted in the introduction – there are usually two situations in which invited users may be joining your product – when they are invited by a friend’s referral or when they are invited as a team member.
In both cases – there are some onboarding best practices you should follow. They differ, however, depending on the invited user’s use case.
The Welcome Email
First – the welcome email. This is the first step to getting your invited user to use your product and should state clearly:
- who invited them
- what is the product they are being invited to
- why they should join – 3 top-key features

In the case of a team member invite, the welcome email should also state which team the invited users will be a member of.
Personalized Onboarding
Now – apart from not having any onboarding for the invited user at all, there is another nightmare scenario that the invited user usually has to face: being subjected to the same onboarding as a user that has not been invited by anyone.
This is wrong in both use cases:
The referral invited user usually knows a little about the product from the user that referred them – so they don’t need a full-blown onboarding telling them everything your product does. Instead, they need a personalized onboarding adapted to their specific use case and role (ask them in the welcome screen!).
The team member invited user may have different account permissions than the admin user! This means that if you show them the same onboarding flow as for the admin user – you may end up showing them features they have no access to (aka can’t use). This, obviously, is only going to frustrate and confuse everyone. Instead: show them only the functionalities they have access to, depending on their role (we will discuss how to track this later).
Skipping the Product Tour
Exactly for that reason – you should probably skip the lengthy product tour for the invited users (although we generally advise our users against product tours – and to use interactive product tours instead) – or at least make it optional.
What happens if you don’t onboard invited users?
Most products focus on onboarding that one primary user. That makes no sense. Sure, it’s important that the primary user understands how to get up and running. But those invited team members are going to be doing a lot more of the daily work.
That means you need to make sure they know what they’re doing.
Unfortunately, it isn’t as simple as rehashing the same primary onboarding flow. These invited users will each have different use cases, or access to different features. They also won’t need to set the product up, as the primary user should already have done that.
The worst thing you can do, as you’re about to see, is to ignore invited users entirely.
Invited users for BotStar don’t know what to do
I’ve recently been playing around with a product called BotStar. It’s a drag-and-drop interface for designing and building chatbots.
It’s a great product, and, seeing as I’m the only one using it, the onboarding works fine.
However, I was curious to see what would happen if a user was invited to collaborate on a bot.
I added myself as a different team member, and this is what happened.
Firstly, I was sent an email:
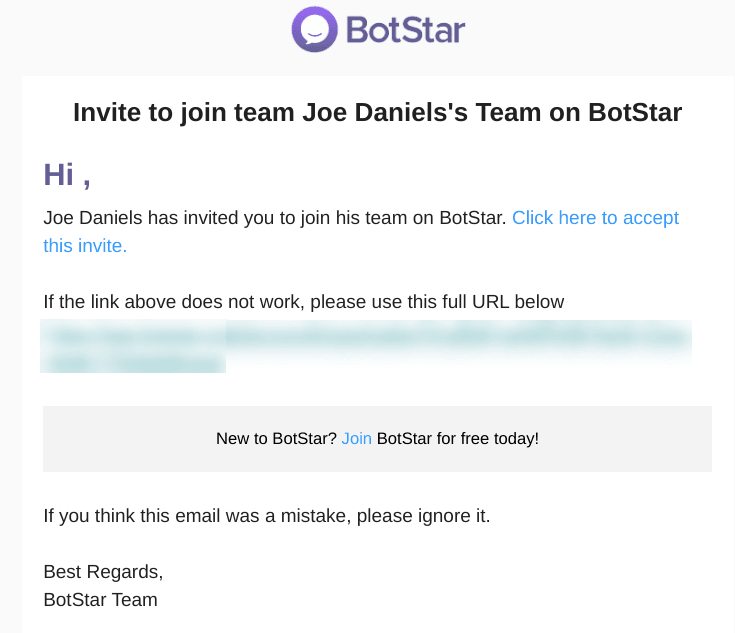
It tells me that I’ve been invited to join a team on BotStar, and to click a link to accept.
Sounds good. So I click on the link and I’m taken to this sign up page:
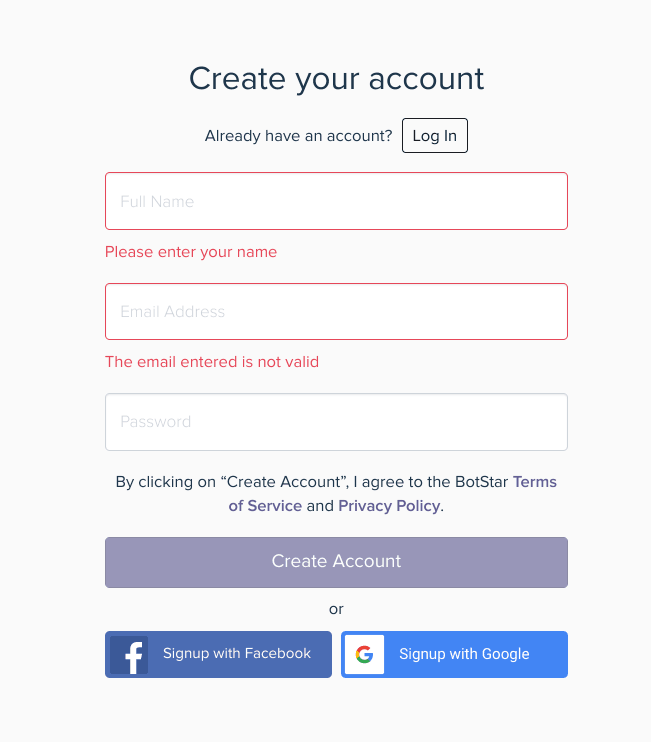
This is a little confusing. I thought I was joining a team, not creating an account. I’m not sure if I’m supposed to sign up or log in.
This could have been a great opportunity for BotStar to provide a bit of context and guidance, thus reducing the friction of signing up to make an account.
After filling in my details and creating my new user account, I’m taken to this dashboard:
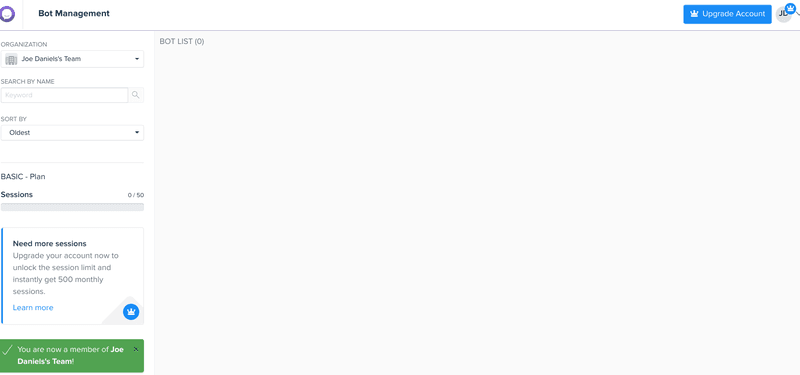
And that’s it. That’s the onboarding I get as an invited user. A blank dashboard, and one little message acknowledging that I’m part of the team.
At this point I have no idea what to do next.
What should happen is that BotStar should explain that I’m not currently attached to any chatbots. In that case, I could contact the team leader and ask them to add me to the relevant bots.
Alternatively, it could provide me with a checklist that explains the various steps I can take.
When I finally manage to access one of the chatbots, I’m greeted with this:
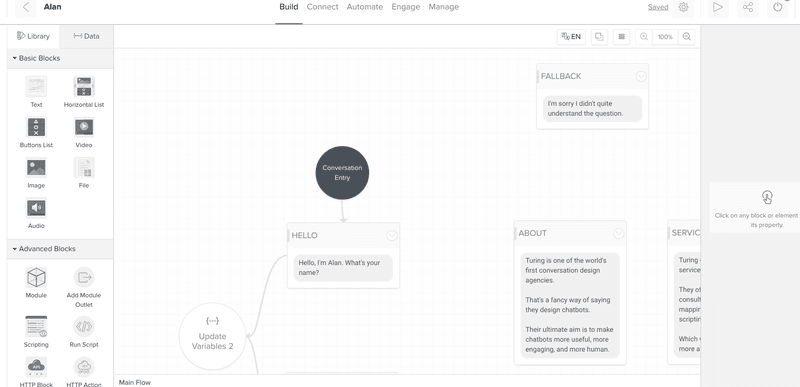
The chatbot is in the middle of being built, and now I’m here to help finish it off. Only, I have no idea how to use BotStar. I’m new here, remember?
By forgetting to onboard invited users, BotStar has made it difficult for newcomers to start working. This added friction means invited users will be less productive, and may end up not using the product altogether.
What happens if you do onboard invited users?
In all fairness, BotStar isn’t the only product that doesn’t onboard invited users very well. In fact, the majority of products seem to forget all about it.
It’s a shame, because if you can effectively onboard invited users, then customers are far more likely to stick around.
Here are a couple of examples of how products onboard invited users well…
Asana combines email and in-app onboarding flows
Asana, the task-tracking tool, is something I use to keep track of various projects. As with BotStar, it’s something I use on my own.
But again, I wanted to see how they would treat a user that I invited in.
The first thing they do is send the invited user an email:
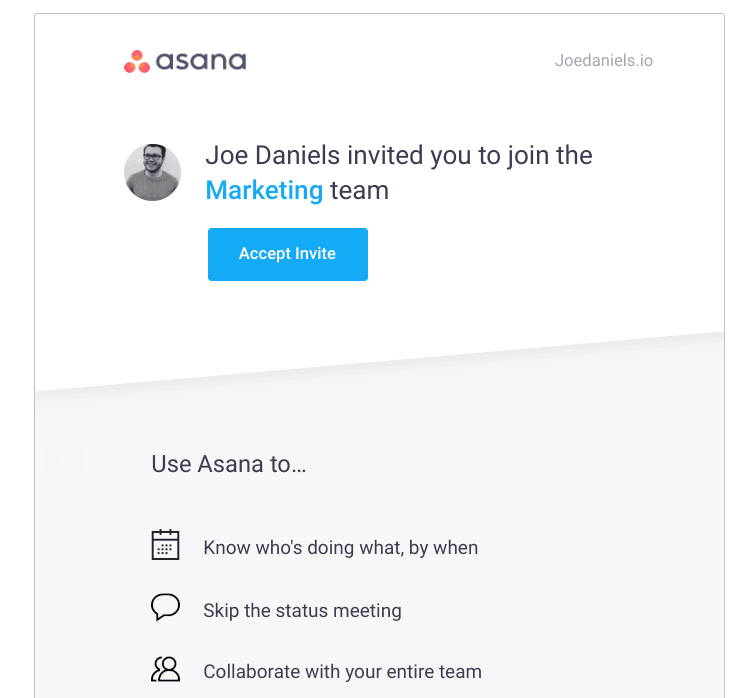
It’s short and to the point, with the CTA to accept the invite standing out from everything else.
Also, notice how they provide a list of three key benefits that Asana provides. This is useful, because an invited user may not have any awareness of why Asana is a product worth using.
When you accept the invite, you’re shown a welcome screen:
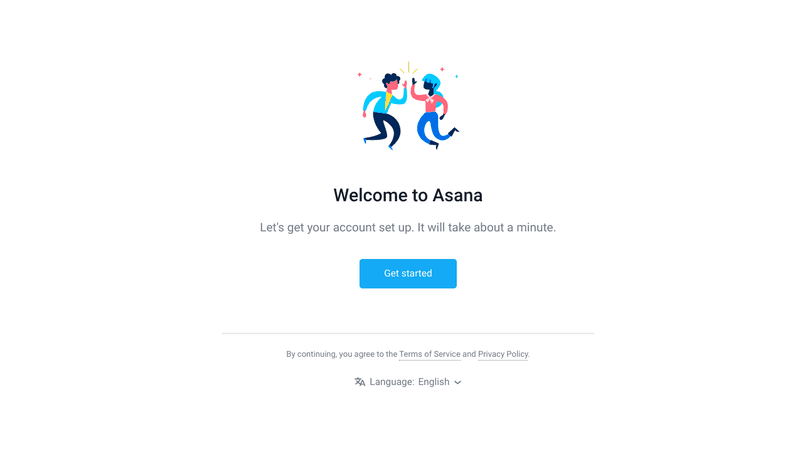
Unlike BotStar, which confused me by asking me to sign up, Asana takes the time to explain what’s going on. It even sets expectations by telling me it will only take a minute.
After working through the steps to set up my account, I’m taken to my Asana dashboard.
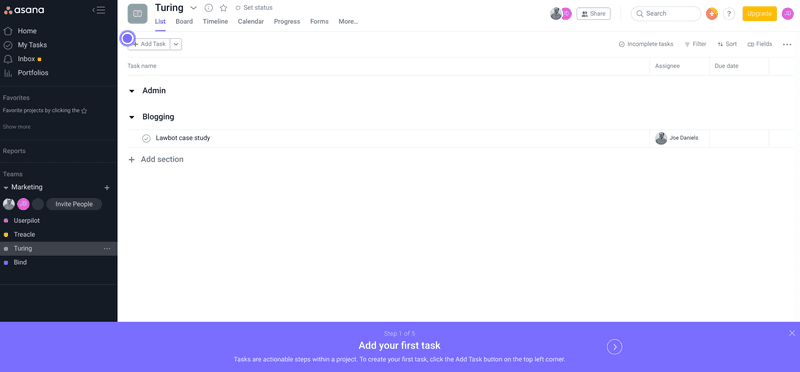
Asana’s UI can be a little tricky to get your head around at first glance. Fortunately, they provide me with a simple onboarding flow.
This is different to the primary user onboarding flow. The initial onboarding focused on setting up the Asana account and creating different projects and teams.
Now that the primary onboarding is done, invited users are simply taught how to create and manage tasks. This means the onboarding focuses entirely on the use case of the invited user. That’s essential if you want to onboard invited users.
I should also point out that Asana sent an email to my primary user account, notifying me that the invited user had accepted the request. It then prompted me to set them a task.
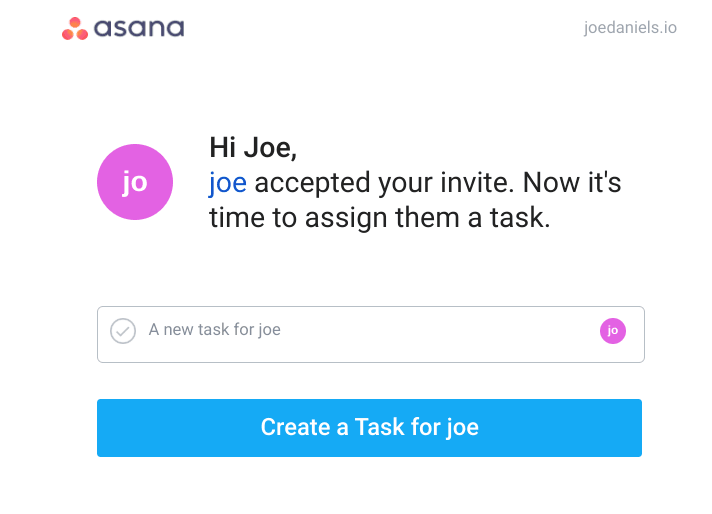
This is a handy way of increasing engagement with invited users.
What can we learn from Asana’s onboarding?
The key takeaway here is that you need to show invited users what to do. You can’t simply give them access to the product and then leave them to it.
The key is to pass a custom event. In this case, it would be when an invited user signs in for the first time.
This event can then trigger the invited user onboarding flow. The flow needs to quickly show the invited user the value they can get from the product. The fewer the steps required, the better.
As always, using interactive walkthroughs is more effective for learning.
Notion lets invited users get to grips in private
Notion, an all-in-one collaborative workspace, is the kind of product that does a little bit of everything. As a result, I was curious to see how they onboard invited users.
The onboarding starts with a very minimal email:
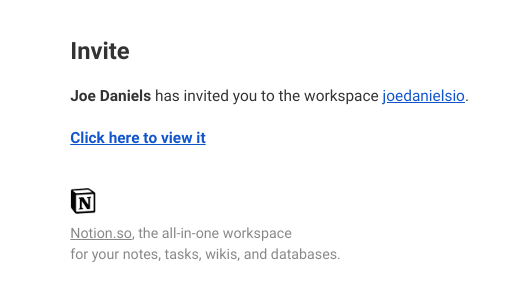
This email contains the bare minimum that the invited user needs to know. Personally, I would have liked a bit more information about the kind of things I could do by accepting the invite.
Clicking the link takes you to a sign up page:
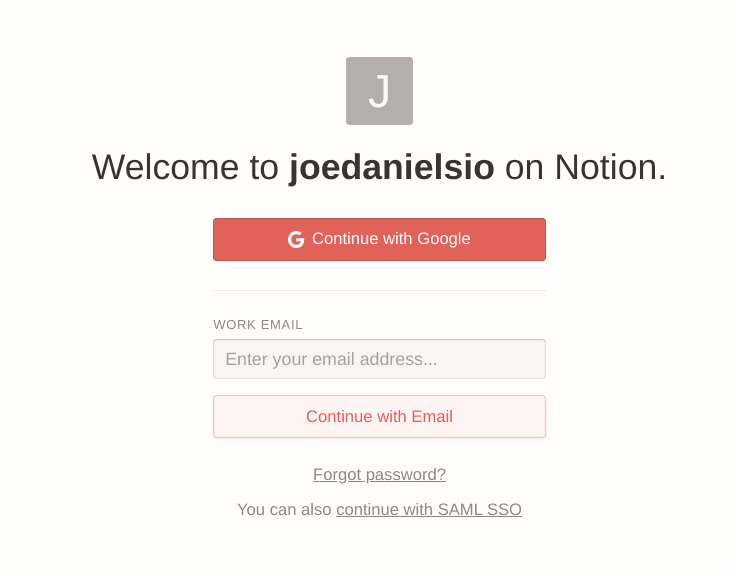
By providing just two options for me to choose from, they reduce cognitive load.
RELATED: 9 Growth Hacky Ways to Use Psychology in your App Onboarding
This makes it easy for me to progress to the next step.
I’m then asked to input some more information about me:
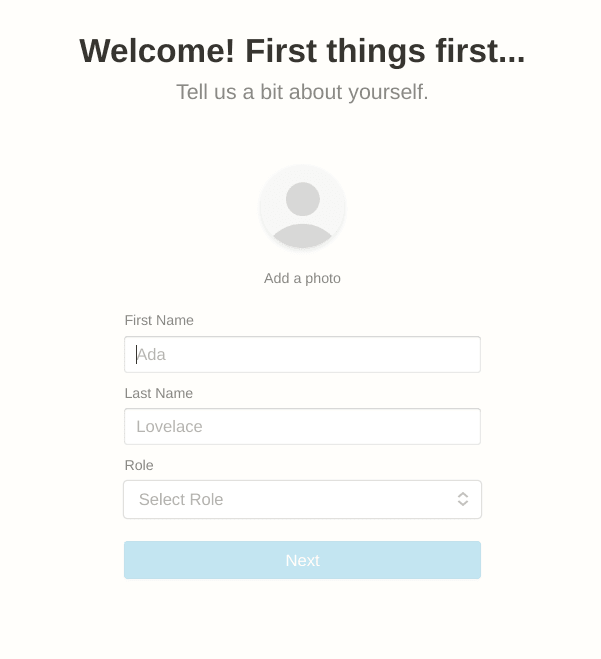
This helps Notion to personalize the product towards my needs. Designers will need different aspects of Notion than marketers. Asking for your job role is a clever and simple way of providing more relevant guidance to the user.
Once I’m signed up and logged in, I’m taken to this screen:
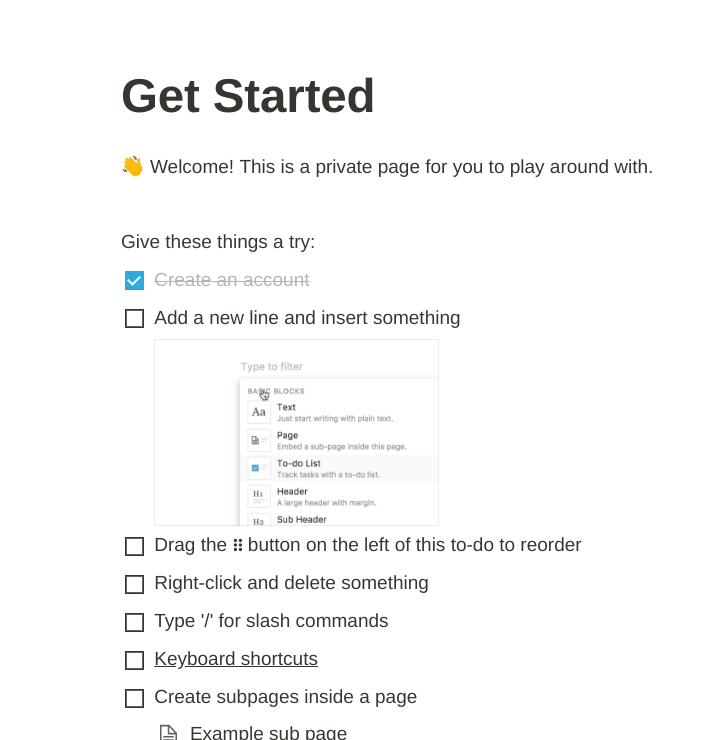
I’m told this is a private space where I can get to grips with the product.
The onboarding checklist is created in Notion, so that I can instantly get an idea of how it works.
I then complete the checklist by actually using Notion.
My only complaint here is that these onboarding tasks only touch the surface of what Notion is capable of. Once I’ve completed these basic tasks, I’m left to my own devices.
Having said that, this onboarding flow provides a good introduction to Notion and helps to onboard invited users.
What can we learn from Notion’s onboarding?
One of the biggest concerns that users face when they’re invited into a product is that they’ll do something wrong and mess up the workspace.
Notion overcomes this fear by providing a private space where the invited user is able to try out different features, safe in the knowledge that they can’t mess up the entire workspace.
Like Asana, Notion also uses interactive onboarding to great effect, embedding the checklist within the product itself.
Another key learning to take from how Notion onboards invited users is that it’s worth collecting key information from invited users. In this case, Notion ask for a user’s job role. This helps them to personalize the onboarding experience.
Airtable reaches invited users through email
Airtable is a popular collaboration tool. Like Notion, the possibilities are endless, and it can be overwhelming to invited users. Here’s how they onboard invited users.
When a user is invited to Airtable, they receive this email:
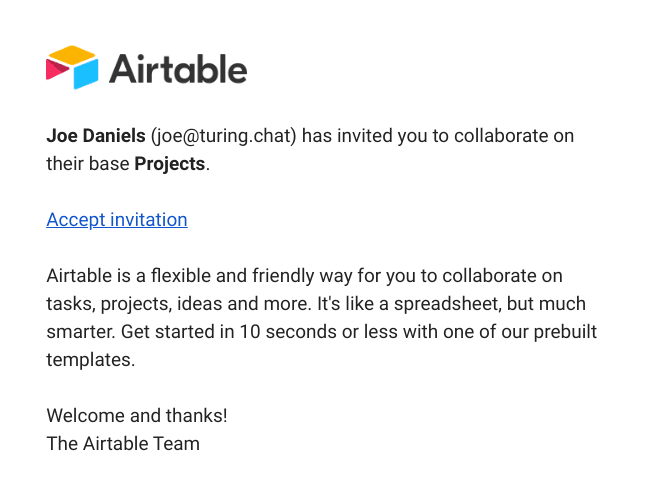
This is a perfect example of an invitation email. It succinctly explains what’s going on, and why I should care.
The focus on the benefits that Airtable provides is a really effective way of making sure I accept the invite and get started.
Once I click the link, I’m taken to a brief welcome screen.
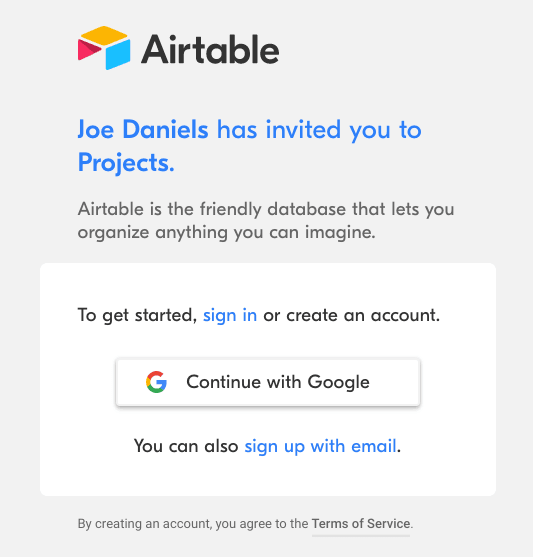
Airtable puts the main focus on the “Continue with Google” button. This is the easiest, most friction-free way of signing me up. Focusing on this one method reduces the choice paradox and keeps things simple.
After signing in, I’m prompted with a pop-up modal.
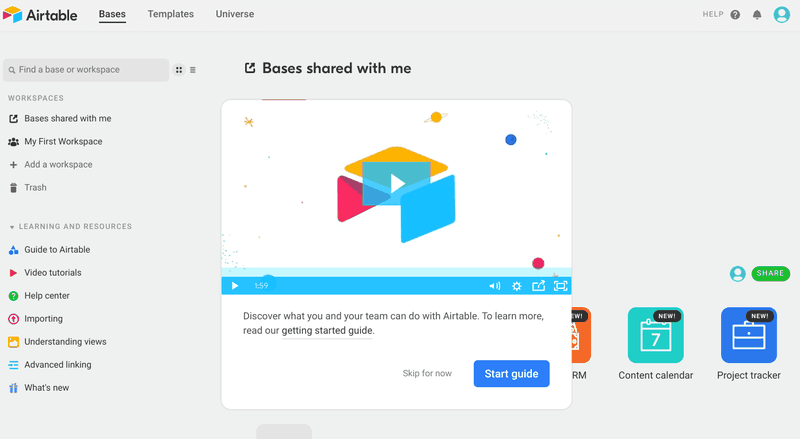
The modal contains a short video that introduces me to the main functionality that Airtable has to offer. It also encourages me to venture over to the getting started guide.
For users who prefer to get stuck in and learn by doing, like myself, it’s possible to skip the start guide and jump in.
When I first enter the workspace I’ve been invited to, I’m shown a different onboarding flow.
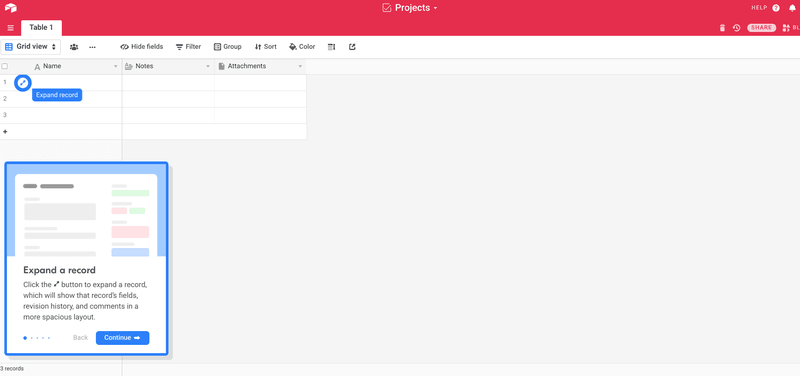
This flow runs me through the relevant features, showing me where they live on the screen.
After working through this flow, I’m finally presented with a CTA that asks me to “Add a block”.
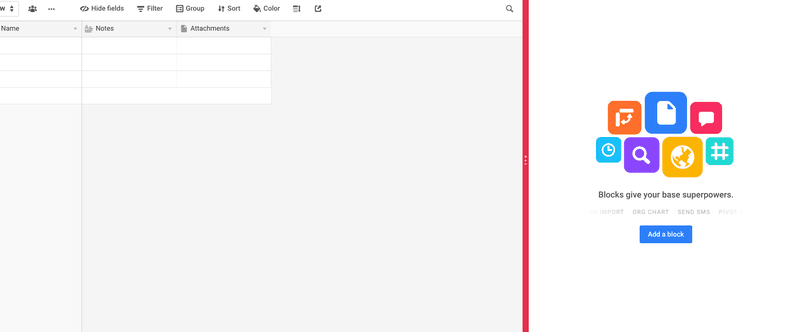
This CTA serves as an end to the initial onboarding, and nudges me towards the best possible starting point.
Another useful aspect of Airtable’s onboarding is this email they send out once you’re up and running:
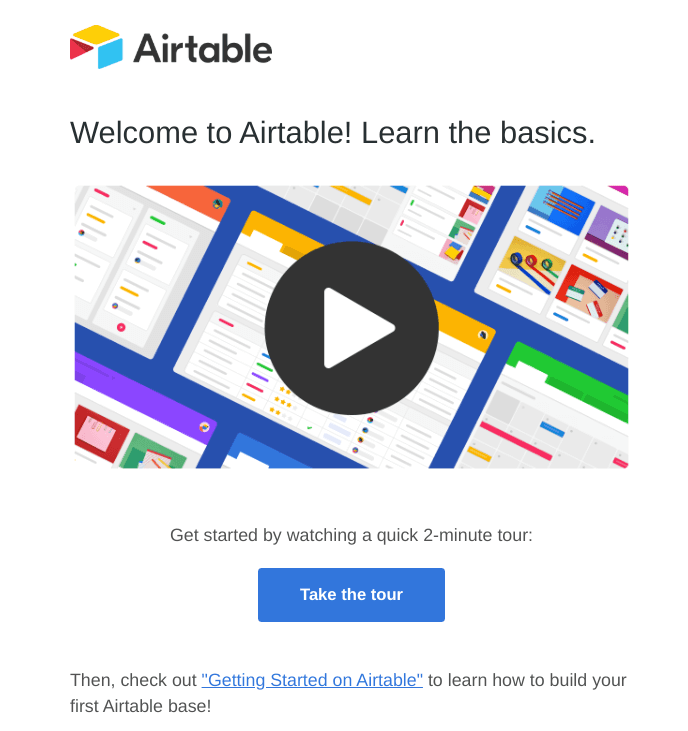
It contains a link to that intro video, just in case you missed it. This is a good way of ensuring you onboard invited users properly.
What can we learn from Airtable’s onboarding?
The trouble with in-app onboarding is that while it’s generally more effective, it can sometimes go ignored. For various reasons, such as being too busy, invited users may not actually start using the app. This means they may miss the onboarding altogether.
By sending the intro video in an email, Airtable makes it far more likely that the user will see it.
Email can be a powerful tool when it comes to onboarding invited users. It’s a good way to bypass your product and reach out to them directly. It’s also great at hooking invited users in, and encouraging them to start using your product.
How to start onboarding your invited users
Now that you know the best practices around onboarding invited users, here’s how you can get started with your own product.
Step 1: Nail the onboarding email
The email sent to an invited user is often that person’s first interaction with your product. You need to make it count.
A good welcome email will contain three things:
- An explanation of why they received the email
- An overview of what your product is or does
- A CTA
So, start by explaining that they’ve been invited to use your product, or join a team within your product. It helps if you provide the name of the colleague who invited them. This will give them more context, and they’ll know who to reach out to with questions if they’re unsure.
Next, you need to explain a bit about what your product does. This can be as simple as a one-line elevator pitch, or as complex as a list of benefits. The idea is to give the invited user a little more knowledge about your product. After all, they might not have any idea what your product is.
Finally, the CTA needs to be clear and obvious. One click of the button should take the invited user into your product for the first time. Make the wording clear; something like “Sign in” or “Accept invite”.
Step 2: Add custom events and identification markers
The most effective way of personalizing onboarding for invited users is to pass the invitation/acceptance as a custom event to your onboarding tool.
Each invited user should have an ID parameter that lets your product know they’ve been invited in.
This essentially acts as a marker so that you can then trigger the most relevant onboarding flow.
It should be fairly easy for your developers to add the custom event tracking, and can save you a lot of hassle in the long run.
If you’re using Userpilot to create your onboarding flows, it’s really easy to set up triggers based on ID.
Imagine that you have an ID parameter called “invited-user”. Any users who are invited in to your product are tagged with “invited-user”.
Once you create the onboarding flow for them in Userpilot, you can set an audience trigger.
Simply scroll down to “Audience”, and check the box labelled “Users that match specific conditions”.
Then add the settings as shown in the image below:
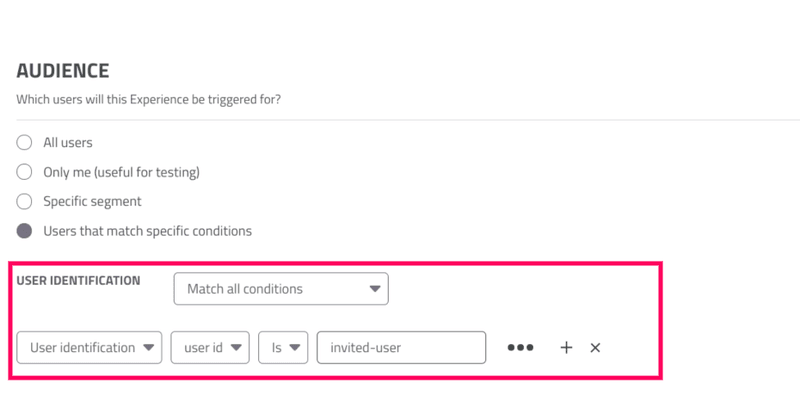
This means that your onboarding flow will only be triggered for users tagged with that ID parameter. With Userpilot’s mobile SDK, you can create targeted onboarding flows using slideouts, carousels, and push notifications without writing extra code.
Wanna create an onboarding flow for your invited users? Book a demo call with us now and we will help you set it all up!
Step 3: Design the onboarding flow
As you can see from the examples I showed you above, the key to successfully onboarding invited users is to provide them with as much information as they need, and to sell the benefits of your product.
A good first step in your invited user onboarding flow is an introduction to your product. This can be a video (like Airtable) or simply a welcome screen.
You need to cover what your product is, what it does, and why it’s going to help make the user’s life easier.
The rest of your onboarding flow needs to be two things:
- It needs to be relevant
- It needs to be contextual
Relevant onboarding means that it’s relevant to their use cases. If a user has been invited in with read-only permissions, for example, there’s no use showing them how to customize branding. They can’t do it, they aren’t supposed to do it.
You need to ensure your onboarding shows them what they can do. A one-size-fits-all approach isn’t going to be very effective.
As for contextual onboarding, that basically means you show the right message at the right time. In other words, as the invited user starts interacting with your product, onboarding flows should be triggered by their actions.
There’s no use in showing invited users every single feature of your product. It’ll overwhelm them, confuse them, and ultimately frustrate them. Instead, when an invited user starts trying to achieve something from your product, that’s when you should show them how to do it.
Key takeaways
- While most products contain onboarding for the initial admin user, the majority fail to onboard invited users effectively.
- Start by sending an informative welcome email that explains what your product is, why they’ve been invited, and includes a clear CTA.
- Once they’ve accessed your product, welcome them with a video or explainer text to show the main benefits of your product and to provide extra context.
- Use custom events and ID parameters to trigger the appropriate onboarding flows for invited users.
- Your onboarding flows need to be both relevant and contextual.
About the author

Joe is a content writer, with several years of experience working with SaaS startups. He’s also the founder of Turing, a conversation design agency, making chatbots more human.


