How to Send Push Notifications: A Step-By-Step Tutorial (+Use Cases & Tips)


If you’re managing a mobile product, I probably don’t have to tell you that it is a must to learn how to send push notifications at the right time, with the right message, and to the right users.
So from my experience as a product manager, I’ll not only walk you through the entire process of sending mobile push notifications but also the most important practices and use cases to avoid spamming your app users.
In short, we’ll go over:
- How to send targeted push notifications step-by-step using Userpilot.
- The best use cases to drive retention, upgrades, and engagement with push.
- Best practices to avoid spamming and build real value with every message.
A step-by-step walkthrough on how to send push notifications
There are many ways to implement push notifications in your app but I simplified this into 5 easy (but unskippable) steps:
Step 1: Select and implement the right push notification platform
Sounds obvious, but I can’t stress enough how impactful it is to choose the right tool.
Unlike web push notifications, mobile users are very delicate and require very tactful strategies to engage them. Which means you’ll be limited to the capabilities of the platform you’re working on.
Here’s what to look for when evaluating your options:
- No-code. Even if you know how to code, you want your team to be able to move fast without relying on engineering for every small change.
- Audience targeting. The best tool should let you target users based on in-app behavior, segment, device type, or even past engagement.
- Analytics and performance tracking. Make sure your platform gives you insight into delivery rates, views, click-throughs, and completions so you can continuously refine your messaging.
- Cross-platform support. Look for platforms that support Android, iOS, and frameworks like React Native and Flutter to maintain consistency and reach across your app.
Once you’ve selected your platform, the next step is to set up your account and integrate the SDK into your mobile app. For example, with Userpilot it’s a lightweight process—just copy and paste a few lines of code in your app, and then initialize it.
Step 2: Create your push notification from scratch or use templates
After your SDK is live and your platform is set up, it’s time to create the actual push notification. In Userpilot, you can either start with a ready-to-use template or build your message completely from scratch, depending on how you want users to receive push notifications.
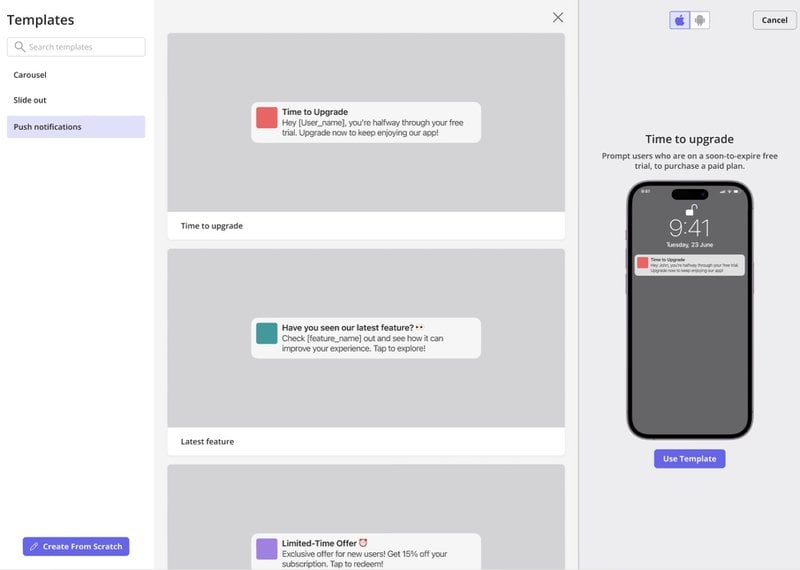
This takes three simple steps:
- Select the operating system (Android or iOS). Formatting and behavior may differ slightly, especially for the Apple push notification service.
- Customize the copy, title, and design of your notification. Less is often more here, so try to come up with a snappy title, a brief message, and a clear action. You can also add emojis to make your message stand out and sound more human (just don’t overdo it).
- Add a destination link. So that when users tap on the push notification, they’re taken directly to the most relevant screen in your app.

Step 3: Choose when and who the push notification will show to
Once you’ve designed your notification message, you’ll need to decide who will see it and when it should appear.
With Userpilot, you can set this up in three simple steps:
- Target specific user segments based on behavior, activity, device type, or even where they are in their user journey. For example, if you’re trying to nudge new users who haven’t completed onboarding, you might create a segment of “Signed up in the last 7 days AND did not complete checklist item X.”
- Set the triggering conditions. This could be immediate (right after a key action), time-based (24 hours after sign-up), or event-driven (after skipping a feature walkthrough).

- Determine the frequency. Push notifications lose their effectiveness fast when they feel repetitive or spammy. For example, you could set it so that a reactivation message only shows once every 7 days to dormant users rather than every time they open the app.
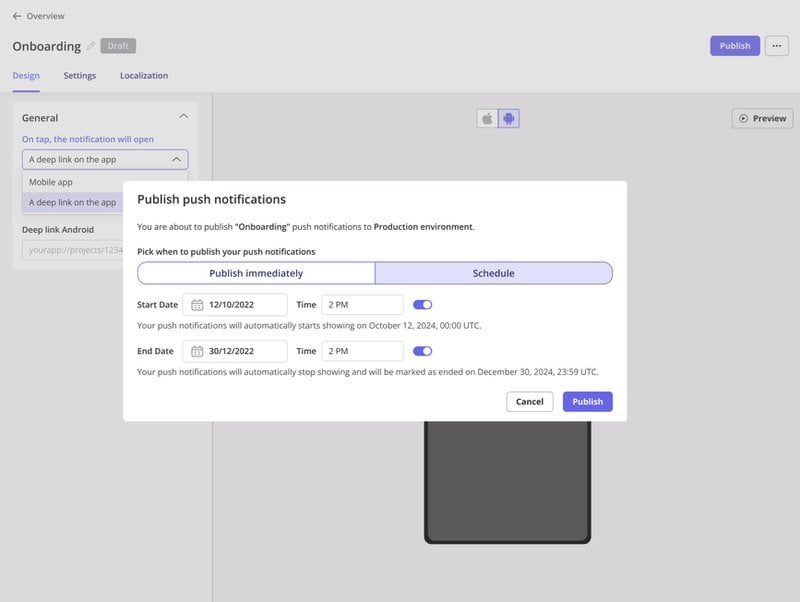
Step 4: Launch the push notification for the relevant audience
Alright, you’ve crafted the perfect message and chosen the right audience.
But there’s one crucial step before you hit publish: testing.
I highly recommend testing your push notification before it goes live. If you don’t, you risk broken links, formatting issues, or mistimed triggers that can confuse users or damage trust.
In Userpilot, you can first launch your push notification in a staging environment. This lets you preview exactly how it will appear across mobile devices and verify that all logic (like segmentation and triggers) works as intended. If anything looks off, you can tweak and retest until it’s just right.
Once everything checks out, you’re ready to pick your launch time and go live. Depending on your use case, you can publish immediately, schedule for later, or tie the push to a specific event or user action.
Step 5: Analyze the performance of your push notification
Once your push notification is live, the work isn’t over.
In fact, this is where you need to analyze the performance of your in-app messaging, understand what’s working (and what’s not), and what to improve next time.
In Userpilot, for instance, you can measure key metrics like:
- Views. How many users actually saw your notification.
- Completions. How many followed through and clicked or performed the desired action.
- Performance by segment. Which audiences are responding best to your messaging.
- Completion rates. The percentage of users who clicked the notification and performed the action.

💡Pro tip: If a notification underperforms, don’t scrap it completely. Use the data to tweak elements like the timing, CTA, copy, or even the audience segment. For example, if completion rates are low, your CTA might not be compelling enough, or maybe it’s showing up at a time when users are less likely to engage.
When should you leverage push notifications?
You should use push notifications like salt—not too little and not too much.
So let’s explore four scenarios where push notifications work best:
Re-engaging inactive users to retain them
Sometimes users drift away—not because they didn’t find value, but because of reasons outside their control.
In these cases, push notifications give them a subtle, timely opportunity to re-engage users back to your app.
This works especially well when users:
- Haven’t completed onboarding.
- Dropped off mid-way through a key setup step.
- Haven’t opened your mobile or web app in several days or weeks.
For example:
- “You didn’t finish setting up your account! Complete it in 2 minutes.”
- “Friendly reminder that you can send your invoices from your phone now! 😉”
- “You haven’t tried our segmentation feature yet? Let’s explore it together!”
A well-timed push notification can remind users to finish setting up their account or return to explore a feature they previously skipped (instead of generic nudges that will likely be ignored).
Keeping users informed about important changes
Push notifications aren’t just for promotion—they’re essential for keeping users in the loop when something important happens.
These are the kinds of push messages users expect and appreciate, especially when they involve:
- Billing updates (like upcoming charges or failed payments).
- Security-related events (password changes, suspicious activity, login from a new device).
- Confirmation of successful actions (a file uploaded, integration completed, or task finalized).
For example:
- “Your integration with Slack is now live—start automating your workflow!”
- “Heads up: Your trial ends in 3 days. Don’t lose access to your data.”
- “Someone changed your password. Was this you?”
These notifications build trust because they show your product is paying attention and has the user’s back. Plus, they can prevent confusion, support tickets, and dropped conversions when timed right.
Promoting time-sensitive offers
When there’s a limited offer, push notifications are your best bet for getting it in front of users fast. Especially because they don’t rely on users to check their email or open the app on their own.
They’re especially effective for:
- Discounts on upgrades or premium plans.
- Invitations to exclusive webinars or live events.
- Early access to new features, betas, or limited releases.
For example:
- “🔔 Upgrade to Pro before midnight and save 30%—don’t miss out!”
- “You’re invited: Join our live masterclass on user onboarding, happening tomorrow!”
- “Want to be the first to try our mobile feature? Get early access here!”
Just remember—use this tactic sparingly. The more exclusive or time-sensitive the offer, the more impactful the notification will feel.
Upgrading users based on usage behavior
One of the most powerful (and underrated) uses of push notifications is to encourage upsells.
BUT… Only when it makes sense based on how a user is actually engaging with your product.
Instead of generic upsells, behavior-based push notifications let you offer the right plan at the right time. Think of it as a helpful heads-up rather than a sales pitch.
Here’s when it works best:
- A user is consistently hitting usage limits (like projects, seats, or data storage).
- They’re using advanced features that are only partially available on their current plan.
- Their activity signals that they’d benefit from higher-tier functionality.
For example:
- “Looks like you’re using automation with the basic plan—make it unlimited with Pro!”
- “You’ve hit your project limit. Upgrade now to keep building without interruption.”
- “Would you rather send your invoices automatically? Try it out with a free trial and upgrade later!”
Make it a win-win: The user gets more value, and you drive expansion revenue without being pushy.
Best practices for a successful push notification strategy
Now, before you start sending push notifications all over, keep in mind these best practices:
Personalize push notifications to encourage user interaction
Generic notifications are easy to ignore. But personalized messages make users react as if you’re speaking directly to them.
Go beyond a basic “Hey there!”—use the recipient’s name, reference their recent activity, or tie the message to their specific journey inside your product.
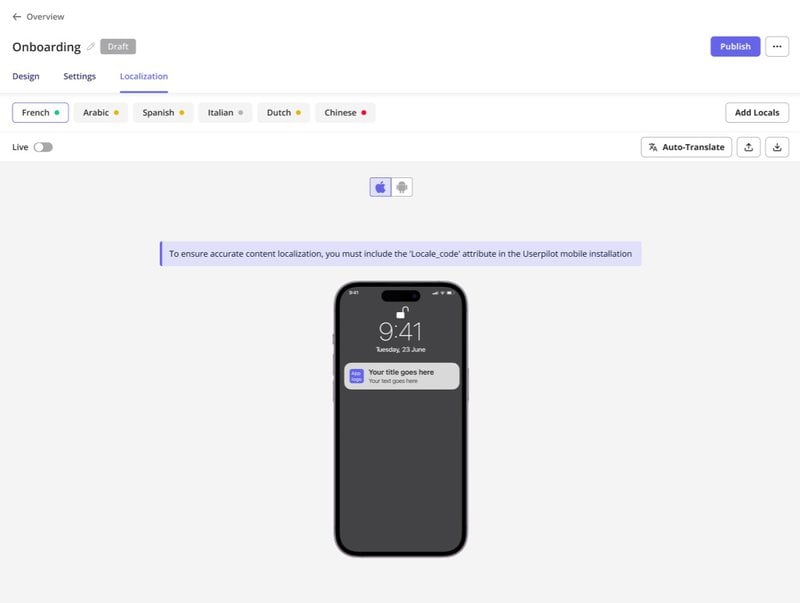
And here’s where Userpilot gives you a unique edge: you can even translate your push notifications into the user’s native language. If your product has a global user base, this is a game-changer—it shows cultural awareness and makes your message feel more familiar and intuitive.
To illustrate, compare these two examples:
- “Hi Carlos 👋 You haven’t used your first template. Let’s build something great with them!”
- “Hey, check our templates to build something great!”
One is talking directly to the user, and the other feels like a broadcast.
Get the timing right for maximum impact
Even the best-crafted push notification will fall flat if it hits at the wrong time.
To avoid this, you want to send notifications when users are most likely to see, read, and act on them—not while they’re asleep, in meetings, or busy with their families.
Here’s how to time it right:
- Respect time zones. Hit for times that make sense for the user’s timezone.
- Analyze historical behavior. Send notifications when users typically open your app or engage most (you’ll need mobile analytics for this).
- Avoid weekends and odd hours. Unless your product is built for those moments (e.g. entertainment, fitness, or productivity apps).
Ensure your copy is clear and actionable
Push notifications don’t leave much room for fluff, so your message needs to be sharp, specific, and immediately understandable.
Think of your copy like a mini ad. In just a few words, you should tell the user:
- What’s happening.
- Why it matters.
- What they should do next.
Vague messages like “Check out what’s new” get ignored. But something like “🎉 New feature unlocked: Try Smart Filters in your dashboard now” gives both context and direction.
Some quick tips:
- Keep it short. Aim for fewer than 40 characters in the title.
- Use action verbs. Such as Start, Join, Finish, Unlock, and Upgrade.
- Make the benefit clear. What will the user gain by clicking?
Focus on delivering value over being spammy
Push notifications are powerful, but if every ping feels like a sales pitch or distraction, users will turn off notifications completely.
That’s why every message you send should earn its place on the user’s screen.
Ask yourself before hitting send:
- Does this notification help the user accomplish something?
- Is it timely and relevant based on their behavior?
- Would I find this message useful if I received it?
Value can come in many forms: a helpful tip, a timely reminder, a heads-up about an issue, or a personalized offer that makes sense based on product usage. The key is to make sure each push has a purpose that’s aligned with what the user needs—not just what you want them to do.
Next steps: Invest in the right mobile engagement platform
Here’s the truth: Even if you know how to send a push notification, a subpar tool can limit your ability to personalize messages, delay your time to launch, or frustrate your team with complex integrations.
That’s not just inconvenient, it’s a risk to your brand and your user experience.
That’s why we’ve built a mobile engagement platform that’s actually made for product teams. With no-code visual editors, powerful segmentation, performance analytics, and event-based targeting.
So if you’re a product manager who needs to improve mobile engagement, why not book a demo with Userpilot to start sending targeted push notifications without coding?
FAQ
What are push notifications?
Push notifications are short, clickable messages sent directly to a user’s device—even when they’re not actively using your app. They’re commonly used on mobile apps to deliver timely updates, reminders, or promotions that drive user engagement and action.
What is the difference between a push notification and a text message?
The main difference is where and how they’re delivered.
- Push notifications are triggered by your app and delivered through the device’s operating system.
- Text messages (SMS) are sent via the user’s mobile carrier and don’t require your app to be installed.
Push is better for in-app engagement and behavior-based messaging, while SMS may be better for reaching users without the app or for urgent alerts.
What are the different types of push notifications?
There are many notification categories depending on your goals and product:
- Transactional: Confirm actions like signups, payments, or file uploads.
- Promotional: Announce discounts, feature releases, or special offers.
- Behavioral: Triggered by user activity (e.g., inactivity, reaching usage limits).
- Informational: Share updates like system changes, renewals, or alerts.
A solid push strategy often includes a mix of all, tailored to different moments in the user journey.
About the author