What is Retroactive Analysis? [+ How to Conduct]

![What is Retroactive Analysis? [+ How to Conduct] cover](https://blog-static.userpilot.com/blog/wp-content/uploads/2024/07/what-is-retroactive-analysis-how-to-conduct_bb3f1100397f486994c0d15e7cd98188_2000-1024x670.png)

Retroactive analysis is a valuable perk in product analytics, as it allows you to retrieve the data you want on-demand without having to set it up first.
But what’s retroactive analysis and how can you do it with Userpilot?
Let’s explore its definition and how it can benefit your business decisions in the long term:
Retroactive analysis – quick summary
- Retroactive analysis involves retrieving historical data that wasn’t initially set up for event tracking, allowing for actionable insights without prior configuration.
- Retroactive analysis reduces manual work, saves time, maintains data integrity, provides instant answers, and avoids bias by capturing all event data automatically.
- Here’s how you can conduct retroactive analysis using Userpilot:
- Enable Userpilot to collect historical data: Configure settings to allow Userpilot to automatically capture all user interactions.
- Label events for further analysis: Search and filter collected raw data, and label it for better categorization and analysis.
- Utilize analytics reports and dashboards for actionable insights: Use labeled data in Userpilot’s analytics tools to perform various analyses and generate advanced reports.
- Book a Userpilot demo to see how you can upgrade your product analytics and make more impactful decisions!
What is retroactive analysis?
In analytics, retroactive analysis is about pulling historical data that was previously collected since you started using your analytics tool—and getting actionable insights from relevant data without going through a process.
This type of analysis is commonly used in various fields, including business, finance, healthcare, and research, to assess the effectiveness of strategies, identify errors or successes, and guide improvements.
Retroactive analysis not only helps you learn from past experiences and processes. It offers you the flexibility to analyze a different type of data as you need it (unlike tools like Google Analytics, where you need to set it up and wait until you’ve collected the missing data).
Benefits of retroactive analysis
In most data platforms, users cannot access historical data for events that have not been previously tracked. This means users must create a feature tag or tracked event to create segments or reports based on user behavior.
A retrospective study allows you to see all the events in your app. This includes all clicks and text inputs on elements—even when they have not previously been tagged.
As a result, you’ll be able to use this data to create reports without the need to tag or track the event itself (just like a doctor reviewing the medical records of a patient before making a decision).
The benefits of this feature are multiple:
- Reduces manual work: The feature tracks all historical data automatically once it’s installed—no need to do anything.
- Reduces dependencies on engineering: No need to ask engineers to write code.
- Maintains data integrity: No more data gaps, where you missed tracking an event for a few weeks.
- Get answers instantly: Now, you can ask questions and get answers instantly as you have all the data in your hands. You don’t need to wait for weeks to collect data.
How to conduct retroactive analysis using Userpilot
Userpilot has recently enabled auto-captured data, which is a data collection method that tracks all event data automatically.
It also means that you can perform retrospective studies once you have enough time using the app.
Here’s how you can do it in three simple steps:
Enable Userpilot to collect historical data
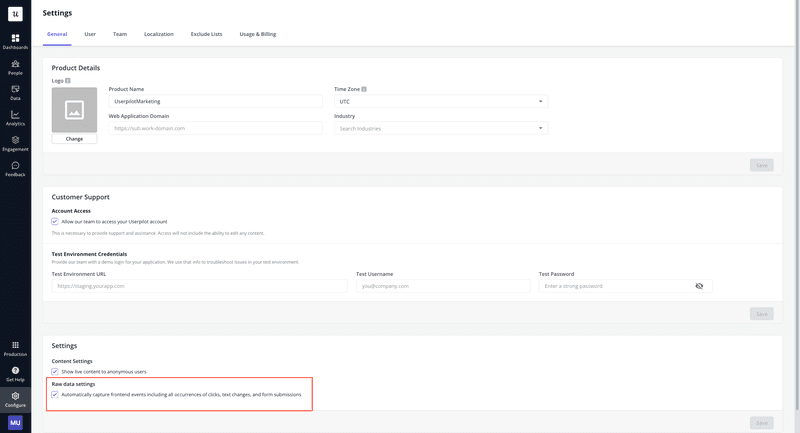
In Userpilot, head to:
Configure → Settings → General.
Under the settings section, find and enable an option labeled “Raw data settings”. This setting allows Userpilot to collect all users’ interactions on your platform.
Once enabled, Userpilot will automatically collect different types of raw data, including:
- Clicks. Including clicks on different <div> or <span> elements, each coming with a descriptive title.
- Form submissions. Data inputs submitted by the user containing critical information such as survey responses, etc.
- Input change on entries or texts. Direct changes happen from the user’s actions, such as typing on a search bar or checking a checklist.
Note: Userpilot already has this setting enabled by default. Only do this if you can’t see raw data in your events tab to check if it’s enabled, or if you’ve been using Userpilot in the past.
Label events for further analysis
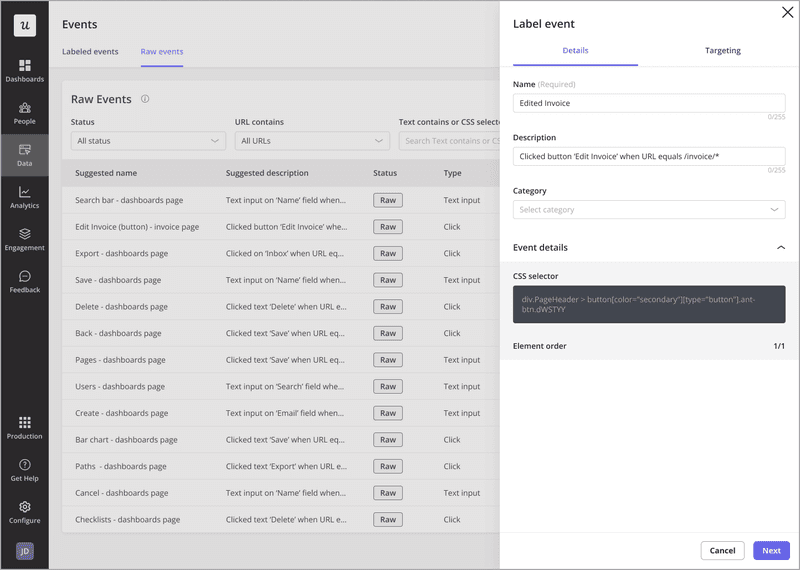
Once you’ve collected enough data, go to:
Events → raw events
Here, you can get access to a whole list of raw data that Userpilot has been collecting since you installed it. You’ll be able to search for specific types of data in the search bar and add multiple filters to it.
Once you determine the data you need to analyze, click on it to label it. You can rename it, add a description, categorize it, and even target it to a specific domain or page (depending on where the event occurs).
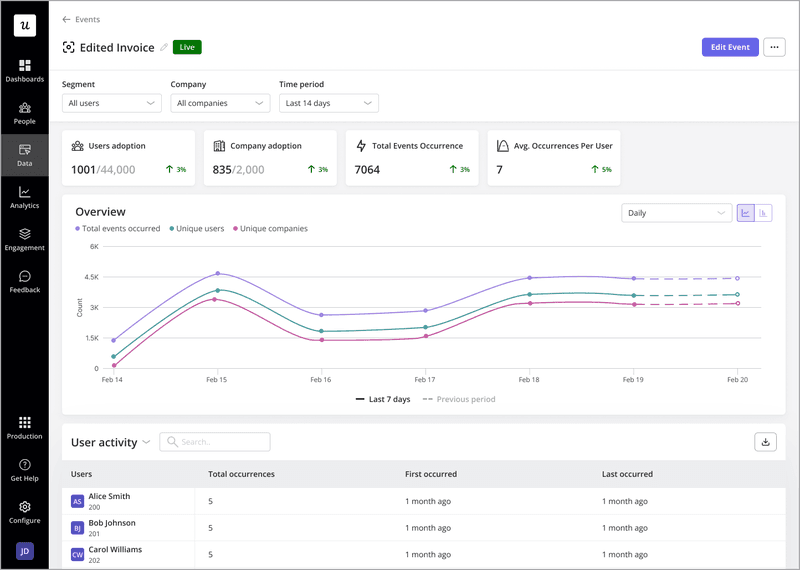
Utilize analytics reports and dashboards for actionable insights
After labeling the data, you’ll instantly be able to see information, such as the users that performed the event, the number of events per week/month, frequency, and more.
Now, you can look deeper into your labeled data using any of Userpilot’s analytics tools. These can include trends analysis, path analysis, funnel analysis, statistical analysis, and so on.
For example, if you want to see your conversion rate trends, you need to search for the event name you tagged it with, add it, and visualize the results.
Finally, you can do much more with labeled data, such as:
- Trigger specific in-app flows when a relevant event happens.
- Segment users based on multiple types of events they’ve performed.
- Generate more advanced reports based on in-app behavior.
Conclusion
Retroactive analysis offers the insights and flexibility many SaaS businesses need to thrive.
That said, book a Userpilot demo to see how you can upgrade your product analytics and make more impactful decisions.
About the author