Is Fake Door Testing Still Worth Doing in The Vibe-Coding Era?


The promise of fake door testing is very appealing to us PLG folks. Harvard Business School professor Clayton Christensen has estimated that 95% of new product ideas fail, so a research method that can predict whether a feature idea will succeed is indispensable.
But in reality, fake door testing isn’t the only way to validate feature ideas, and nowadays it might not even be the best one. With vibe-coding tools, a working proof of concept can be running in a weekend, and real usage data from a prototype provides better feedback than clicks on a fake door.
Now, this doesn’t mean this method has no use case, but it’s necessary to understand where it fits and how to conduct it without making users feel tricked. So for this guide, I wanted to do three things:
- Explain why fake door tests are riskier and less necessary than most guides admit.
- Show you the specific situations where they still save you money.
- Walk through a step-by-step setup for fake door testing without damaging user trust.
Why fake door testing isn’t as good as it sounds
A fake door test (also called painted door testing) places a UI element in your product or website that appears to be a real feature. The element can be a button, a tooltip, a menu item, or a landing page CTA. Then, when a user clicks on the “fake door”, they find a “reveal page” saying that the feature is still in development (often with an option to join a waitlist).
The concept sounds good, but the data it collects isn’t always good enough. The click-through rate measures curiosity, but not necessarily commitment. A user clicking a button doesn’t prove they would change their workflow, pay more for the feature, or consistently use it once it is shipped.
Additionally, the widespread adoption of tools such as Claude Code, Codex, Lovable, and Cursor has accelerated the pace of feature releases. As our CEO, Yazan Sehwail, says:
“Instead of every quarter, you’re releasing one or two features, now you’re releasing 7, 8, 9. It becomes even harder for product teams to manually track each one and understand usage for each one.”
At that pace, there is very little room for fake door tests. If a user lands on a “coming soon” page more than once, they’ll likely become skeptical and lose trust. Instead, with a little more time, you could vibe-code and test a prototype to get richer feedback in a couple of weeks (e.g., drop-offs, task completion rates, in-app behaviors, etc).
Essentially, you can’t run this test on every feature idea, especially in a market where PLG teams are shipping 3x as much.
When you should not run a fake door test
As I mentioned, fake door testing isn’t a good option for all products. These are situations where I’d skip this test:
- Testing complex multi-step features: A single CTA cannot represent a process that takes many steps to complete. Users who click can’t form a clear picture of what they’d be signing up for, so click data won’t reflect real interest. I’d recommend running usability testing instead, or prototype the core flow.
- Very early product stages: One poorly handled fake door test can damage the user relationship before it has formed. In a young product, every interaction shapes initial trust, and a badly timed “coming soon” reveal is an expensive first impression.
- Over-tested user segments: If a segment has already encountered a fake door in your product, adding another one will make them grow skeptical and lose trust. Space tests at least six months apart per user segment.
- Testing features without a clear segment: If your testing process isn’t targeted tightly, you’ll only get curiosity clicks. I’d recommend pairing your click data with a short survey or focus groups to gather insights on why they clicked.
When fake door testing can still save you money
Fake door testing is still one of the fastest ways to gather behavioral demand data before investing resources in development. Here are a few situations that make it a reasonable option:
- Complementing research data for demand validation: If you have a concept you haven’t started building yet, a fake door test can complement research data and help validate whether a feature or product is worth developing.
- When the cost of prototyping is high: Deep integrations, infrastructure-level features, multi-platform builds, and anything requiring third-party API negotiation still take months to prototype. For those features, a fake door test gives you an early demand signal at a cost of hours rather than weeks.
- Building a qualified beta waitlist: Users who click a fake door have demonstrated interest through behavior. This makes them a stronger cohort for beta recruiting than users sourced from a pop-up survey.
Best practices for creating fake door tests
That said, fake door testing remains an efficient tool for validating product ideas before you’ve committed to a technical approach. Below, I’ll go over some of the best practices that make this test more efficient:
Best practice #1: Use the reveal page to test pricing
A click tells you a user was curious enough to engage. But it doesn’t tell you what they’d pay, which plan they’d land on, or whether your target price point aligns with actual demand.
You can pre-validate prices by using the reveal page itself to collect pricing preference data. It will tell you whether your users are willing to pay at your target price point, allowing you to estimate a product’s potential ROI before writing a line of code.
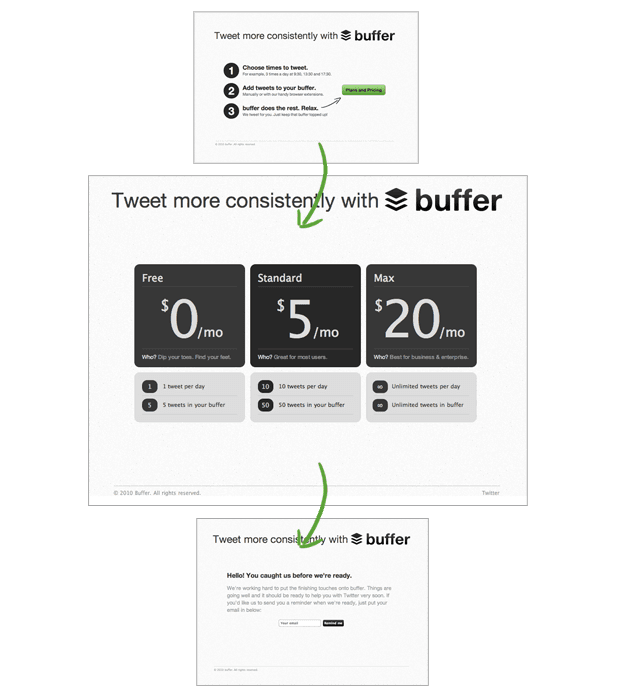
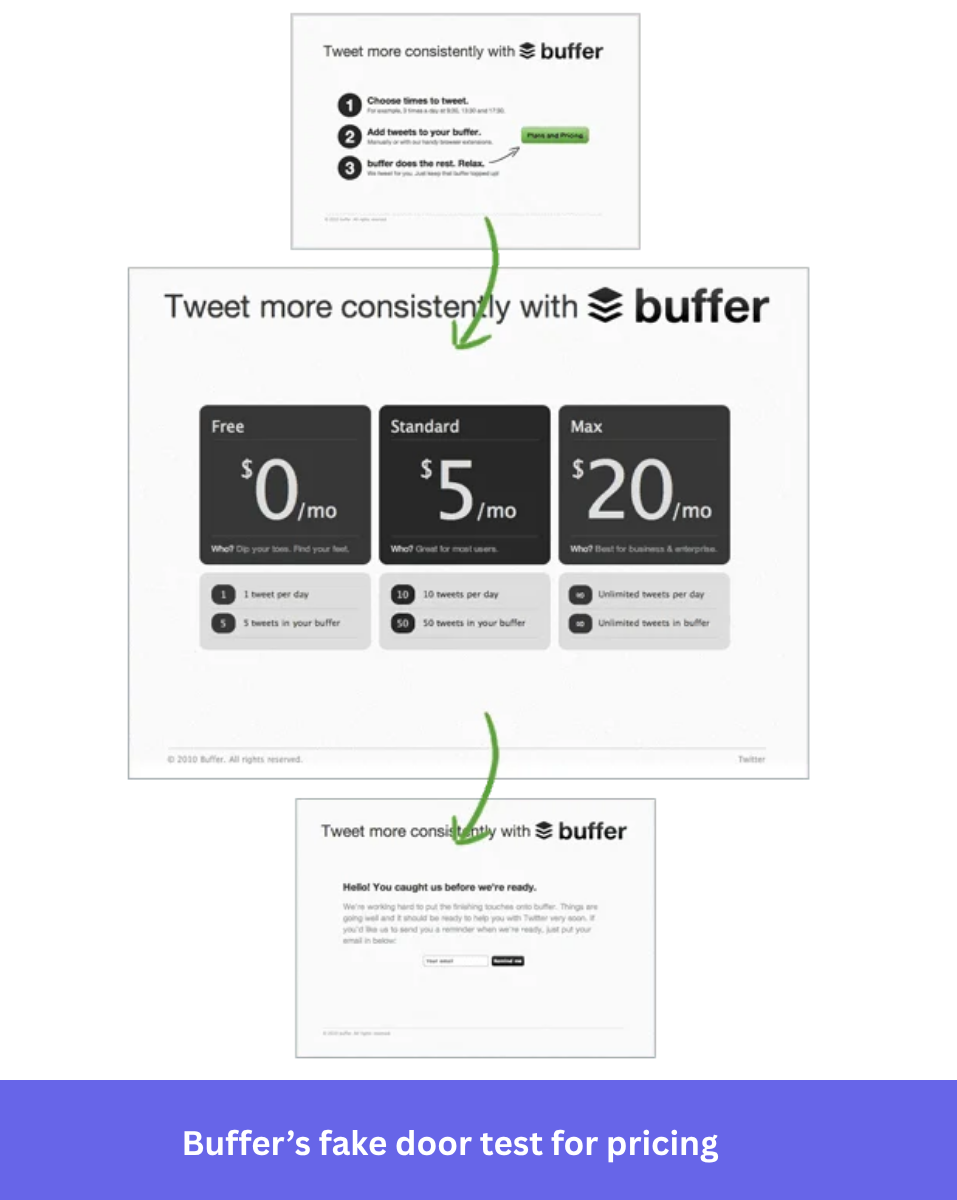
For example, Buffer did this in two stages. Their landing page for Twitter automation featured a “Plans and Pricing” CTA, and users who clicked it could indicate which pricing tier suited them.
Best practice #2: Convert clickers into a beta waitlist immediately
Instead of just showing a “coming soon” message and moving on, use the reveal moment to invite visitors to join your beta testing program. They’ve already shown behavioral intent, which makes them a far stronger cohort than users you would recruit cold through a survey.
 But don’t limit yourself to collecting those leads. If you invite users to test the feature when it arrives, keep them informed about testing dates, release dates, or why you decided not to build the feature. Closing that communication loop is essential to avoid losing their trust (especially for potential tests in the future).
Best practice #3: Target a small segment
Instead of showing the fake door to 100% of active users, start with 5% to 10% of one segment that’s most likely to get value from the feature, maybe they have previously asked for a feature.
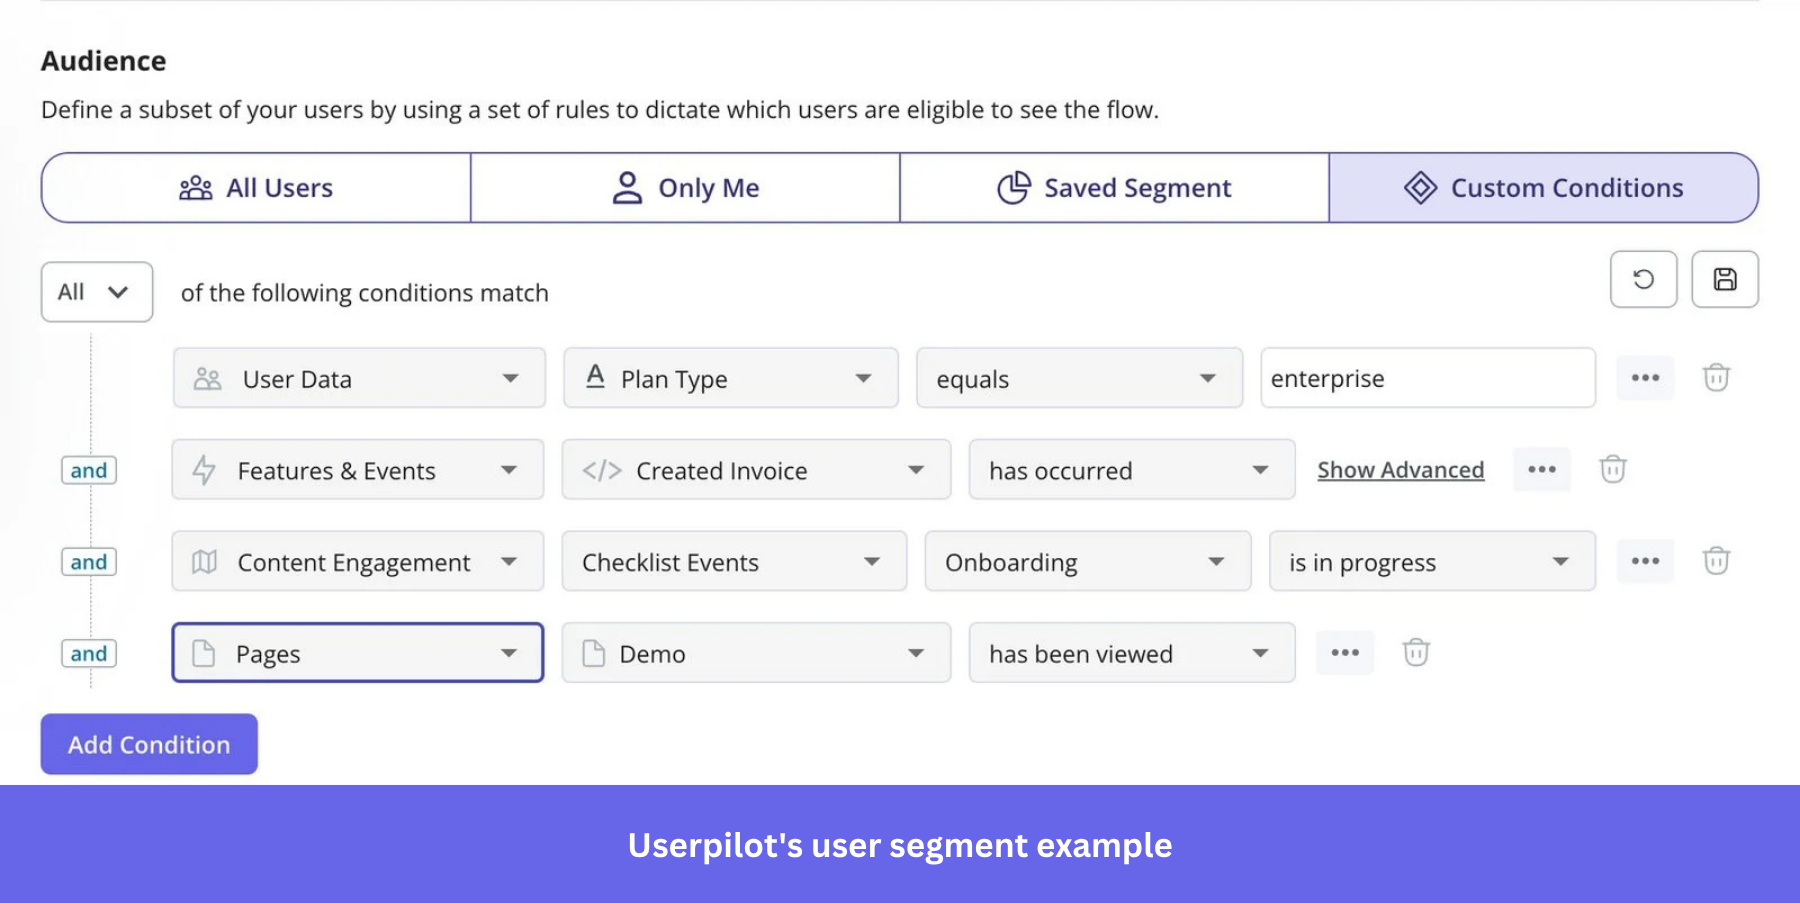
First, identify a segment based on relevant product usage patterns rather than demographics. A project management tool testing AI-powered task prioritization should show the test to users who create and assign 15 or more tasks per week, not to users who open the product once a week to check updates.
Tight targeting also improves the reveal experience itself. It makes the “coming soon” reveal feel relevant rather than frustrating. Whereas users outside that segment are more likely to feel misled by an announcement that has nothing to do with them.
To select the right test audience, you need to validate the segments with previous feature requests and usage analytics.
Best practice #4: Avoid overpromising and creating frustration
If a tooltip says “try our AI-powered competitor tracking feature”, you’ve created an expectation that the feature is usable now. But once the reveal page says “we’re still exploring this,” the gap between the promise and the reality is big enough to hurt customer trust.
My recommendation is to be transparent from the beginning, without implying that the feature already exists. Write something like “Are you interested in…”, “Do you want…”, or “How would you like …” and don’t use phrasing that implies they’ll actually get to do what the CTA says.
This also means resisting the urge to change the copy mid-test because there aren’t enough clicks. This would skew your data, so set your copy before launch and leave it alone until the test window closes.
How to set up a fake door test step by step
The steps below show you how to perform this test inside your app. For landing page tests targeting external demand, the mechanics are similar. Still, you control traffic sources through your ad setup and landing page tool rather than an in-app targeting layer.
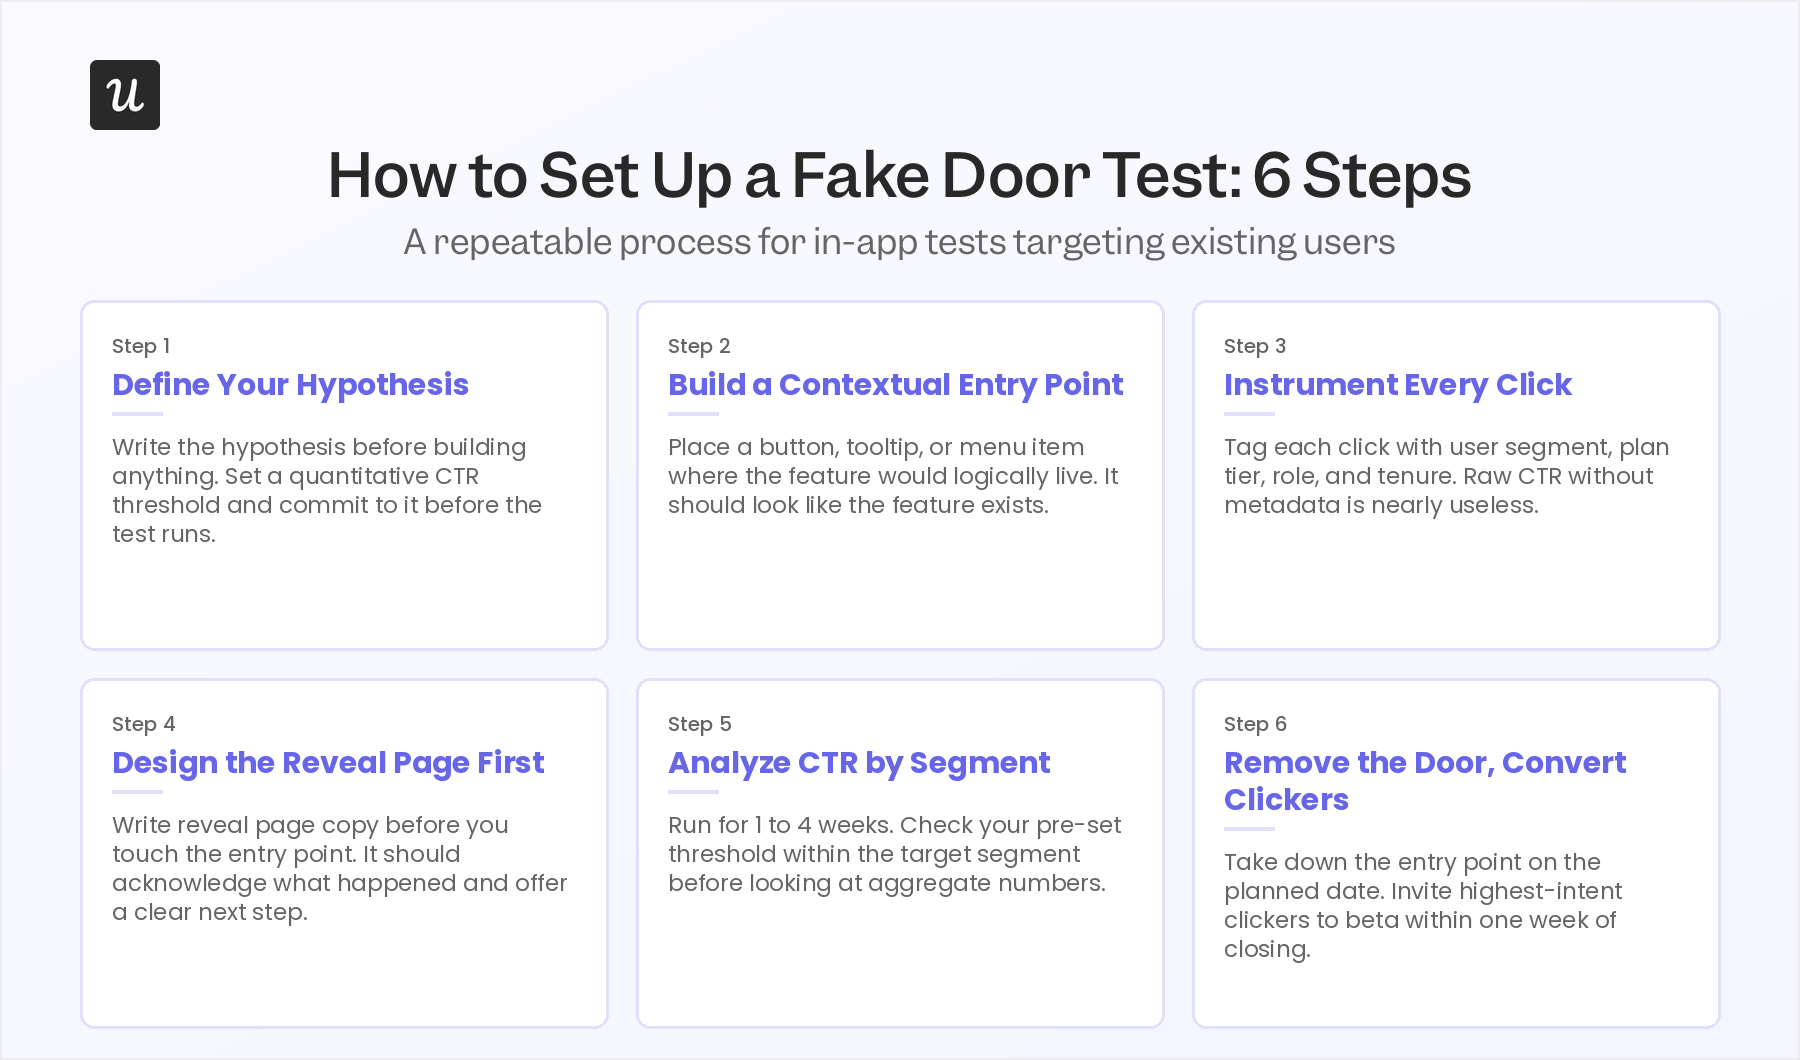
Step 1: Define a clear, testable hypothesis with a quantitative threshold
A fake door test without a pre-defined success threshold is just traffic data. Before you build anything, write the hypothesis in this format:
“If [target segment] sees [this CTA], and more than [X] signups in the waiting list, there is sufficient demand to begin discovery on [feature].”
Not setting a threshold to make a decision will turn this test into a confirmation-bias machine.
A reasonable starting threshold for a feature targeting existing power users is around 5% CTR from the targeted segment over the test window. For a brand-new audience segment with no prior product exposure, 2% to 3% click intent from cold traffic is still meaningful. Set the number before you launch, commit to it, and don’t move it once the results come in.
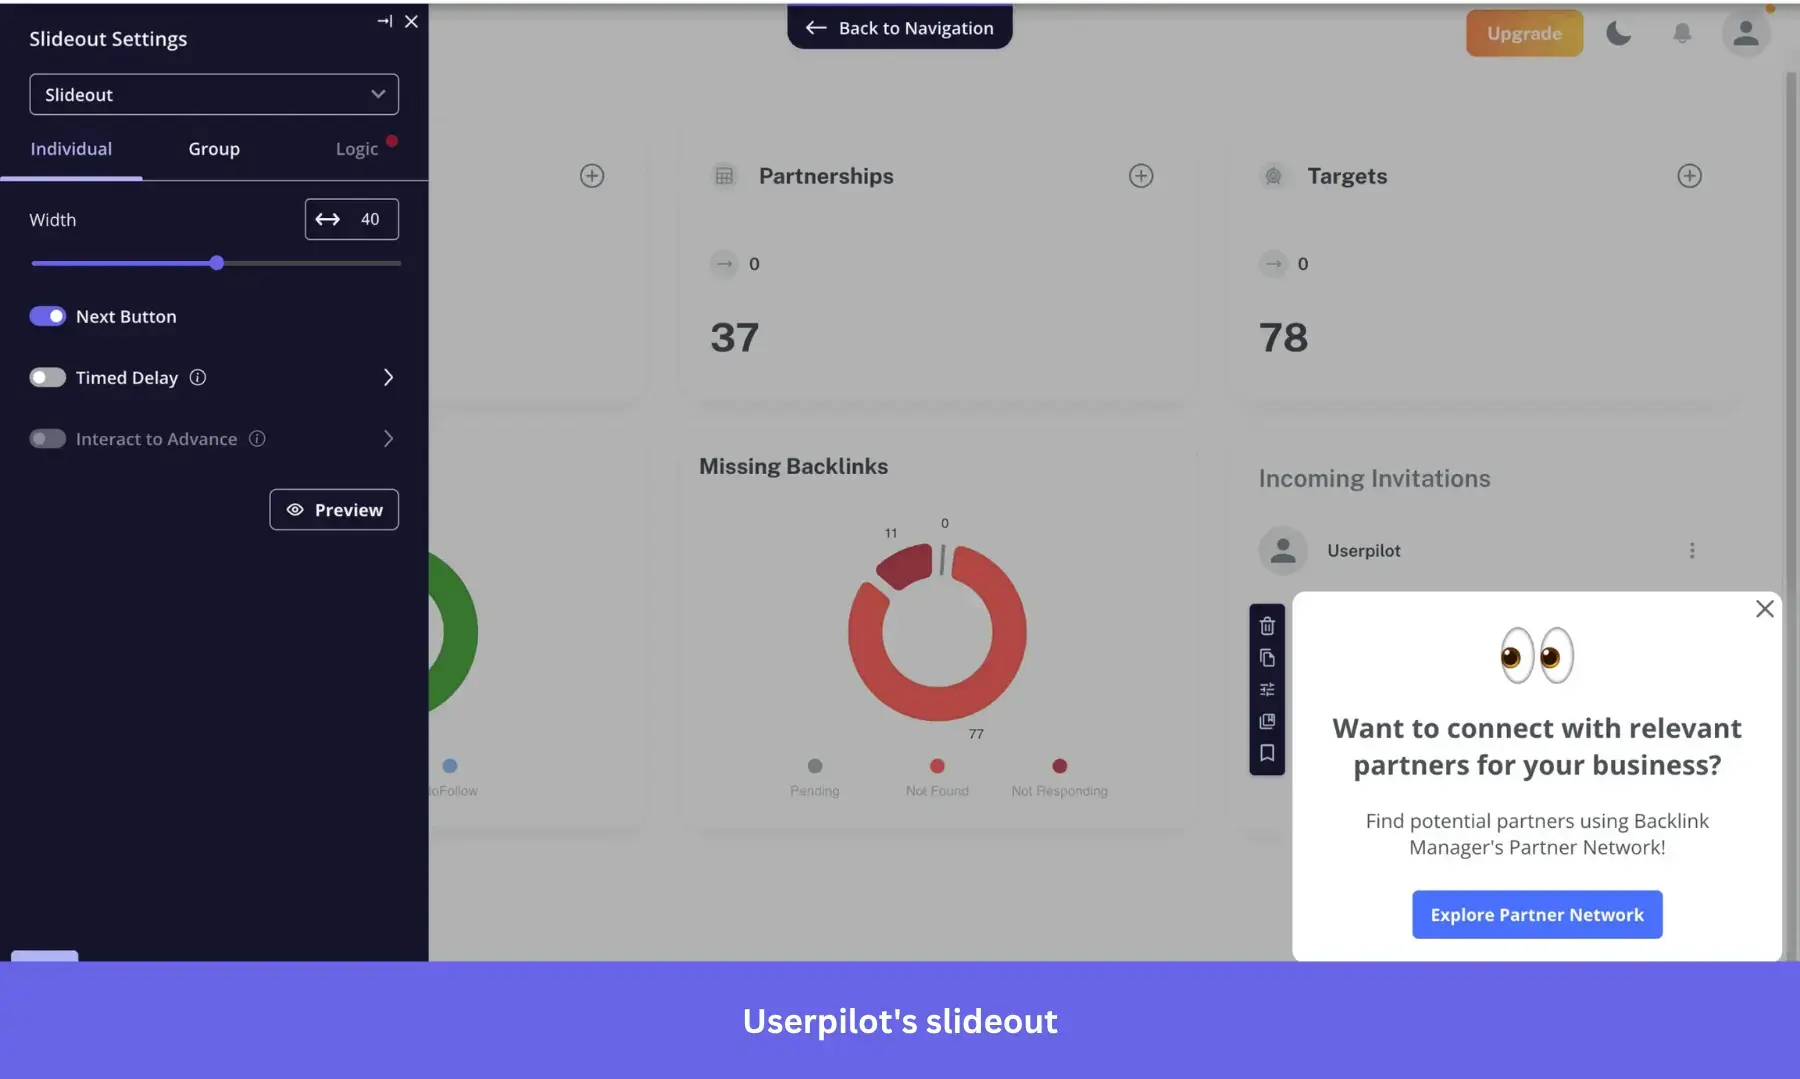
Step 2: Build a low-fidelity fake door
With a clear goal in mind, set up the button, tooltip, in-app banner, or landing page CTA that leads to the reveal page. As I mentioned, it needs to look plausible enough to earn a genuine click, but without implying that the feature is ready.
Phrases like “explore AI cohort comparison” or “need automated reporting?” suggest the feature exists without stating it’s live. Avoid technically false copy (“Your AI report is ready”) and copy so vague it won’t earn a click (“New feature coming”). The goal is to allow users to click through the fake door with curiosity or interest, without a strong intention to use it (they can show further interest by joining the waiting list).
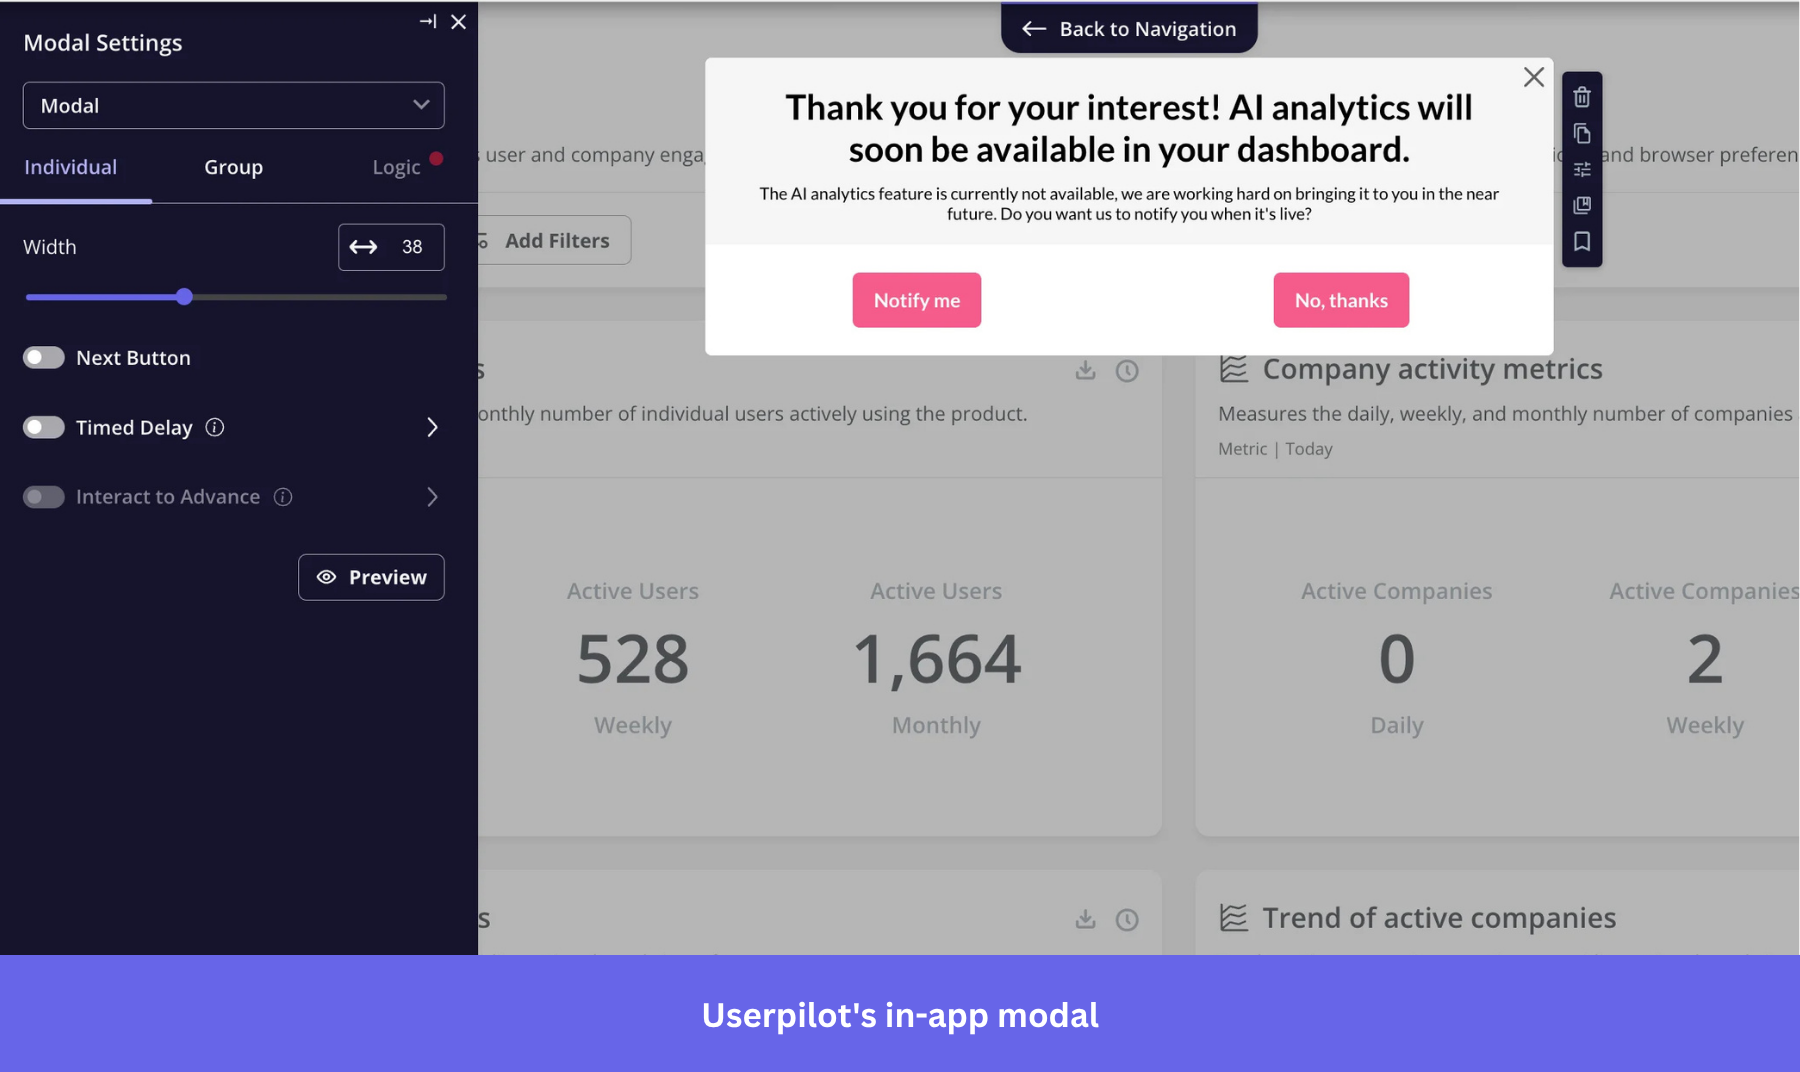
A modal also works well when the copy is short, with one or two sentences on the feature’s core benefit to attract the user’s attention.
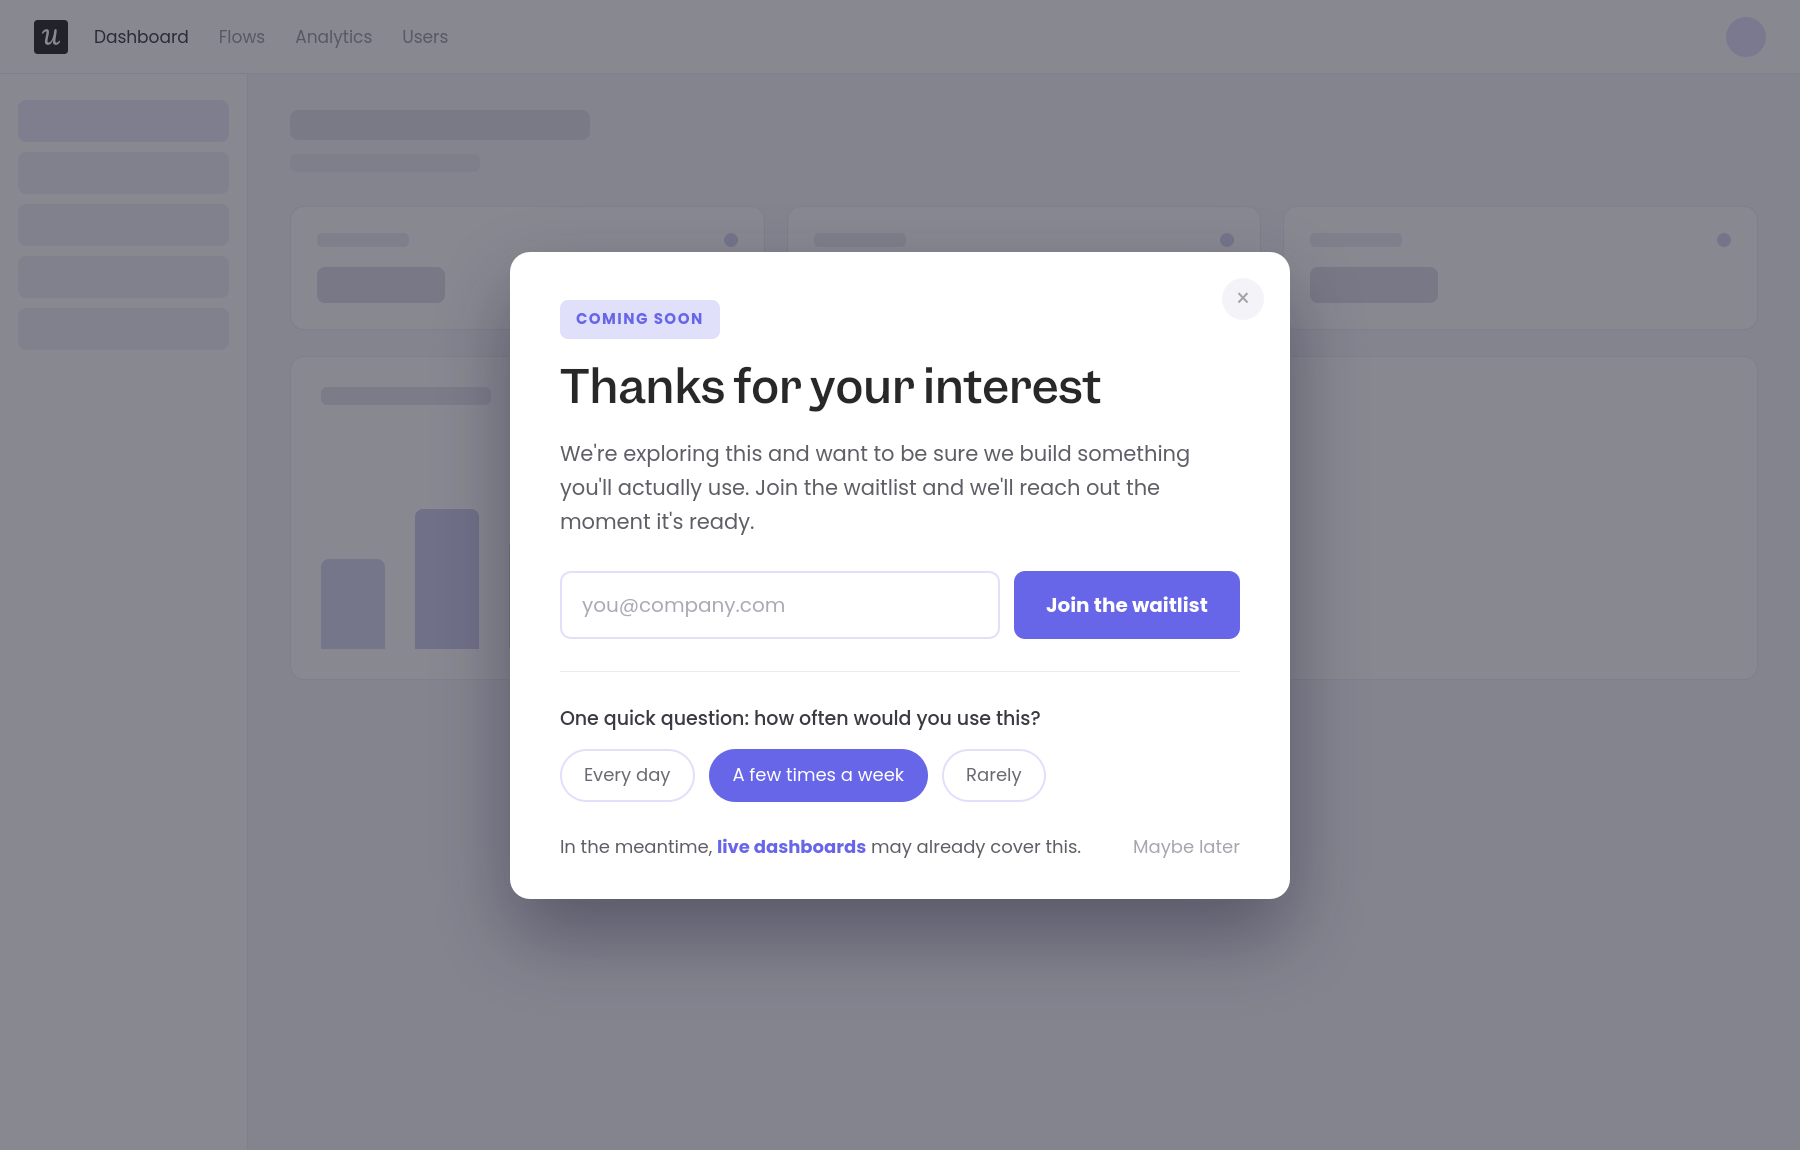
Step 3: Design the reveal page
The reveal experience is where most fake door tests fail. A bare “coming soon” page with no explanation and no clear next step won’t provide high-quality data for a roadmap decision.
I recommend thanking the user for their interest and explaining that you want to make sure you’re building features they want. You might even go out of your way to offer a similar feature as an alternative, so their attention isn’t totally wasted.
However, I’d refrain from describing the feature in too much detail. Additional details at this stage could set user expectations to a standard that might change completely during development.
In addition to offering a waitlist signup, a good reveal page could include a short survey and provide a clear path back into the rest of the product (making it less disruptive). For instance, an in-app modal can do all of this without redirecting users to a separate page.
Step 4: Instrument click events with audience metadata
As I’ve mentioned, raw CTR is not enough data to make a build decision. You need to know which segments clicked, which plan tier those users are on, which features they actively use, and which region they’re in.
First, segment click events with user types, plan tier, role (if available), and user tenure (how long they’ve been a customer). If you’re using Userpilot for the test, this metadata is captured automatically against the user profile. If you’re running a landing page test for external traffic, append UTM parameters to each traffic source so you can segment results by acquisition channel in your analytics tool.

Beyond segmentation, there are other metrics more telling than CTR. Besides tracking waiting list/beta signups, you can also look at time on page, heatmaps, and the pages they visited after (e.g., help docs, relevant features, etc).
Step 5: Run for a finite window of 1 to 4 weeks
Set an end date before you launch. Fake door tests that run indefinitely produce data that becomes increasingly hard to interpret as the surrounding product changes. A one-to-four-week window is enough for most in-app tests, while landing page tests with paid traffic can often reach significance in two weeks.
When you analyze, look at each segment rather than looking at aggregate CTR first. Check whether the threshold you set in Step 1 was hit, then segment the data by plan tier, role, and tenure. A 4% aggregate CTR might contain a 12% CTR from enterprise users and a 1% CTR from free-tier users, leading to different product decisions.
Also, if your reveal page included a short open-text field or a two-question survey, read every response. High CTR with negative qualitative feedback is a false positive, while low CTR with feedback that addresses consistent pain points could be worth exploring.
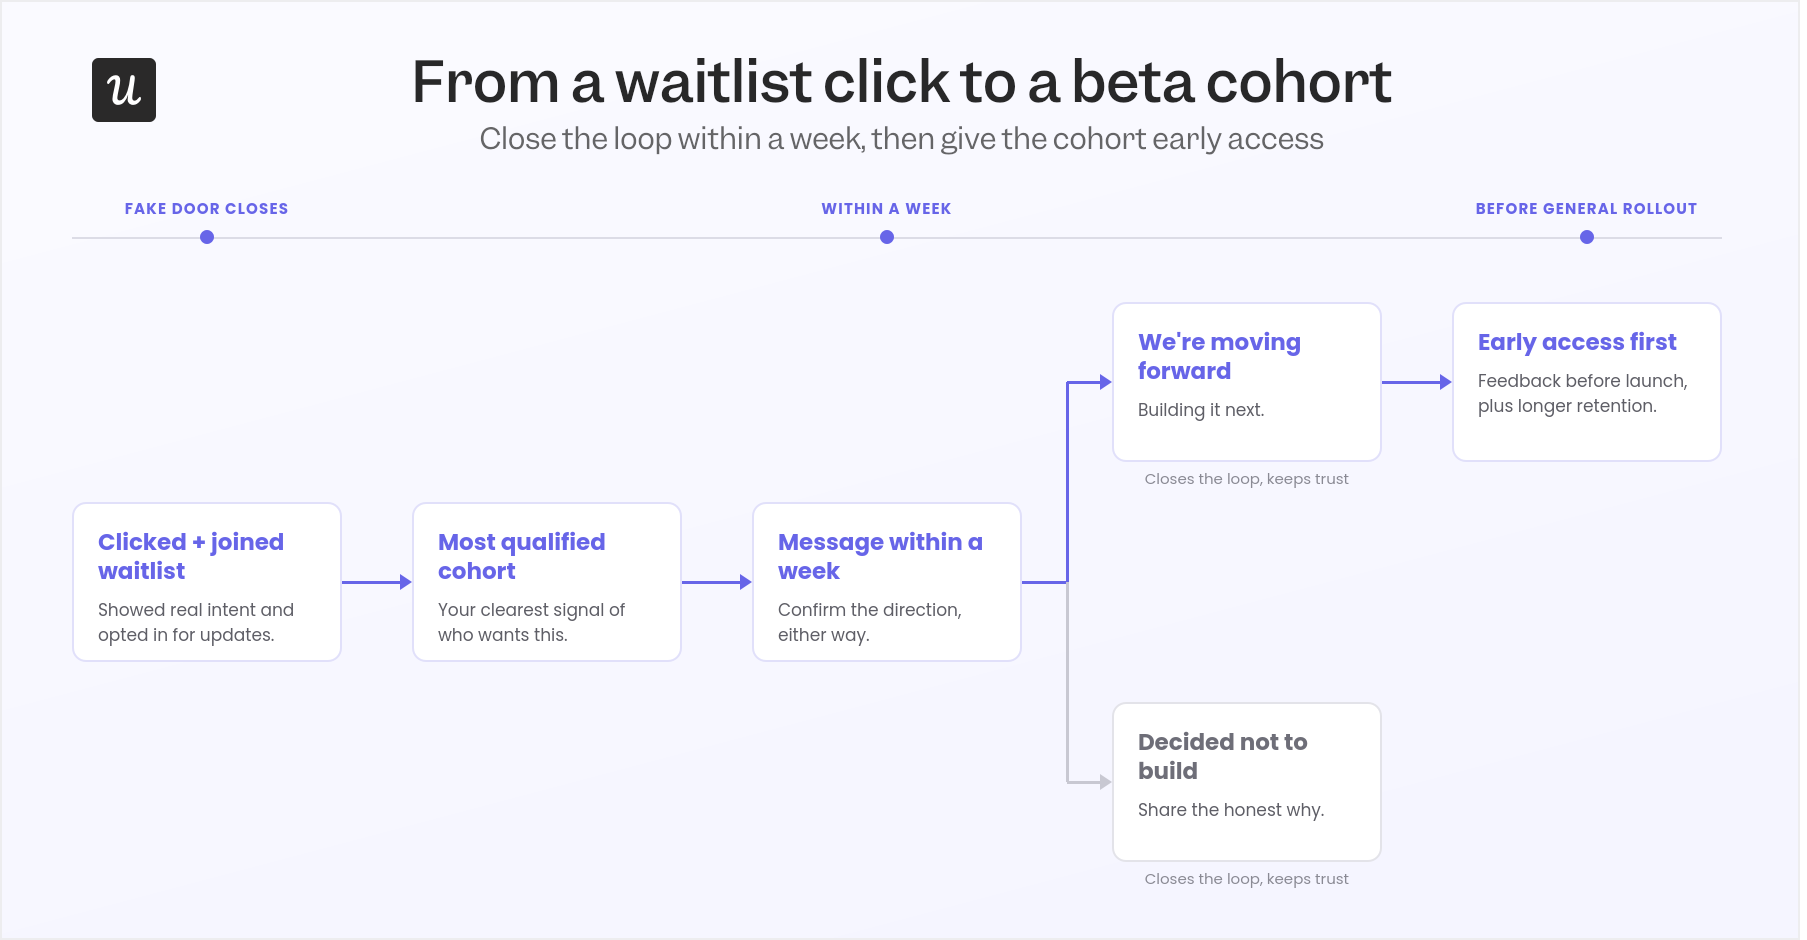
Step 6: Convert high-intent clickers into beta cohorts
After closing the fake door, the users who clicked and joined the waitlist are now your most qualified cohort for the next phase. They showed behavioral intent, engaged with the reveal page, and signed up for updates.
Send them a brief message within a week of the test closing, either confirming you’re moving forward or explaining why you decided not to build. Both messages will close the communication loop and keep their trust for future testing.
If the feature does ship, give this cohort early access before the general rollout. This will let you collect feedback before launch, fix potential issues, and even retain users for longer.
Fake door testing works in the right context
The principle behind fake door testing, that behavioral data beats survey data, is still true. Even if vibe-coding tools will let you test a prototype in weeks, the painted door test can still complement and even validate research data before committing resources to development.
So if you want to run in-app fake door tests, behavioral segmentation, and flow analytics from one platform without engineering tickets, book a Userpilot demo to see how you can set it up without coding.
About the author