Product Launch Communication Plan: A Practical Guide for SaaS Teams

According to the Marketing Science Institute, 40% of product launches fail to achieve their intended goals, often because marketing is treated as an afterthought. When messaging is inconsistent or poorly timed, even the strongest products struggle to gain traction. Establishing a clear product launch communication plan upfront helps prevent this by bringing structure, alignment, and focus.
In this blog post, I’ll show you how to build one, covering the key steps, best practices, and real-world examples you can apply to your next launch.
How to create a successful product launch communication plan
Before you put pen to paper, you need to get clear on two things: why you’re launching the product and who it’s for.
Step 1: Set clear objectives and define success metrics
You cannot improve what you do not measure. It is easy to get distracted by “vanity metrics” like email open rates. I focus on SaaS product success metrics that indicate genuine value delivery.
I track three specific indicators for every launch:
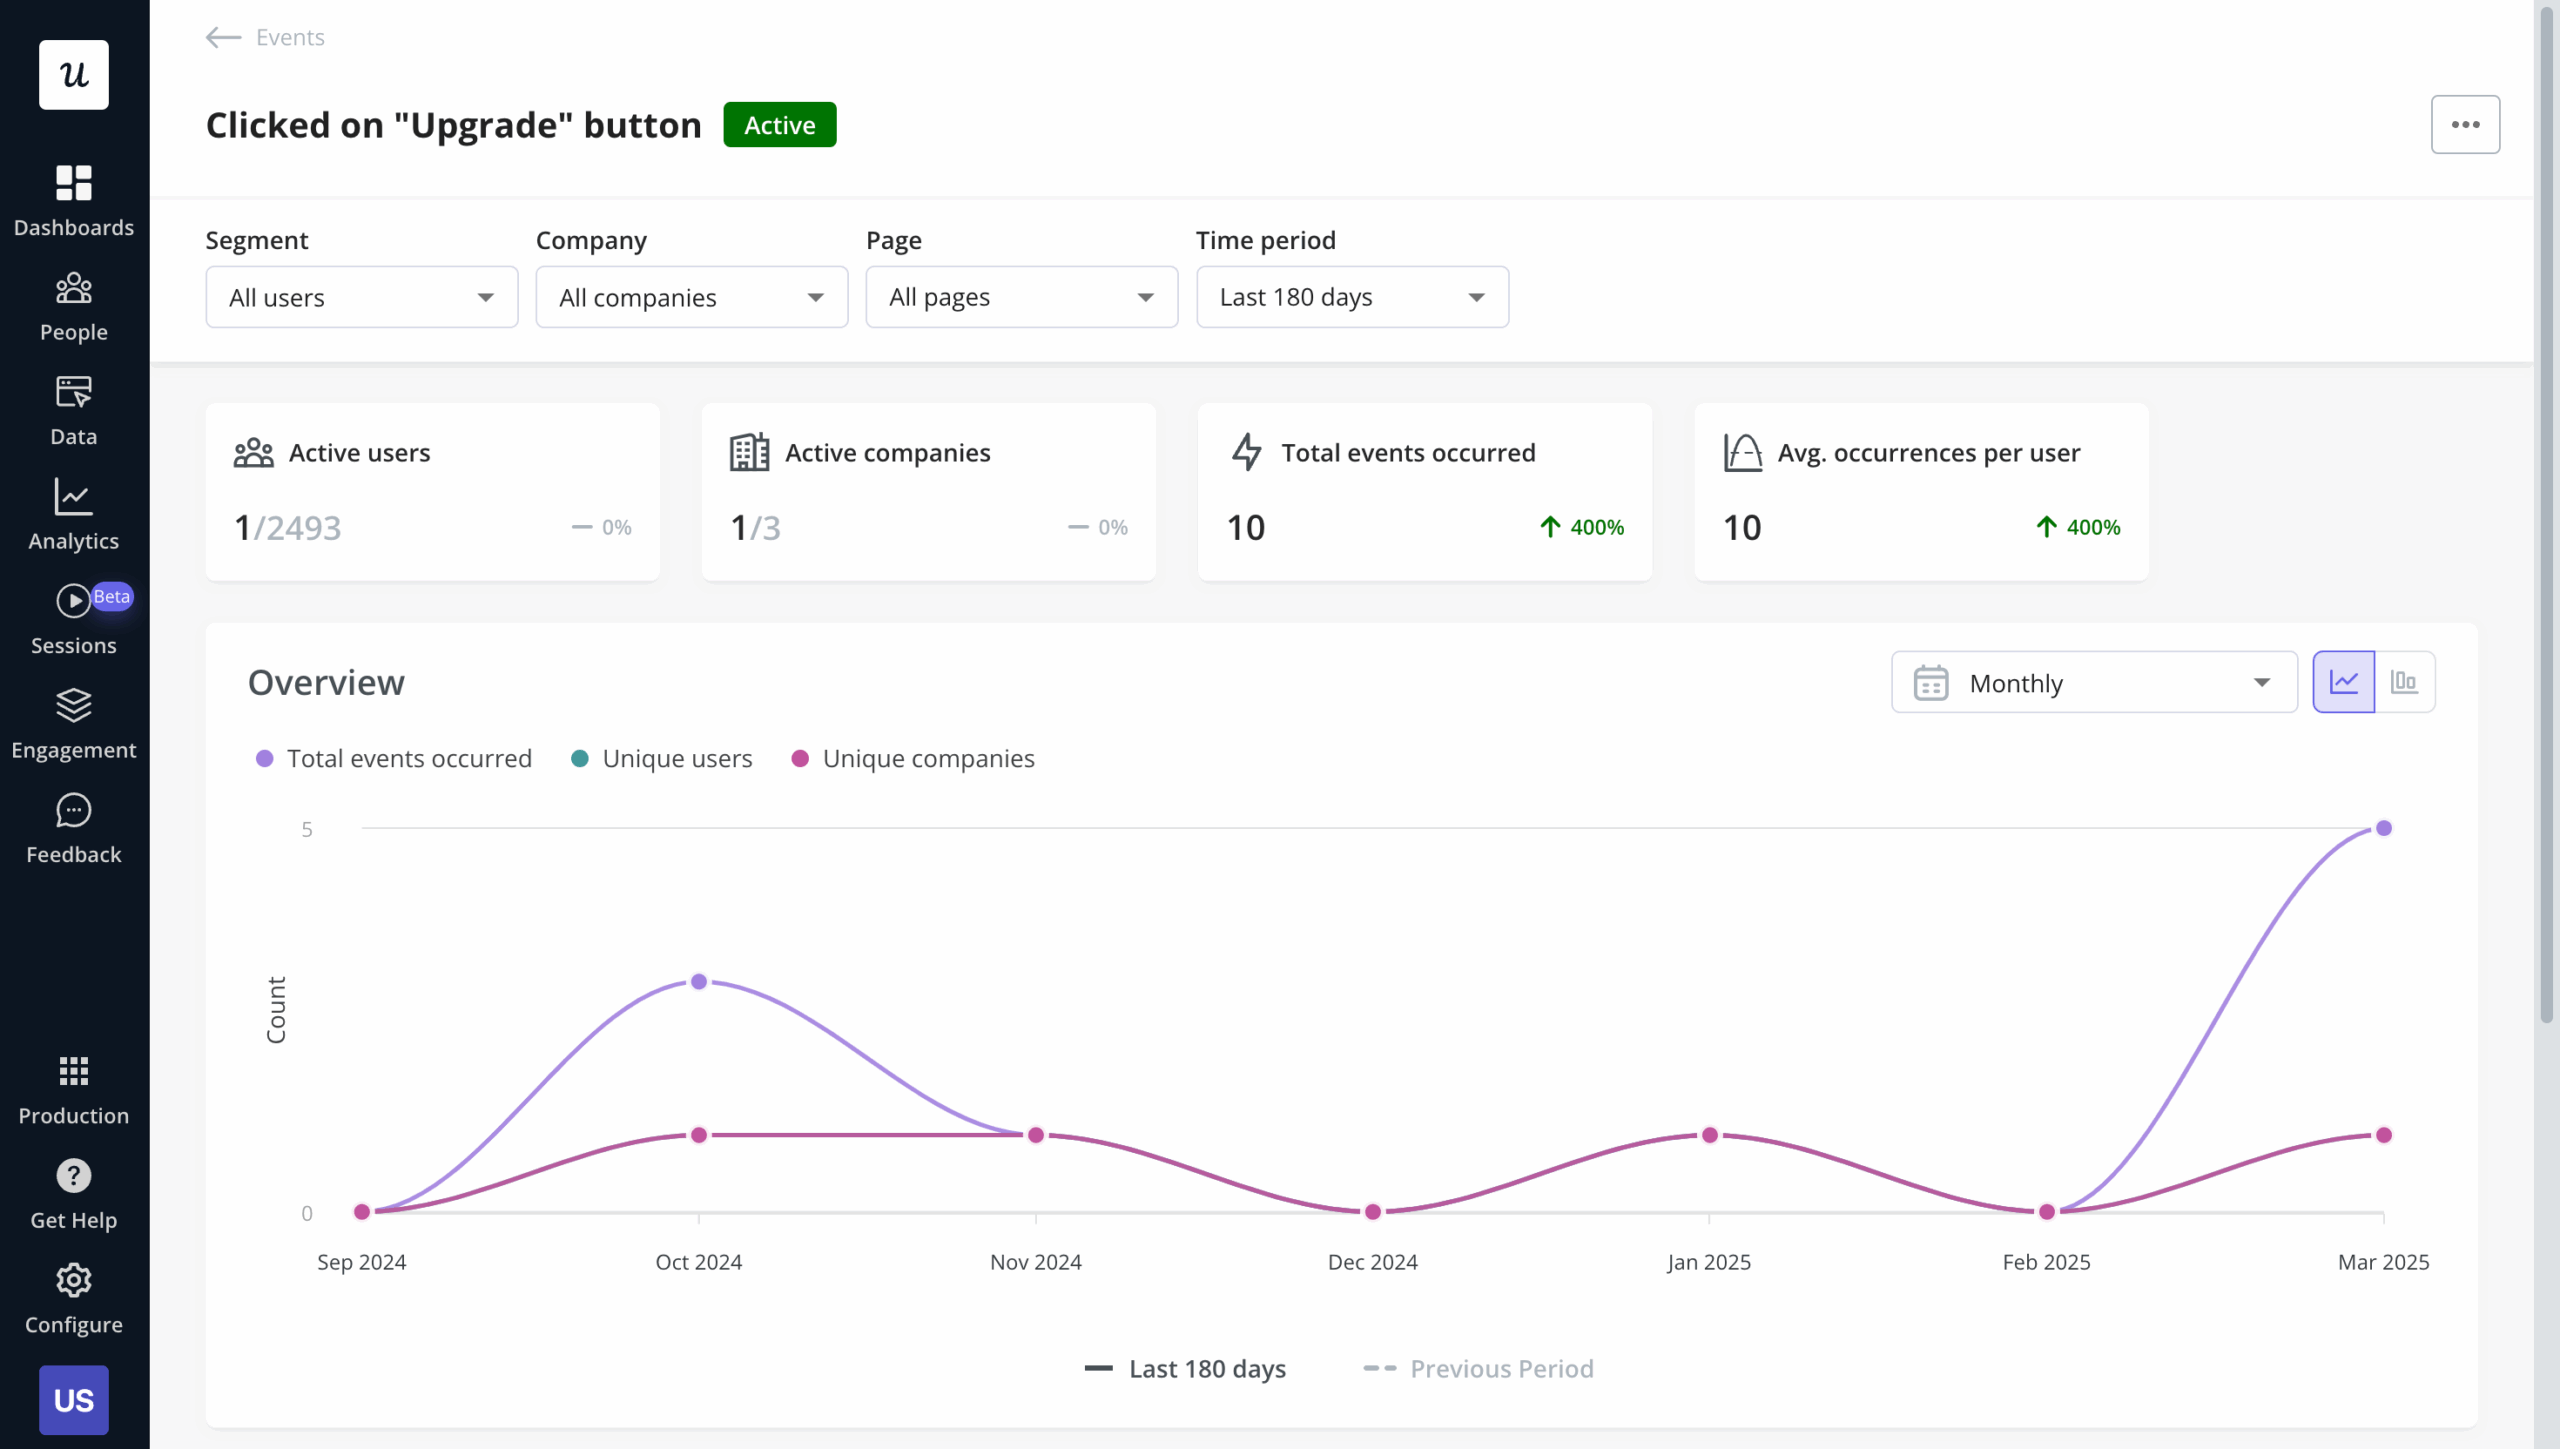
- Discovery Rate: What percentage of eligible users saw the feature announcement? (Reach).
- Activation Rate: Of those who saw it, how many tried the feature once? (Interest).
- Adoption/Habit Rate: How many users returned to use the feature a second or third time within the first week? (Value).
It’s critical to set up tracking early. If you don’t tag the feature before launch, you lose Day 1 data. I use Userpilot’s raw events autocapture to ensure data is recorded in the background, even if I forget to tag a specific button manually.
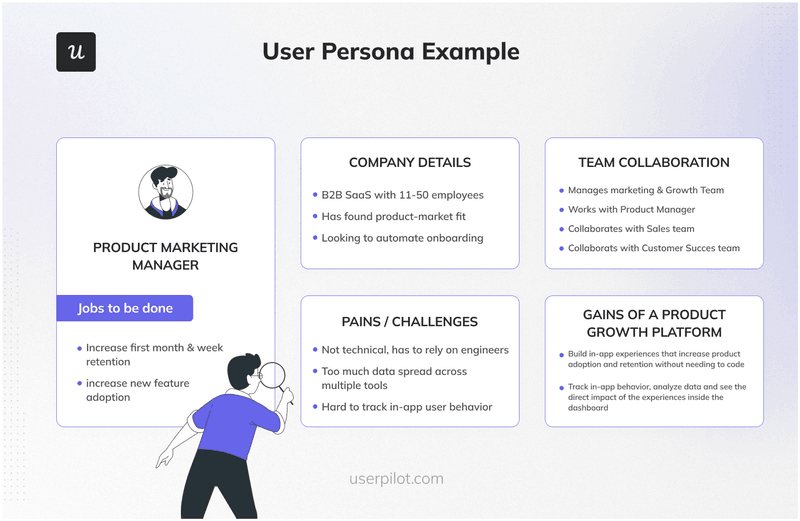
Step 2: Identify your target audience
One of the most common mistakes I’ve seen is teams launching a feature to everyone.
Take an advanced API feature, for example. If you promote it to a marketing persona who has no use for it, the best-case outcome is indifference; the worst case is confusion. Either way, you’re burning resources, failing to drive adoption, and muddying your metrics.
Every launch should be tailored to the audience it’s actually built for. Start by segmenting users through research and look closely at:
- User role: Is this designed for admins, editors, or viewers? Admin-only features shouldn’t appear to viewers.
- Plan tier: Is the feature limited to Growth or Enterprise plans? Don’t advertise functionality users can’t access.
- Behavior: Have users engaged with related features before? Someone who’s never built a dashboard is unlikely to jump straight into advanced cohort analysis.
Step 3: Nail your product positioning
You already understand how the feature works. Your customers don’t care about that, they care about what it enables them to do. Product positioning closes that gap by turning features into clear, compelling benefits and key messages.
I typically start with a simple positioning statement:
“For [Target Audience] who [Problem or Need], [Product Name] is a [Product Category] that [Core Benefit]. Unlike [Alternative], our solution [Key Differentiator].”
For instance, a positioning statement for a session replay feature might look like this:
“For product managers who struggle to understand why users drop off in key flows, session replay is a behavioral analytics tool that shows exactly where users get stuck. Unlike generic screen-recording tools, it automatically connects replays to specific events and user attributes, providing full context.”
This positioning statement then serves as the backbone for everything: from feature announcement emails to in-app tooltips and onboarding messages.
Step 4. Align internal teams
You cannot sell a feature to the market if you haven’t sold it to your organization first. If a customer asks a support agent about a new feature and the agent is confused, you have failed before you started. A robust product launch communication plan begins internally. This phase is about equipping your sales enablement manager, customer success managers (CSMs), and support teams to speak fluently about the new capabilities.
I create an internal “Launch Kit” to ensure no support agent is caught off guard. This kit is distributed 48 hours before the public release as part of the internal communication plan.
Here’s what it includes:
- The “One-Pager”: A single sheet covering the Problem, the Solution, and the Value Proposition (the “Why”).
- The FAQ: Anticipated questions and scripted answers (e.g., “Will this increase my price?” or “Does this replace the old widget?”).
- The Demo: A 2-minute Loom video walkthrough of the feature in action.
- The Routing Rules: Who handles bugs related to this specific feature?
Step 5: Choose your communication channels and create a cohesive strategy
Once you know what you want to say, the next decision is where to say it. Not every message belongs in every channel, and using too many at once can quickly turn helpful communication into background noise.
The key is to align each channel to both the audience and the moment while keeping the message itself cohesive across touchpoints:
- In-app messages: Ideal for contextual guidance when users are already in the product. Use them for feature discovery, walkthroughs, and nudges tied to specific actions.
- Email: Best for broader announcements, added context, or reaching users who aren’t logging in daily. This is where you can expand on the “why” and the value.
- Push notifications: Effective for time-sensitive updates, but easy to overuse. Save them for moments that genuinely require immediate attention.
While each channel serves a different purpose, they should all reinforce the same core story. Your in-app tooltip, launch email, and sales team talking points shouldn’t sound like three different products. Keep the value proposition, language, and benefits consistent, and simply adapt the depth and timing to the channel. The goal isn’t to repeat the same message everywhere; it’s to deliver a unified experience wherever users encounter it.

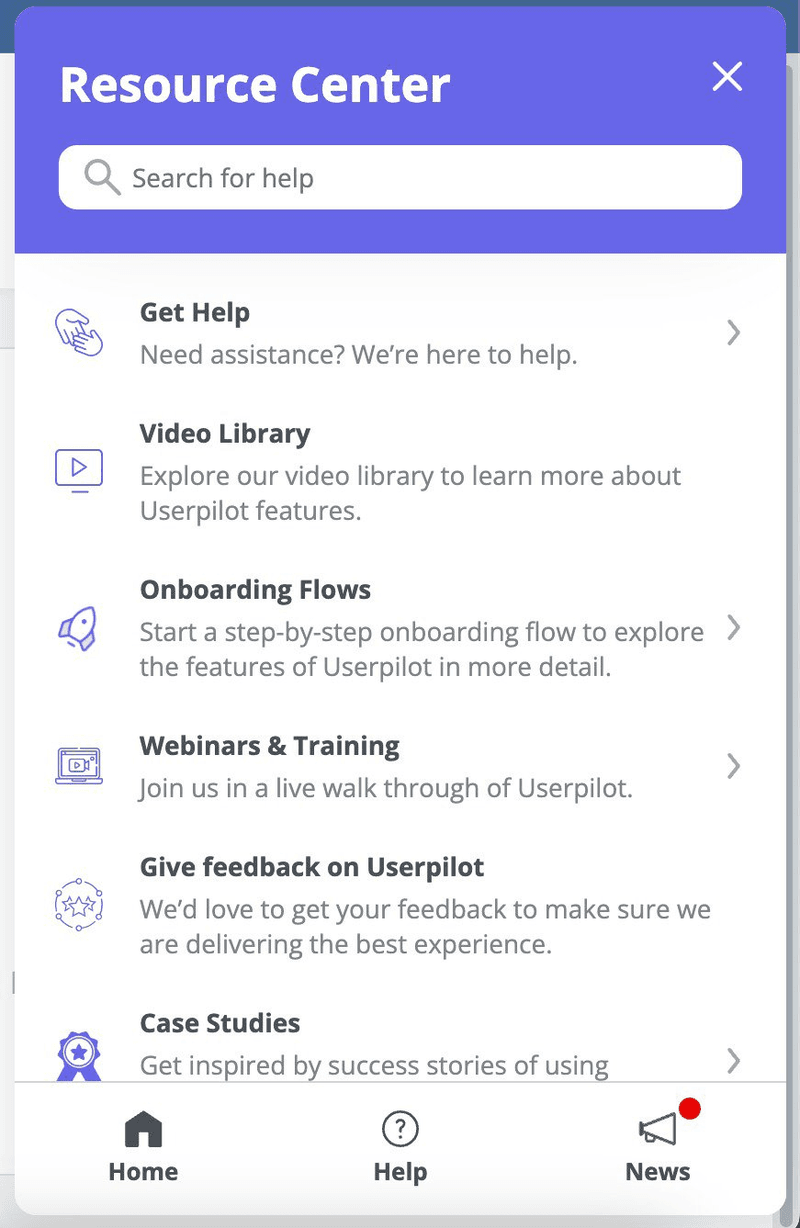
Step 6: Create a permanent knowledge repository
Not everyone engages on Day 1. Some users will dismiss your modal because they are busy. You need a safety net.
I added a “New Release” module to our Resource Center. This always-on widget acts as a catch-all for users who dismissed the initial announcement.
By integrating your knowledge base directly into the widget, you allow users to self-serve documentation long after the launch hype fades. This reduces “How do I…?” support tickets and empowers user autonomy.
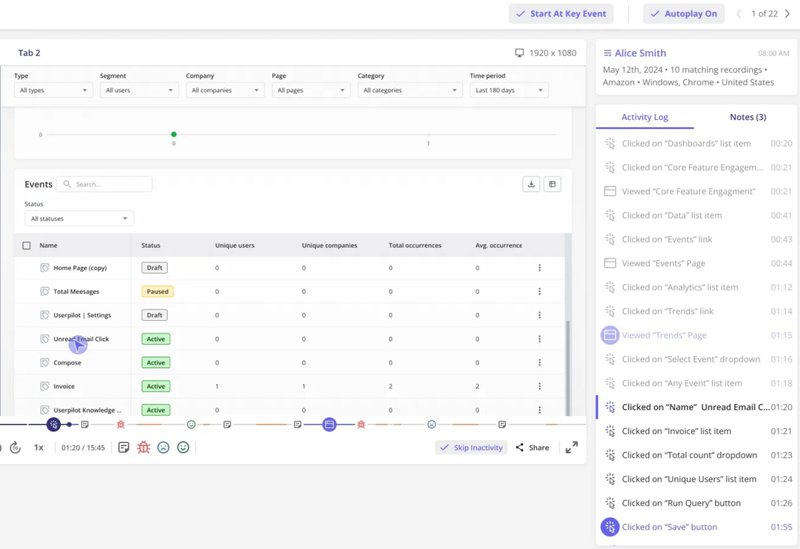
Step 7: Analyze data and iterate on your product launch communication plan
Using Product Usage Dashboards, I see what percentage of eligible users adopted the feature. If adoption is low, I investigate the funnel. Is it a discovery problem (they didn’t see it) or a usability problem (they saw it but didn’t use it)? If 50% of users open the new feature but only 10% complete the action, I know my UI is confusing.

I also watch session replays to spot friction points, like broken links or confusing UI that quantitative charts can’t reveal.
A few days after a user engages with a feature (triggered by a custom event), I trigger a microsurvey.
I ask for a Customer Effort Score (CES): “How easy was it to use [New Feature]?” If the score is low, I trigger a follow-up question asking “Why?” This customer feedback loop helps prioritize UX fixes immediately.
Best practices for executing the product launch plan
You now have the product launch plan template and the exact framework I personally use. To get real value from it, though, you need a few guiding principles. These are the rules I rely on every time.
Assign clear ownership
Every task in your launch plan should have a clearly defined owner, and that owner should be a specific person, not a department.
As I mentioned earlier, assigning a task to “marketing” usually means it belongs to no one. Assign it to “Sarah,” and it gets done. That’s why I always use individual names, set clear deadlines, and review progress weekly throughout the pre-launch phase.
Maintain a single source of truth
Avoid spreading launch-related discussions across Slack messages, Jira tickets, and random spreadsheets. Choose one tool and make it the authoritative source for everything.
I typically use a shared Notion document, but the exact platform matters less than accessibility. Everyone involved should be able to open it during standups and instantly see what’s happening.
Separate “hard” launches from “soft” launches
Not every release needs a big reveal. In some cases, a quiet or dark launch is the smarter move. This might mean enabling the feature on the backend while keeping it hidden in the UI, or rolling it out to a small percentage of users to test performance and usability.
Once you’ve validated stability and gathered early feedback, you can gradually roll it out to a wider audience.
Tier launches by impact and scope
A three-month launch campaign isn’t necessary for every update. I use a simple three-tier framework to decide how much effort a release deserves:
- Tier 1 (Major): New products or major features that significantly change user workflows. These require a full marketing campaign, comprehensive sales enablement, and robust educational resources.
- Tier 2 (Mid): Meaningful feature enhancements or additions. These typically need an in-app announcement, blog post, email campaign, and updated documentation.
- Tier 3 (Minor): Bug fixes, small improvements, or lightweight feature additions. For these, an in-app tooltip, changelog update, and documentation refresh are usually sufficient.
Launch new products successfully with Userpilot
By structuring your processes and using tools like Userpilot, you can automate in-app experiences that drive adoption without relying on engineering.
Want to simplify both launching and monitoring new features? Book a Userpilot demo to see how in-app messaging, analytics, and feedback tools remove the coordination headaches that slow teams down.
About the author