Session Recordings 101: Definition, Use Cases, and Best Practices


Session recordings show you the users’ interactions with your product as they happen.
Every click, scroll, hover, or keystroke you see can uncover insights to improve the user experience.
In this article, you will learn what session replays are and how they work, what benefits they offer, how to analyze them, and what the best session replay tools are.
What are session recordings?
Session recordings are digital recordings of user interactions with a website or app. They track every user action, from clicks and scrolls to page transitions and mouse movements, to recreate a complete user journey.
By showing how users interact with different elements on the page or product screen, session replays provide product teams, designers, and marketers with valuable insights into user behavior. This allows them to quickly identify issues and improvement opportunities.
How do session recordings work and what can you see with them?
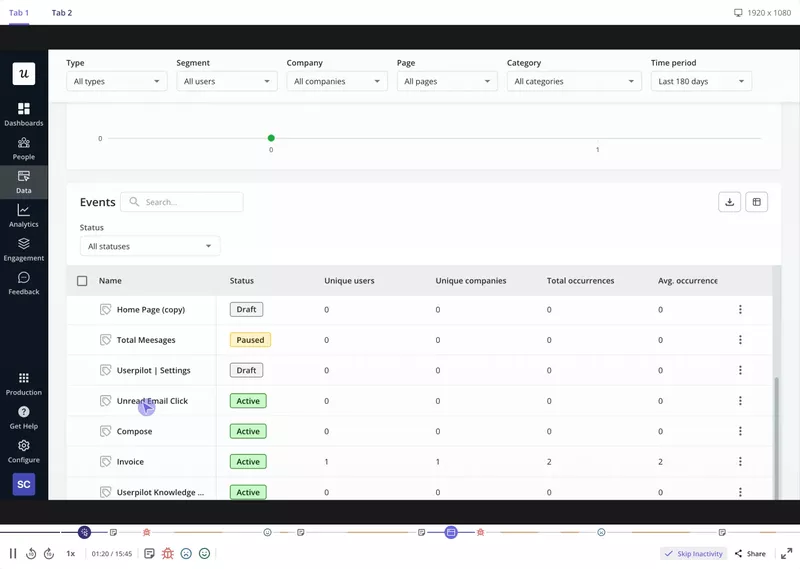
When you watch a session replay, it looks like a video recording of the user’s screen.
When a user interacts with your product, a small piece of code, typically a JavaScript snippet for websites or an SDK for mobile apps, tracks every movement: mouse cursors, clicks, taps, scrolls, and even text inputs in real-time.
This captured data is then used to rebuild the user’s unique journey, allowing you to play it back. In Userpilot, our raw events auto-capturing feature automatically collects crucial data like clicks, text inputs, and form submissions the moment our SDK is installed and auto-capture is enabled.
These raw user events can then be easily transformed into labeled events, providing an even clearer and actionable understanding of specific user sessions.
How can watching session replays help you?
To illustrate their benefits, let’s look at specific use cases of session recordings.
Identify points of user frustration and friction
Session replays allow you to see where users experience friction and diagnose the causes of their frustration.
By analyzing user rage clicks, extended pauses on specific screens, hesitant mouse movements, or back-and-forth navigation between pages, teams can quickly identify pain points that hinder the user experience. Examples include confusing layouts, unclear instructions, or counterintuitive navigation.
Troubleshoot bugs and technical issues
Recordings can reveal bugs and technical issues so developers can tackle them more efficiently. They show browser information, error messages, and precise user actions leading to technical issues, streamlining the debugging process.
Improve the user experience
Observing real user interactions helps teams understand natural user behavior and expectations.
Such insights enable informed design decisions, from simplifying navigation to restructuring content structure for better usability.
Optimize conversion rates across key user journey stages
By analyzing the sessions of customers who converted and those who abandoned an action, you can identify successful behaviors.
You can use the insights to optimize critical user flows and touchpoints like onboarding processes or signup forms.
Analyze paths taken by churned users
Struggling with customer churn but not sure why your users are leaving?
Watching the sessions of users who churn can highlight the specific triggers that result in drop-offs. Identifying recurring behavior patterns leading to churn will help you adjust your retention strategies.
Monitor how users engage with newly released features
Imagine you’ve just launched a new feature.
Session replays provide insights into how users engage with new features, allowing you to validate your design decisions, pinpoint usability issues, and identify areas for improvement.
This immediate feedback enables you to stay agile and make improvements on the fly after you release the feature.
How to implement and analyze user session recordings?
Here are my practical tips for getting started and maximizing your investment:
Define clear objectives
Don’t just hit record and hope for the best. Before you start watching any sessions, ask yourself specific questions: What am I trying to achieve? Am I looking to improve a particular sign-up flow? Understand why users drop off at a certain point in a critical customer journey? Validate the adoption of a new feature? Setting clear, measurable objectives will help you focus your analysis, prevent you from getting lost in a sea of data, and ensure you’re extracting actionable insights.
Choose the right session replay tool
The market offers a variety of session replay tools, each with its own strengths. When making your choice, consider key features and capabilities:
- Ease of installation: How quickly and easily can you integrate the session replay tool with your web page or app? Userpilot offers quick installation methods via JavaScript, Segment, or Google Tag Manager.
- Data capture capabilities: What types of interactions does it record, and what level of detail is provided?
- Filtering and segmentation: Can you easily segment users and filter sessions to find the specific interactions that matter most to your objectives?
- Integration with your existing stack: Does the session replay software seamlessly connect with your other product analytics, CRM, and marketing automation tools?
- Robust privacy features: Reputable session recording tools are engineered with stringent privacy measures. These typically include:
- Automatic masking: Sensitive data, such as passwords, credit card numbers, and other personally identifiable information, is automatically detected, masked, and never recorded.
- Configurable restrictions: Tools provide the flexibility to define and exclude specific elements, fields, or even entire user segments from recordings. Userpilot’s robust data capture restrictions, for instance, allow you to specify domains, geographic locations, or user groups to exclude, aiding in compliance with regulations like GDPR and CCPA.
- Anonymization: User IDs are frequently anonymized or pseudonymized, making it difficult to directly link a session to an individual, further safeguarding privacy.
Combine data sources for holistic insights
As I’ve emphasized, session recordings are most powerful when combined with other data sources. Here’s how to integrate them for a holistic view:
- Heatmaps: When heatmpas reveal “hot” areas that aren’t clickable, it immediately directs me to session recordings to understand the user’s intent behind clicking a non-interactive element.
- Surveys and feedback: If a user survey flags a specific pain point or a customer leaves feedback about a confusing flow, I filter recordings to watch sessions of users who provided that feedback. Combining quantitative and qualitative data, I get a better outlook on user behavior.
- Funnel analytics: A funnel report highlights where users drop off; session recordings reveal the exact why behind that abandonment-was it a bug, a confusing UI, or a lack of motivation? This combination is critical for optimizing conversion paths.
- Custom dashboards: I often correlate user actions observed in recordings with broader product usage trends tracked on custom dashboards, offering a comprehensive view of product health and performance. This helps validate or challenge hypotheses derived from quantitative data.
- A/B testing: When an A/B test yields unexpected results, watching session recordings from users in different test groups can uncover the behavioral nuances that explain the outcome, providing deeper learning beyond mere statistical significance.
Implement, monitor, and iterate
Product development is an iterative process. Once you identify a problem through recordings and implement a solution, don’t stop there. Use new session recordings to validate your changes. Did the redesigned onboarding flow reduce confusion? Are users now completing the form without unnecessary clicks or hesitations?
This continuous cycle of observing, analyzing, changing, and testing is fundamental to building truly user-centric products. Userpilot supports A/B testing for flows, enabling you to compare different versions of your in-app experiences and directly measure their impact on user behavior and conversion rates.
Best practices for making the most of session replays
How do you get the most out of your session recordings?
Here are a few best practices:
Analyze session recordings regularly
Don’t just turn to session replays when you already know something is malfunctioning. Instead, book some time in your busy week to watch and analyze session recordings, especially after you make UI changes or implement new features.
Most of the success stories from our clients come from watching session replays regularly. For example, Cleeng diligently monitored how users interact with a new feature button, and session replays quickly clarified that the design change had made a valuable feature invisible to users. Cleeng team quickly implemented fixes and made further changes, not only preventing traffic drops but actually increasing it.
“Session replays were super useful when we changed the navigation. We could see what exactly the users were clicking and if they were visiting the pages we want them to visit.” – Anna Sobiak, Product Designer
Our other client, Amplemarket, turned to session replays to design new tools with more confidence. Session replays became a game-changer for the product team: they set up a weekly meeting to watch replays and align on their learnings.
“We release a lot of new features and improvements every week. Without a way to see what’s happening with the product, things simply break. Session replays are a huge lifesaver. Whenever a new feature is released, we watch 10-15 session replays to understand how it works. It made our product designers 80-90% more confident in developing new solutions.” — Awni Shamah, Staff Product Manager at Amplemarket
Look for patterns in user behavior
Individual user behavior inside the product can be intriguing, but that’s not something you should use to make product decisions. The fact that a couple of users scroll mindlessly up and down the page or seem to be stuck doesn’t mean that there’s an issue.
To inform decisions that will improve the overall user experience and drive product success, look for trends in the recorded sessions.
Don’t overwhelm yourself with data — use segmentation
Session recordings offer tons of insights.
The thing is, not all of them are relevant in a particular context.
Imagine you’re building accounting software, and you’ve just launched a new feature, automated bank reconciliation. Normally, accountants set this feature up for their customers, so you only want to watch their session recordings.
To avoid getting overwhelmed with irrelevant data that could skew your results, use segmentation to watch targeted user sessions.
FAQ
What's the difference between session recordings vs. other tools for UX research?
Session replays vs heatmaps
While both heatmaps and session recordings shed light on user interactions, they provide different insights.
A session recording is like a video playback of an individual user’s interactions, capturing every click, scroll, and keystroke across multiple pages. This level of detail is invaluable for troubleshooting specific issues and understanding user journeys on a granular level.
In contrast, heatmaps collect user interactions across many sessions, giving a high-level view of common engagement areas on a single page. They reveal patterns in user attention, for example, where they click or how far they scroll. They shine when you want to optimize your page layout and UI design.
For optimal results, use both tools: heatmaps to spot patterns in what users do collectively and session recordings to investigate the ‘why’ behind those patterns.
Session replays vs. traditional web analytics
Tools like Google Analytics provide broad quantitative metrics: page views, bounce rates, time on site, and conversion metrics. They are excellent for identifying trends and the scale of issues, like a high drop-off rate on a particular page in your user funnel. However, traditional web analytics don’t explain why users are bouncing or dropping off, nor the reason behind unexpected user behaviors. Session recordings bridge this gap by providing the visual context, allowing you to observe specific user behavior patterns that directly contribute to those metrics, offering a rich narrative that quantitative data lacks.
Session replays vs. usability testing
Usability testing involves observing a small group of users in a controlled environment as they complete specific tasks. It’s fantastic for getting direct feedback and spotting major usability issues early. However, usability testing can be costly, time-consuming, and the “test subject” environment might not fully reflect real-world usage. Session recordings, in contrast, capture the behavior of real users in their natural environment, providing a much larger and more diverse set of interactions. With session playback, you can uncover unexpected issues you’d miss in a lab setting, offering scale and authenticity that complements the depth of usability testing. It’s the difference between asking someone to perform a task versus watching them perform it unprompted.
About the author