What Is Usability Testing? When to Use It, How to Do It, and What to Measure

You can spend thousands on ads and campaigns to get someone through the door, but if the product feels confusing, buggy, or hard to navigate, they’ll churn long before you’ve recovered your acquisition costs. Usability testing helps you uncover these friction points before you roll out a new product or feature, and it does so far more reliably than broad user testing or simple analytics alone.
In this guide, I will break down what usability testing is, the methods you can use, and how to build a usability testing strategy that supports activation in the short term and retention in the long run.
Try Userpilot Now
See Why 1,000+ Teams Choose Userpilot
What is usability testing?
Usability testing is a technique used in user-centered design to evaluate how real users interact with your product.
The primary goal of usability testing is to determine if the product is:
- Efficient: Can users complete tasks quickly?
- Effective: Can users complete tasks accurately?
- Satisfying: Do interactions deliver a positive user experience?
Why is usability testing important?
Building a feature or an entire software product without watching people try it leads to creator blindness.
You know every corner of the flow and every intended step on the happy path, so the product will naturally feel intuitive even when it might not be.
This disconnect is costly. Developers spend almost half their time reworking projects due to avoidable errors that usability testing would have exposed earlier. Every hour spent building features that users can’t navigate becomes UX debt sitting on your balance sheet.
In SaaS, the cost is even clearer because users churn quickly when confronted with friction. As a PM, I’ve seen how adoption rates drop simply because user expectations weren’t met, and users couldn’t locate a button everyone on the team assumed was obvious, or because the label on a core action made perfect sense internally but meant nothing to new signups.
Usability testing is also the fastest way to settle disputes on product teams. Rather than relying on the highest-paid person’s opinion, you can simply run a usability evaluation and watch reality settle the question. In a world where a single bad digital experience pushes one-third of users away for good, usability testing is the most reliable mechanism to ensure that what you’re building is not just functional but usable.
When to choose usability testing?
Knowing when to conduct usability testing is as important as knowing why. Too many teams wait until a feature is code-complete, which makes changes expensive and forces you into the sunk-cost trap. In my experience, usability testing works best when it’s iterative and spread across the entire development process.
Here are the four main phases to employ usability testing:
- Exploratory phase (concept testing): Run tests before any code exists. Paper sketches or low-fidelity wireframes help validate the user’s mental model and let you discover early whether your terminology, navigation, and structure make sense.
- Assessment phase (prototyping): As designs become more detailed, test the interactions inside high-fidelity prototypes. This is where you evaluate whether users can complete specific tasks, such as signing up, finding core actions, or locating important settings.
- Validation phase (pre-launch or beta): Once the product is functional, run tests on the live build. This phase uncovers unpredictable implementation issues that prototypes hide, including loading states, error handling, and quirks across browsers or devices.
- Comparative phase (post-launch): After release, use testing to optimize and benchmark. If analytics show a drop-off at a specific step, testing explains the reason. You may also compare your product with a competitor or test newly released flows against older versions to ensure the experience continually improves.
![]()
Boost Activation Rates Instantly by Streamlining Usability Testing with Userpilot
Core elements of usability testing
Regardless of method or timing, three core elements determine whether a usability test produces reliable results: the right participant, a realistic task, and a neutral facilitator.
1. The right participant
You must test with users who represent your real segments. Testing a data-heavy feature with someone unfamiliar with the domain gives misleading results. So, begin by defining your target personas, then recruit users who match their skills and goals.
How do you recruit users? My go-to option is to pick from existing customers. I typically create a modal inviting users to the usability test.
When our existing users don’t fit the target audience for a particular test, I just use platforms like UserInterviews or Respondent. You don’t need large groups for routine tests. Five users can uncover most usability issues, and additional sessions usually repeat the same patterns.
2. Realistic tasks
After selecting the right participants, the next step is deciding on the tasks you’ll use. I see a lot of product teams make mistakes here. The most common is that they end up recruiting participants for testing comprehension instead of navigation, without meaning to.
For example, if you tell a user, “go to the settings page and update your password,” you’re not testing their ability to find their way through the workflow. You’re just checking whether they can follow a set of instructions. A better task prompt puts the user in a situation and lets them figure out the path on their own. Something like “you’re concerned your account might not be secure and want to update your password” gives them enough context to act without giving away the route.
The goal is simple: the user should understand what they’re trying to accomplish and rely solely on the product’s interface to complete it.
3. The neutral facilitator
It’s easy to step in when someone hesitates, but that urge to help is the very thing that weakens the test. Remember, the struggle you’re watching is the information you came for.
Two simple techniques make this easier to manage. The first is the think-aloud protocol. Ask participants to say what they’re looking for, what they expect to happen, and what feels confusing as they move through the user interface.
The second is the boomerang response. When a user asks, “What does this do?” or “Should I click here?” you send the question back to them with “What do you think?” or “What would you expect to happen?” It keeps you from steering their choices and helps you collect critical qualitative data about their experience.
Usability testing methods
Usability testing comes in different forms, and the method you choose depends on your resources, product development stage, and the kind of insight you’re trying to gather.
Here are the most common approaches.
- Moderated usability testing: A researcher guides the session in real time, either in person or over a video call. It’s useful when you need to ask follow-up questions or want to understand the reasoning behind each decision. It takes more time to run and schedule, but it gives you richer context.
- Unmoderated usability testing: Participants complete tasks on their own while a testing tool records their screen and audio. It’s faster, easier to scale, and helpful when you want to quickly gather feedback on a specific flow or design. The trade-off with unmoderated testing is that you can’t step in to probe deeper when something unexpected happens.
- Guerrilla or hallway testing: This is a quick, informal option. You ask a colleague or someone nearby who hasn’t seen the feature before to run through a task. It’s not a substitute for a full study, but it’s an effective way to observe user performance and catch obvious issues before you spend time setting up a formal test.
- Remote usability testing vs. in-person testing: Most teams rely on remote testing because it’s easier to schedule and allows participants to use their own devices. In-person usability testing has value when you need to observe physical interaction, body language, or multi-device workflows.
- Prototype testing: You don’t need a finished product to test usability. Early wireframes and high-fidelity prototypes help you validate structure and task flow long before the engineering work begins.
- Qualitative vs. quantitative usability testing: Qualitative usability testing focuses on the reasons behind user behavior. It shows you where people hesitate, what confuses them, and how they interpret different elements in the user interface. Quantitative usability testing focuses on the numbers that help you compare versions over time, such as completion rate and time on task. Personally, I prefer to combine both qualitative and quantitative data to gain a comprehensive understanding of the customer experience.
How to conduct usability testing in 5 steps
Earlier, we looked at the core elements that make a usability test reliable. Now, let’s look at how to conduct usability testing in a structured and repeatable way.
I’ll walk you through the step-by-step process my team and I use when we run usability tests. To keep it concrete, I’ll use a simple fictional example so it’s easy to see how each step plays out in practice.
1. Define objectives and metrics
Let’s imagine you just updated the data import feature in your analytics tool.
You introduced these changes to make the experience more seamless for users, but customers are now describing the import step as confusing, and your support team has logged several failed-upload tickets. It’s a good moment to run a usability test and take a closer look at what’s happening.
The first step is to define your objective. In this case, the main objective is clear: you want to confirm that users can upload a CSV file, handle any validation errors, and reach a successful completion state without needing support or relying on guesswork.
Once you’ve decided on the goal, the next step is to choose the metrics that will show whether the flow is effective. Common usability metrics we measure include:
- Completion rate
- Time on task
- Error rate
- Ease-of-use ratings
You can track the first three metrics by watching how participants move through the task during the session and noting where they hesitate, backtrack, or make mistakes.
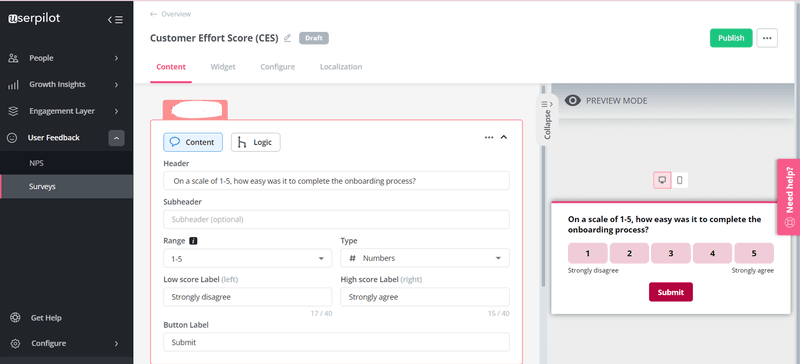
For ease-of-use ratings, Userpilot lets you place a short effort score survey directly in the flow without any engineering work, so you can capture user feedback while the experience is still fresh in their minds.
Here’s an example:
2. Recruit the right participants
Back to our example. The right participants will be people who’ve interacted with the new data import feature at least once. It helps to include both users who completed the flow successfully and those who abandoned it halfway, so you can get a clearer picture of where the experience starts to break down.
Userpilot’s advanced segmentation feature can help you identify these focus groups easily:
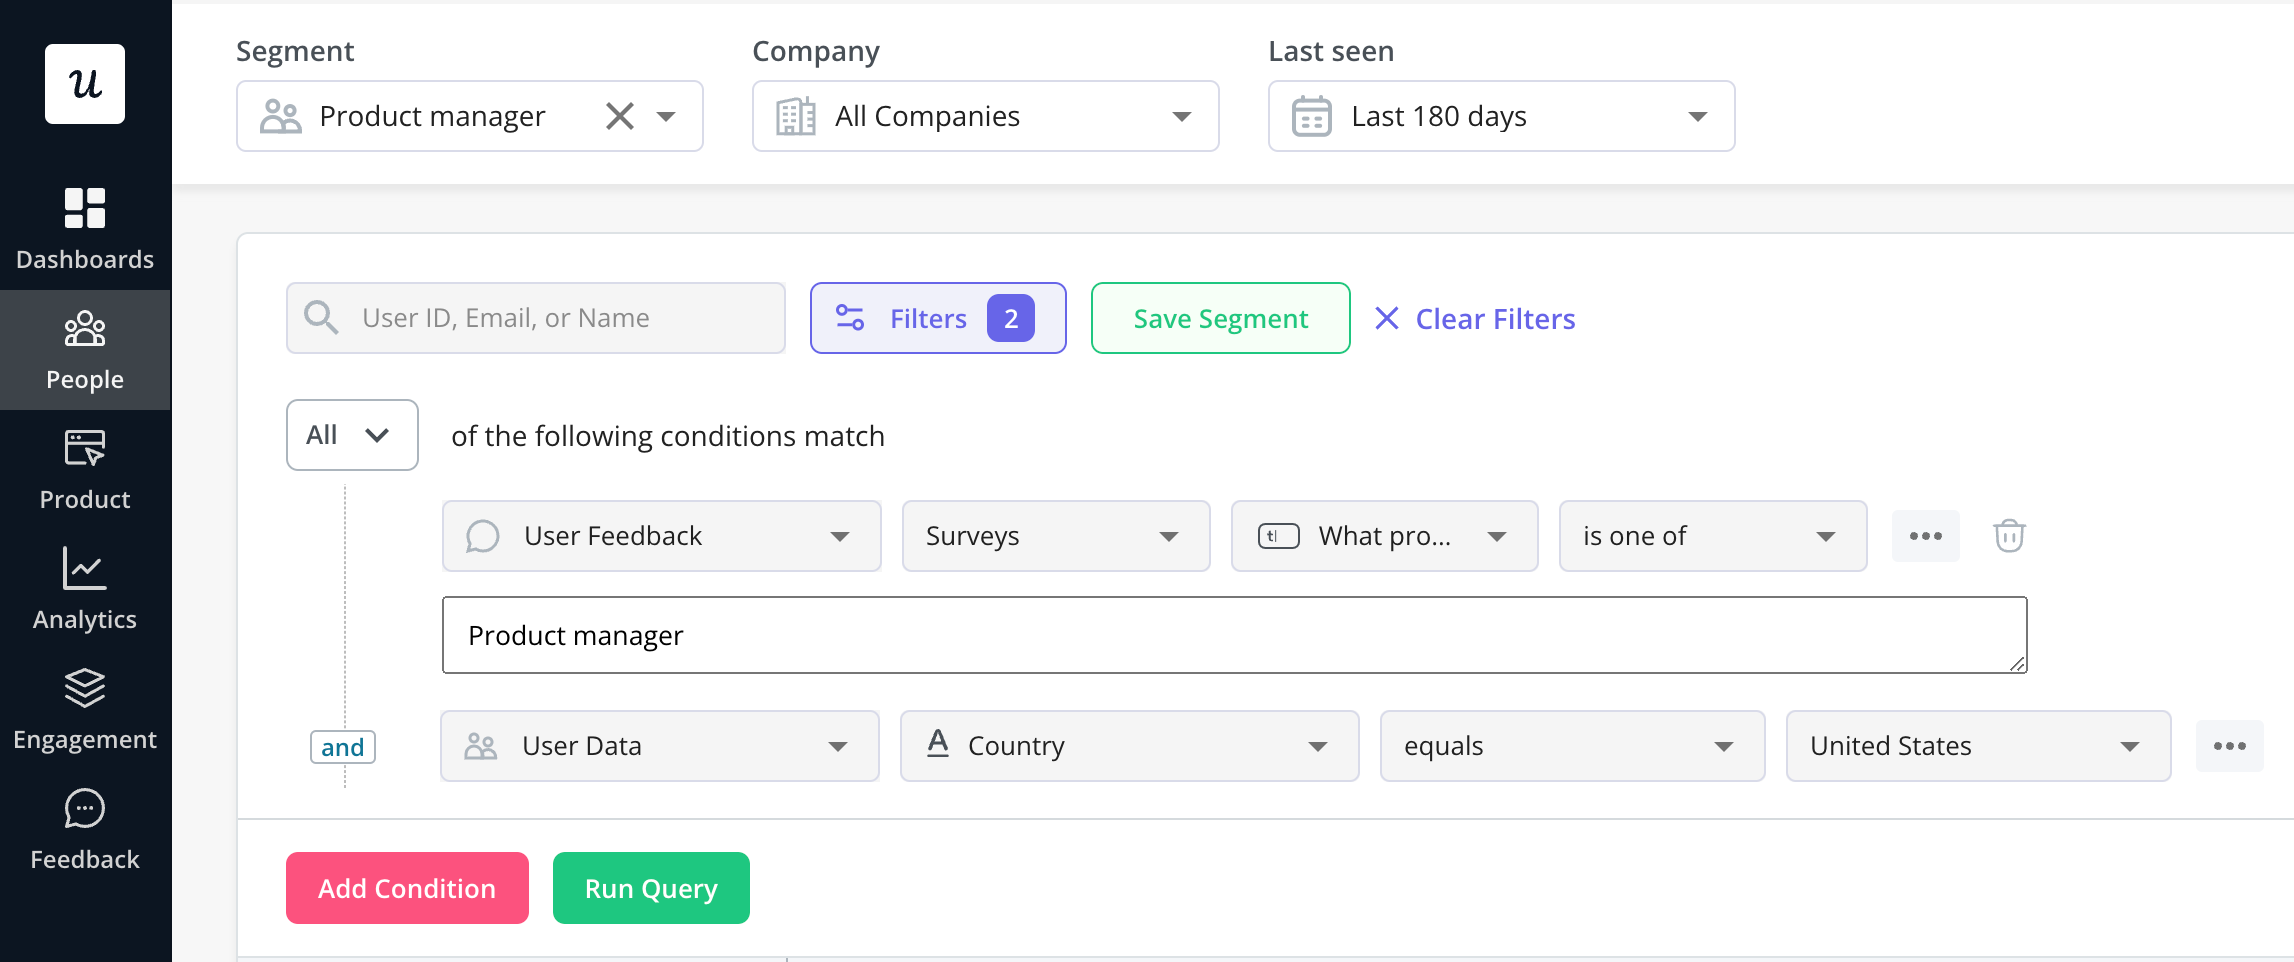
After segmenting them, trigger an in-app modal, a mobile push notification, or an email inviting them to the test. You can offer incentives such as free usage credits, extended trial periods, or access to a premium report template to encourage participation.
3. Create realistic test scenarios
A good usability testing script provides the user with a situation, a clear goal, and just enough context to understand why the task is important. The rest is up to them.
Using our data import example, here’s how that plays out in practice:
A weak script would be something like “Upload a CSV file using the new import feature.” This tells the user exactly what to do and removes any opportunity to see whether they can find the import entry point, interpret the steps, or understand what the interface expects.
A stronger script places the user in a realistic moment. For example: “You’re preparing a dashboard for your weekly team meeting and want to include new customer activity from the last month. You have the data in a CSV file on your computer, and you need to bring it into the analytics tool so you can refresh the charts.”
This version achieves three things. It:
- Gives the user a reason to import the file.
- Provides a clear end goal.
- Forces them to navigate the interface without being told where the import feature lives.
You can create similar scenarios for error handling. Here’s an example script: “You’ve just uploaded a CSV file and noticed that several rows failed to import because of missing values. You need to resolve the issue and complete the import so you can finish your report.”
Scenarios like these let you observe whether users understand the instructions, recognize validation messages, and know how to recover from an error state. The goal is always the same: the user should rely on the product’s design and copy, not on you, to complete the task.
4. Run the test and observe
Whether the session is moderated or unmoderated, or part of a remote usability testing setup, observation is the core of the process. Watch for the subtle signs that indicate user friction. Pay attention to hesitation, misclicks, and any point where the user stops moving and tries to make sense of what’s on the screen.
It also helps to watch for looping behavior. If someone opens and closes the same menu several times or moves their cursor across the page without taking action, they’re trying to find something the interface isn’t clearly surfacing. When they ask questions, write down what prompted the question rather than answering it. That moment of confusion is the insight you’re looking for.
If you’re moderating, keep your presence as light as possible so you don’t influence their decisions. Let silence do some of the work. People often think aloud when there’s space to do it, and those comments reveal the assumptions they’re making.
5. Analyze, prioritize, and iterate
Once the sessions are done, you’ll have a mix of recordings, notes, and small observations that surfaced along the way. Your goal now is to turn that raw input into a set of decisions your team can act on.
You don’t need a full transcript. What you’re looking for are user behavior patterns. If several users stumble in the same place or ask the same question, that’s a strong indication that the design isn’t communicating what you thought it was. If only one or two users encountered issues, then the problem is probably not urgent.
To keep the backlog manageable, I like to use a simple traffic-light system for sorting:
- Critical (Red): Users can’t complete the task because something essential is missing, broken, or invisible.
- Serious (Yellow): Users complete the task, but there’s clear friction, or they succeed only by using a workaround.
- Cosmetic (Green): Users hesitate or show mild confusion but eventually move forward.
The usability metrics we mentioned earlier give structure to what you observed:
- Completion rate tells you how many people reached the end of the flow without help.
- Time on task shows whether the process is slower than it should be, especially when you compare it with how long it takes an expert user.
- Error rate highlights misclicks, looping behavior, and dead ends.
- An effort score survey closes the loop by capturing how difficult the task felt.
Using our example, you might notice that three out of five participants struggled to find where the import feature starts, or that several people had trouble understanding the validation messages when a row failed. If the same issue arises repeatedly, it should be at the top of the list.
Once you’ve identified all the key challenges, it’s time to update your design, refine your microcopy, or simplify the workflow, depending on what the findings point to.
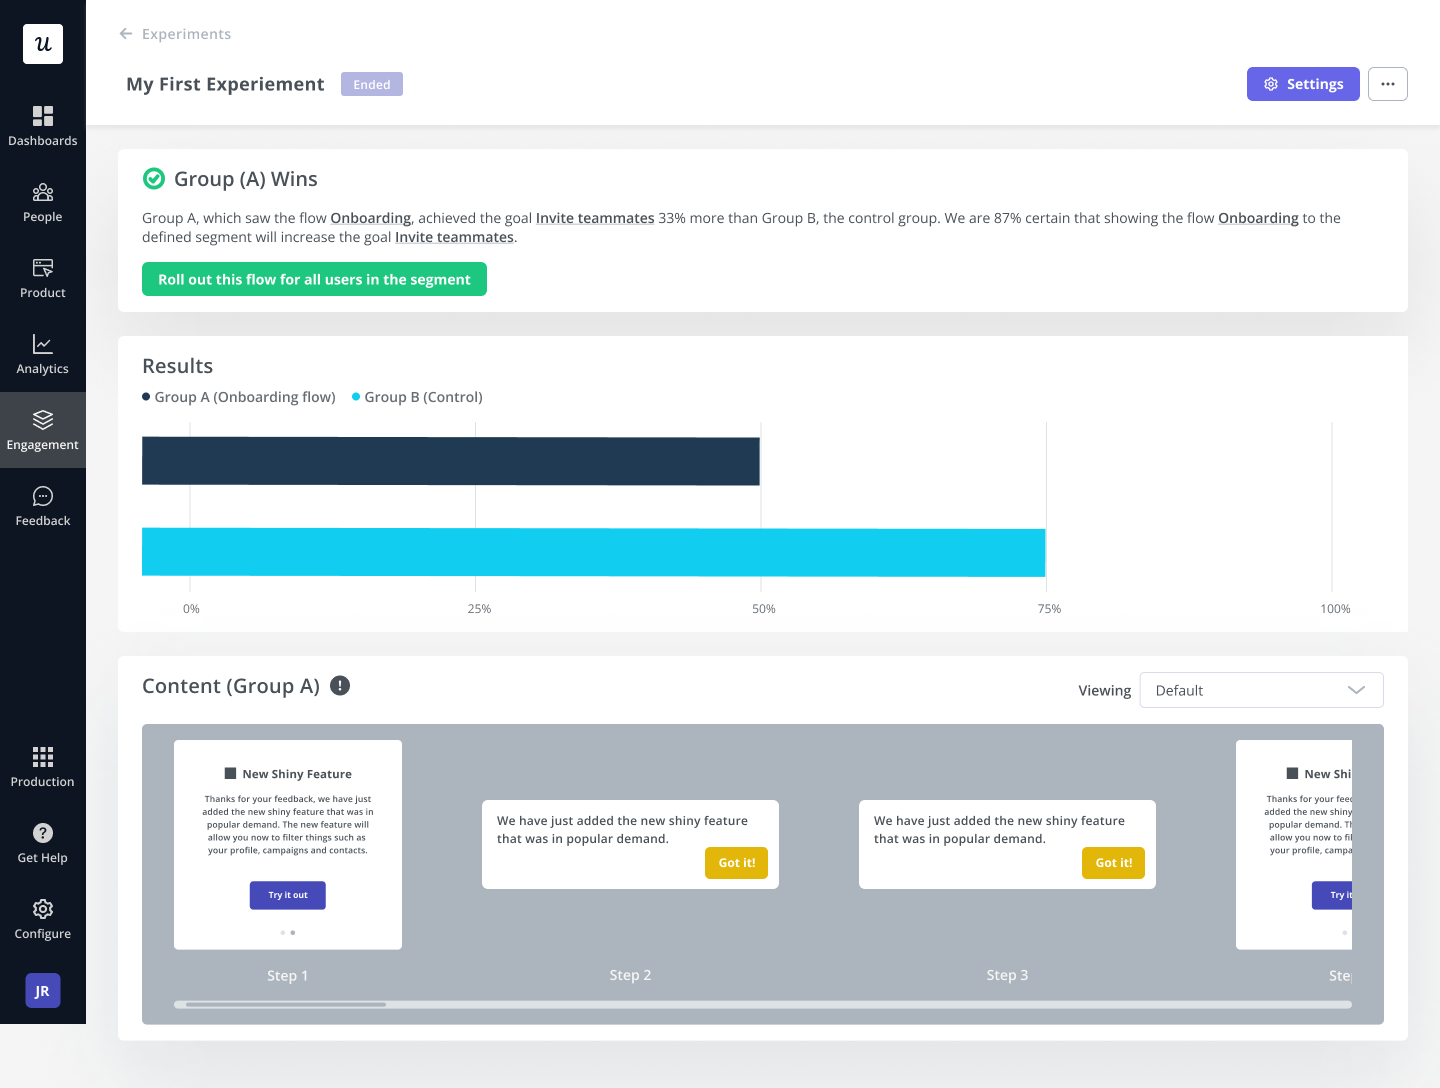
During this final phase, you might be unsure of a few things, such as button placements or the wording of a validation message. In situations like that, I like to use A/B tests to find what resonates better with specific user needs and contexts.
Again, Userpilot comes in handy. Our platform lets you roll out targeted A/B tests and easily implement the winning result:
Drive product growth with clearer decisions
Usability testing sits at the center of building a product that grows. It helps you see beyond your assumptions, understand where users hesitate, and uncover the moments where the design isn’t performing as expected.
Userpilot supports this through qualitative research by giving you the tools to run usability tests smoothly. As discussed, its advanced segmentation helps you find the right participants, in-app surveys let you collect user feedback code-free, and A/B tests make it easier to compare improvements once the major usability problems are resolved. Our session replay feature adds another layer by showing how users interact with the live product, providing continuous insight even when you don’t have the time or resources to run formal studies for every release.
Ready to start usability testing? Book a demo to discuss your needs and see how Userpilot can help.
![]()
Unlock Deep User Insights Code-Free With Userpilot Usability Testing Tools
About the author