PRD Template: Product Requirements Document Guide for Product Managers


When I wrote my first PRD, I had no idea what it was supposed to be. Half the team insisted it had to be an ultra-detailed, all-knowing source of truth. The other half said a “lightweight brief you could skim in a minute” is perfect.
So, which one is right for your product strategy?
A decade later, knee-deep in product management and hundreds of PRDs written, here’s the answer: both.
A PRD can be lightweight. It can also be the single source of truth that aligns your team on the what (user-facing functionality) and the why (the problem to solve).
In this guide, I’ll show you how to strike that balance. I’ve also thrown in a one-page PRD template you can edit on the go.
What is a product requirements document (PRD)?
A Product Requirements Document (PRD) is a guide that explains the product you are about to build. It outlines the following:
- Your product’s purpose and target audience.
- The features.
- The functionality.
When those three are clear, you have a reliable source of truth. New designer joins? Stakeholder questions a decision? Someone forgot the original scope? You point them to the PRD.
A PRD focuses on the “what” and the “why,” i.e., the problem, the users, and the expected outcomes. It leaves the “how” to design and engineering. It’s also a collaboration tool.”
And here’s what it is not: a 100-page technical spec, a list of engineering demands, or a step-by-step manual dictating exactly how to build something.
In summary, a PRD is a guide that provides the clarity and context your team needs to deliver a better product experience for users.
![]()
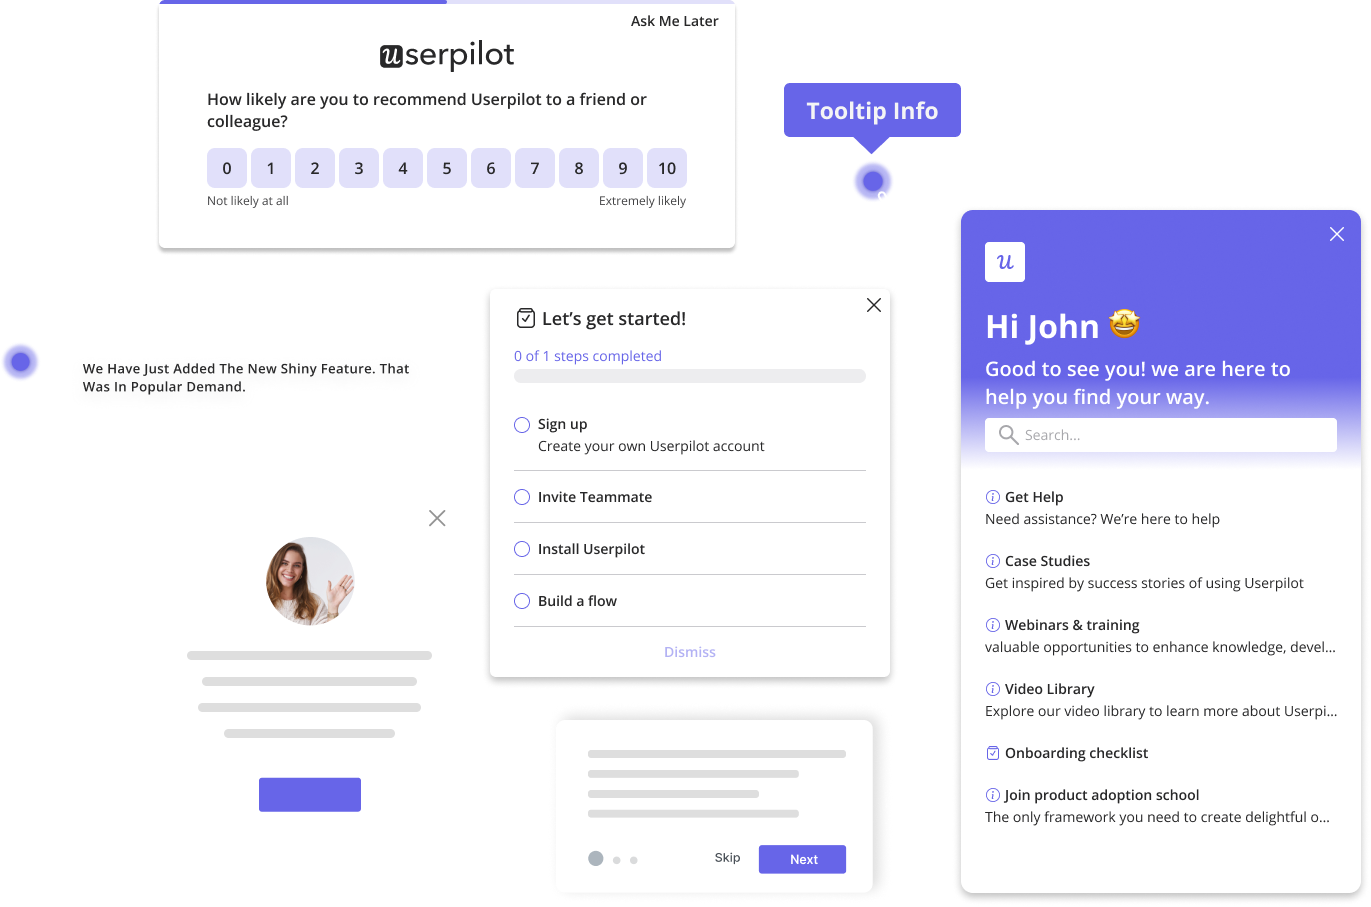
Build a Data-Backed PRD Template that Aligns your Team Using Userpilot
The 8 essential components of an effective PRD template
To write a detailed, no-fluff PRD, focus on these eight components that drive alignment across product, design, engineering, and all stakeholders.
1. Establish context with metadata
Metadata gives immediate clarity to anyone opening the PRD, especially new team members. At a minimum, it should include:
- A descriptive project name: Use something that instantly communicates the project or product’s purpose.
- Core product team members: List everyone involved, from PM and Design Lead to Engineering Lead.
- Project current status: Discovery, Planning, In Development, or Launched.
- Date last updated: This helps your team quickly determine if the info is up-to-date.
An example of metadata done right is Figma’s PRD.

2. Anchor everything in the user problem
Before you mention a single new feature in your PRD, get crystal clear on the WH questions: What specific user problem are you solving? Why does it matter now?
Your answers must be grounded in evidence, i.e., user research. Maze’s The Future of User Research Report 2025 found that organizations that embed user research into product development see significant gains: improved product usability (83%), higher customer satisfaction (63%), better product–market fit (35%), and increased customer retention (34%).
In other words, user research protects you from building the wrong product. So how do you do it?
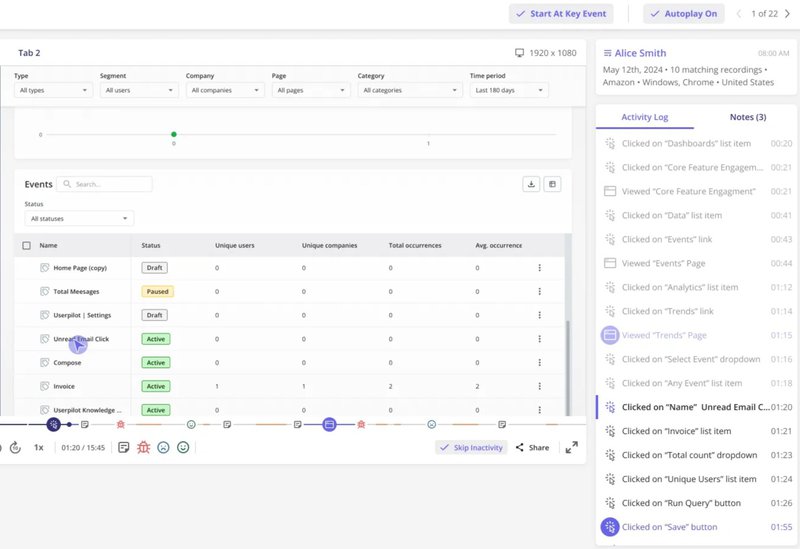
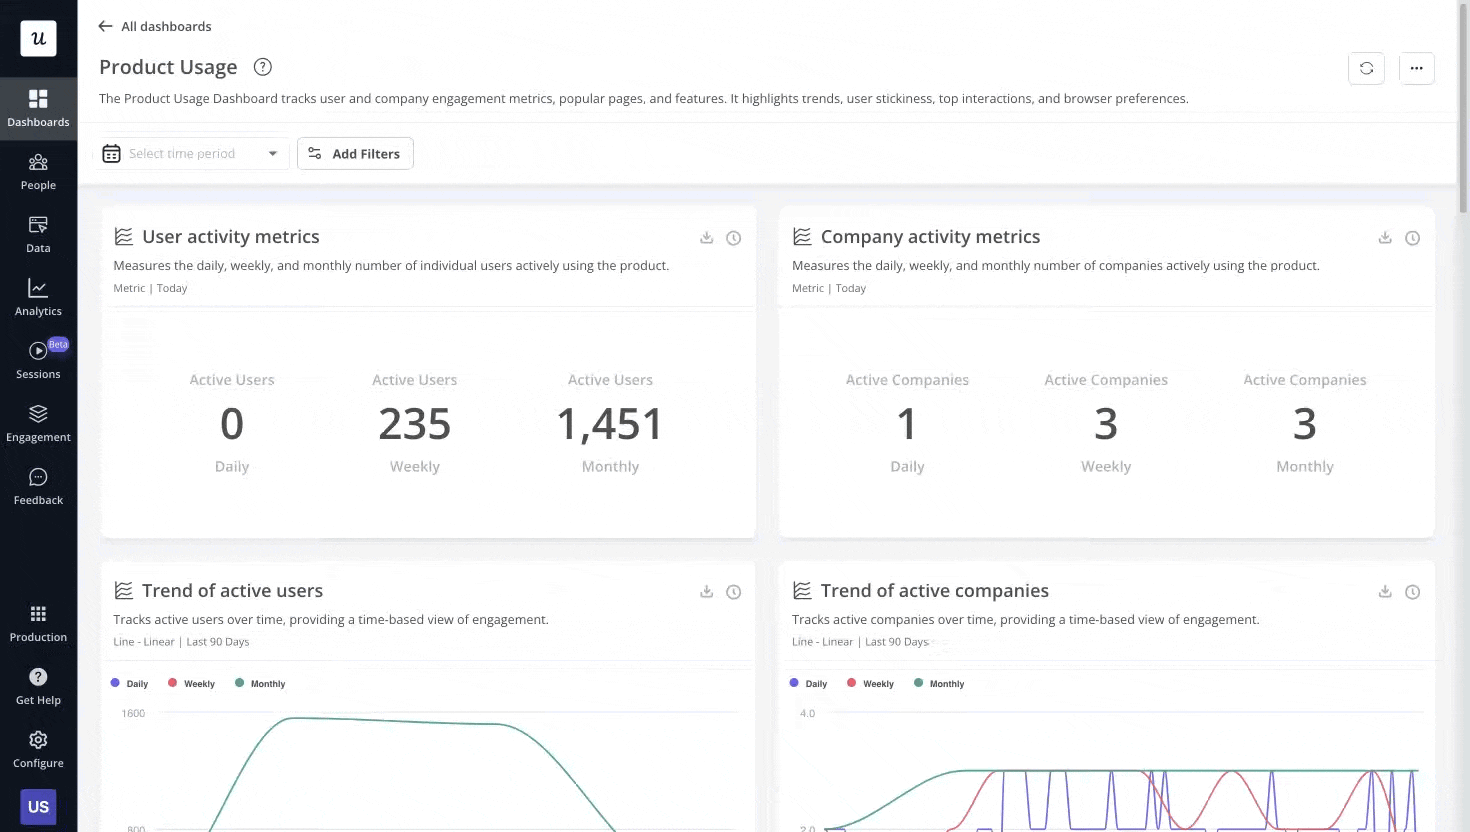
Use a product analytics tool like Userpilot to analyze behavior patterns, study support tickets, and review friction logs. Pair that with Session Replays to see exactly where users struggle, and why.
When you anchor your PRD in this kind of evidence, it stops being a list of requirements and becomes a strategic guide. This way, your team will solve problems users actually care about.
3. Define success with clear goals
Your PRD should spell out concrete, measurable objectives for the user and the business. Without this, you can’t tell whether and how well you met your product goals.
To make this simple, pair each user outcome with a business outcome. Here are some examples to get you started:
- Reduce time to complete new client onboarding by 30% (user) to increase Week 1 retention by 15% (business).
- Cut failed file uploads by 40% (user) to decrease support tickets by 20% (business).
- Improve dashboard load speed to under 2 seconds (user) to boost daily active usage by 10% (business).
Note that setting goals is only the start. You also need to measure them. Using a no-code analytics tool, you can track progress without relying on engineering.
4. Focus on a specific target audience
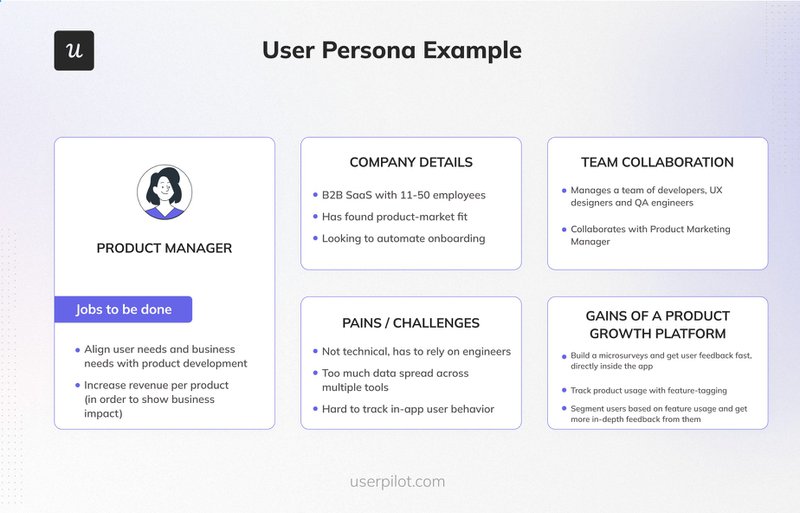
Without a clear target audience, PRD gets fuzzy, leading to wasted efforts on features nobody wants. To avoid this, lean on your customer segmentation strategy to narrow your audience to a real persona.
Ask yourself: Who is this feature for? Can I describe them in plain, everyday language that anyone on the team would understand?
Once you’ve identified the audience, ground it in observable behavior. For example:
Small marketing teams at early-stage startups who schedule social content weekly and need faster workflows.
Next, bring that “user persona” to life with a simple “user story”:
As the lead of a small marketing team, I want a one-click social template so I can schedule a week of posts in minutes.
This level of specificity ensures every requirement ties back to a real human with a defined job-to-be-done.
5. Prioritize what you will build (scope in)
Now we get to the “what.” List the core features required to solve the user problem, focusing on user-facing functionality, not technical details.
A prioritization framework like MoSCoW (Must, Should, Could, Won’t) will help here:
- Must: Onboarding walkthrough for first-time users.
- Should: In-app tips for advanced features.
- Could: Optional dashboard themes.
- Won’t: New integrations for the first target release date.
With such visibility, everyone will know what’s essential now and what can wait.
6. State what you won’t build (scope out)
To protect your team from scope creep, your PRD should be explicit about what’s not included in a release. And while at it, be specific, for example:
- V1 will not include social media integrations.
- Exporting reports is out of scope for this cycle.
- User roles and permission settings won’t be part of this release.
So, when a stakeholder later asks, “Can we also add X?”, you (or anyone in your team) can point back to the PRD. This way, there’s a cover to prevent debate. And in the long run, the effect will reduce churn and remove “shifting priorities.”
7. Visualize the solution with designs
Words can be misleading, even if you use simple language. Visuals usually prove the point much better. Add them to your PRD early.
Once you outline the requirements, illustrate them with Figma mockups, wireframes, or user flows. If you’re still in discovery, quick sketches will suffice.
Then link those files directly in the PRD, so no one has to dig around for them. When your team can see the intended experience, questions shrink, feedback sharpens, and misinterpretations disappear. This is how you turn ideas into something everyone understands instantly.
8. Document all questions and risks
If there’s anything you’re still unsure about, write it down. Use this section to capture anything that could slow the project down:
- Dependencies: e.g., “This feature relies on a third-party API.”
- Assumptions: e.g., “We expect most users to be on desktop.”
- Open questions: e.g., “What should the timeout logic be?”
Putting all your uncertainties in one place gives the team a shared to-do list. This makes blockers faster to spot and resolve, reducing the chances of last-minute surprises during development.
Now that you know the core components, here’s a simple PRD template you can plug into your workspace:
One-page PRD template example to use
I compiled all the necessary components of PRD, along with instructions on how to fill it in and examples, so you can see what the end result looks like – and make your own.
💡 Note: You can edit and drop this PRD template directly into Notion, Confluence, or Google Docs. Either way, treat it as a starting point, not a locked-in contract.
Intro
Project: [Clear, distinct project name]
Team: PM: [Name], Design: [Name], Eng Lead: [Name]
Status: [Discovery | Design | In development | Launched]
Last updated: [Date]
1. Description
Write a single sentence that explains the product in plain language. What are you building, and why does it matter?
Example: A simple dashboard that helps customer support leads track team performance in real time.
2. Background and problem statement
Explain why this project exists. What sparked it? Is it a pattern in user feedback, a drop in a key metric, or a workflow that keeps slowing teams down?
In your answers, point to any data, research, or support conversations that show the problem is real and worth solving.
Example: Support leads told us they spend up to 3 hours a day pulling reports from different tools just to understand team performance. Our recent usability sessions and 27 support tickets confirmed the same pain point. This project aims to remove that manual work and give them an instant view of their team’s health.
3. Goals
List out your high-level objectives. Keep the list short, clear, and easy for the team to remember. Include both measurable outcomes and the user experience you’d like to create.
Example (for “support team performance dashboard”):
- Centralize real-time team metrics in one place.
- Reduce manual reporting time from ~3 hours/day to under 30 minutes.
- Help leads feel more in control and less reactive.
- Reach at least 70% weekly dashboard usage among support leads.
4. Success metrics
Define how you’ll know the project worked. What should improve for users? What should improve for the business? What do we have to accomplish to ensure no negative impact?
Example (for support team performance dashboard):
- User goal: Reduce time spent gathering daily performance insights from 3 hours to under 30 minutes.
- Business goal: Increase ticket resolution speed by 10% within 60 days.
- Counter-metric: No rise in ticket backlog or drop in CSAT during adoption.
5. Target audience and user stories
Identify who the feature is for and describe them in clear, practical terms. Then capture what they need to accomplish through simple user stories. Use a “As a [user type], I want to [action], so that [benefit]” formula.
Example (team-performance dashboard):
- Primary user: Support team leads who review ticket performance daily and need a faster way to spot issues early.
- User story 1: As a support lead, I want a single dashboard showing daily performance so I can quickly identify who needs help.
- User story 2: As a support lead, I want alerts for unusual spikes in ticket volume so I can intervene before the backlog builds up.
6. Features & requirements
List only what the user will see and interact with, and make the priorities unmistakable. For prioritization, MoSCoW or a simple P0/P1/P2 scale can help.
Example (for the team-performance dashboard):
- [Must/P0] Unified performance dashboard: A single screen that shows daily ticket volume, resolution time, and team workload at a glance.
- [Should/P1] Automated spike alerts: Real-time alerts that notify team leads when ticket volume suddenly increases.
- [Could/P2] Customizable widgets: Optional modules that let leads rearrange or hide dashboard sections based on preference.
7. What’s out of scope
Call out anything that won’t make it into your project. This keeps expectations grounded and prevents last-minute requests from sneaking in.
Examples:
- Mobile app support: This release focuses only on desktop.
- Admin-level customization: Advanced settings will be evaluated after we validate the core dashboard experience.
8. Designs & mockups
Add any visual references you have so the team can see the experience instead of guessing.
- [Link to Figma prototype]
- [Link to user flow diagram]
- [Link to wireframes or low-fi sketches]
9. Open questions & risks
Use this section to call out anything that could slow the project down or affect the final product. Capture the unknowns now so the team can resolve them before they turn into blockers.
Example questions:
- How will we handle content localization for Germans?
- Do we need different validation rules for enterprise accounts?
Example risks:
- Dependency on the X team’s API, which won’t be ready until Q3.
- Possible performance issues when the dashboard data volume grows.
How to use your PRD template: A 5-step process
PRDs work best when they’re treated as tools for collaboration and alignment, not just documents to fill out and forget about. Here’s how to use yours that way.
Immerse yourself in the problem first
Before you even edit the requirements template, get close to your users’ realities. Talk to them, dig through behavior analytics, read NPS feedback, and watch session replays to see where they actually get stuck. This depth of understanding is what gives your PRD real weight.
For sharper, more reliable insights, run your research inside one product platform. This way, you can work with the same segments, cross-analyze patterns easily, and compare signals without context gaps.
Clarify your thinking in a first draft
Start by drafting the PRD on your own. Writing out the problem, goals, and core user stories forces clarity before involving the development team. Don’t worry if some sections remain blank or marked “TBD.” It’s all part of the development process.
Build ownership with early collaboration
Once you have a first draft, review it with design and engineering leads in a working session. Their feedback ensures feasibility, surfaces edge cases, and turns the PRD into a shared plan instead of a top-down directive.
Align stakeholders with a walkthrough
After the core team is aligned, walk the wider group (marketing, sales, and support) through the PRD. Don’t just share a link. Provide context, answer questions, and ensure everyone understands the “why”, the “what,” and next steps.
Treat the PRD as a living document
Update the PRD as you go. When design changes the product specs or technical constraints arise, reflect them immediately. Keeping it current ensures the PRD stays the single source of truth for the team.
Build your PRD template with Userpilot
A PRD’s value isn’t in the file, but in the clarity and alignment it creates. It guides product teams to ask the right questions early and anchor every decision in real user problems.
But that clarity depends on accurate research. Userpilot makes this easy by giving you behavioral data, segmentation, surveys, and session replays in one place.
You can validate user problems, spot patterns, and feed evidence directly into your PRD, all without writing a single line of code.
Book a free demo to try it out!
![]()
Fuel Your PRD Template with Actionable Behavioral Insights Using Userpilot
FAQ
Is a PRD template agile-friendly?
Yes. Modern PRDs, like Figma’s, support agile; they align teams on the user problem and success metrics without dictating technical solutions. This shared clarity reduces user friction, speeds up strategic decisions, and keeps the team focused while still giving engineers and designers room to iterate.
What are the common PRD pitfalls to avoid?
I’ve had my share of missteps with PRDs. Here are the big ones to avoid:
- Writing it alone: A PRD template created in isolation leads to weak buy-in, whether for old or new products. Bring design and engineering in early.
- Overstuffing the document: If it’s too long, no one reads it. Keep it tight and link out for details.
- Listing features without context: Every item should connect to customer pain points or stories. Doing so improves the user onboarding experience and leads to product success.
- Treating it as final: Your PRD should evolve as new insights, constraints, and user needs emerge.
About the author


![What are Release Notes? Definition, Best Practices & Examples [+ Release Note Template] cover](https://blog-static.userpilot.com/blog/wp-content/uploads/2026/02/what-are-release-notes-definition-best-practices-examples-release-note-template_1b727da8d60969c39acdb09f617eb616_2000-1024x670.png)