15 Product Tour Examples That Drive Activation and Why They Work


Product tours are not new. I’ve had the pleasure of creating several product tours and examining several more product tour examples.
When they first became standard in SaaS around 2016, they were novel and exciting. Ten years later, users have seen hundreds of them. As a result, you can no longer expect a product tour to be effective simply because it exists.
You also do not need to create a product tour just because others are doing the same. In fact, about 70% of tours get skipped altogether. So, how do you decide whether your product needs a tour and what to include in one?
In this guide, I answer those questions by examining 15 real-life SaaS product tour examples that work and exploring the principles that underpin them.
Why most product tours fail before they start
The first thing I do when I’m called in to examine a failing product tour is conduct a funnel analysis.
I’ve spent a lot of time staring at product tour funnels to understand why they succeed or fail. The common denominator I find across failed tours is a failure to resolve the user’s uncertainty or help them reach their goal.
For the most part, this happens for either of two reasons:
- The tour doesn’t acknowledge or address the user’s immediate goal.
- The tour is too lengthy, and the user has lost interest.
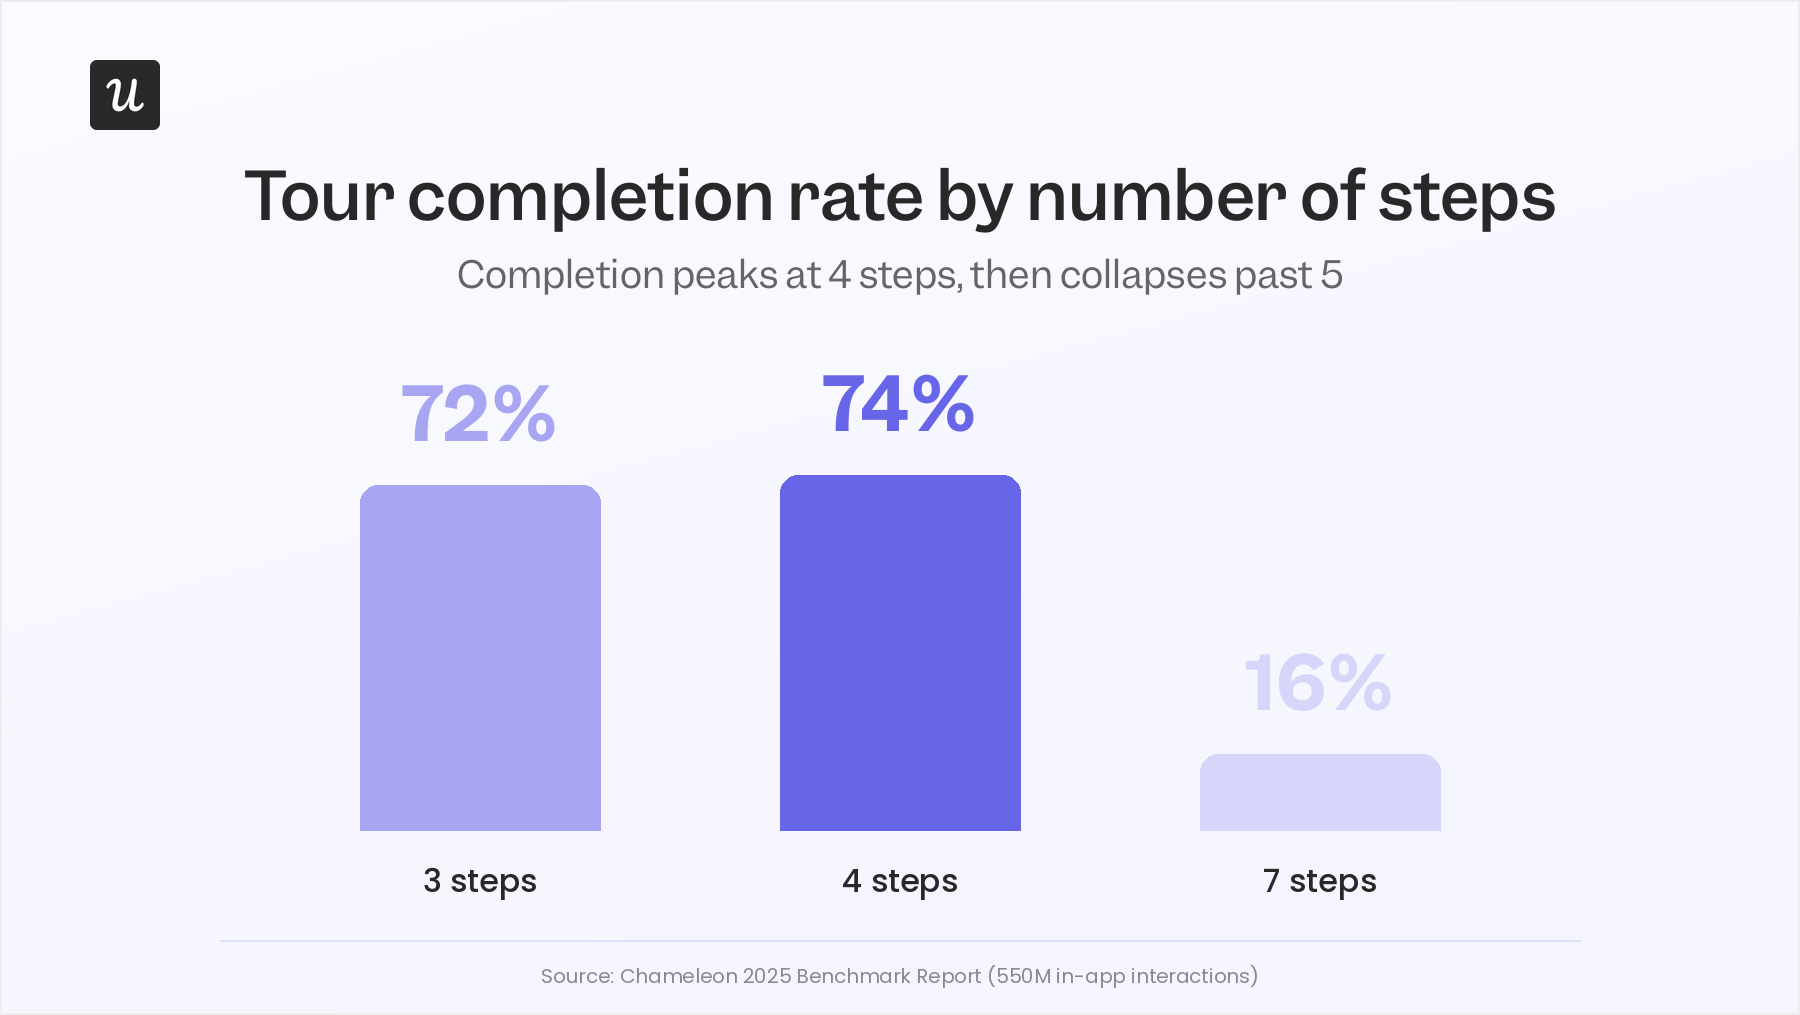
The Chameleon 2025 Benchmark Report, which analyzed 550 million in-app interactions, puts numbers behind something most of us have probably experienced ourselves. Three-step tours achieve a 72% completion rate. Four-step tours reach 74%. By seven steps, completion drops to just 16%.
Most teams look at data like this and conclude they should make their tours shorter. That’s true, but I think it misses the more important question: why did the tour need seven steps in the first place?
Without addressing that question, they find themselves in the same position tomorrow: a new tour is way too long, users skip it before the halfway mark, and activation numbers crash. This is because activation failure is rarely ever a product complexity problem.
When Userpilot launched its email feature, for example, I spotted a sharp drop at the domain verification step in the funnel. It was not obvious what to do next, and that friction was costing us activations we should not have been losing. Within a few hours, I built a contextual tooltip directly in Userpilot, highlighting the correct steps to follow.
I shipped it without involving the dev team. Drop-off closed within days, and the fix took less time to implement than it had taken to diagnose.
That is the thing about most tour failures: the problem is rarely a missing feature or a broken product. The tour is solving for the wrong moment, or solving for the product team’s organizational politics instead of the user’s uncertainty.
Before you build a product tour, ask these three questions
Most teams go straight from “we need a product tour” to opening the tour builder. I’d argue there are three questions worth answering first, and skipping them is how you end up spending days or months building something that gets dismissed at 50%.
Is your UX clear enough that users don’t need one?
For early-stage products, I think teams often reach for product tours too quickly.
If a user can’t figure out what to do next without a tooltip telling them where to click, I’d question whether the problem is onboarding at all. More often than not, it’s a sign that the product isn’t as intuitive as the team thinks it is.
That’s why you’ll often see founders push back on onboarding projects and tell the team to improve the product instead. In many cases, they’re right.
Where I think tours start becoming valuable is when the product grows beyond a handful of features. Different users have different goals, and not everyone needs to follow the same path. At that point, onboarding stops being about explaining the interface and starts being about helping users find the quickest path to value.
And most early-stage products haven’t reached that point yet.
Do your users actually need one, or are you assuming they do?
In my experience, product tours fall into one of two buckets: they help in a specific context, or they have no measurable effect at all.
The worst version of this loop is building a tour, watching half your users skip it, deciding it needs more polish, and burning another sprint refining a thing that was never moving the needle in the first place.
What I’d do instead and what I tell anyone on the fence is run an A/B test with a sample before you commit to a redesign. One cohort gets the tour, one cohort doesn’t, and you compare activation rate, time to value, and support ticket volume across both.
If there’s no measurable lift, the tour isn’t the lever, and you’ve just saved yourself a quarter; if there is, you know exactly what’s worth iterating on.
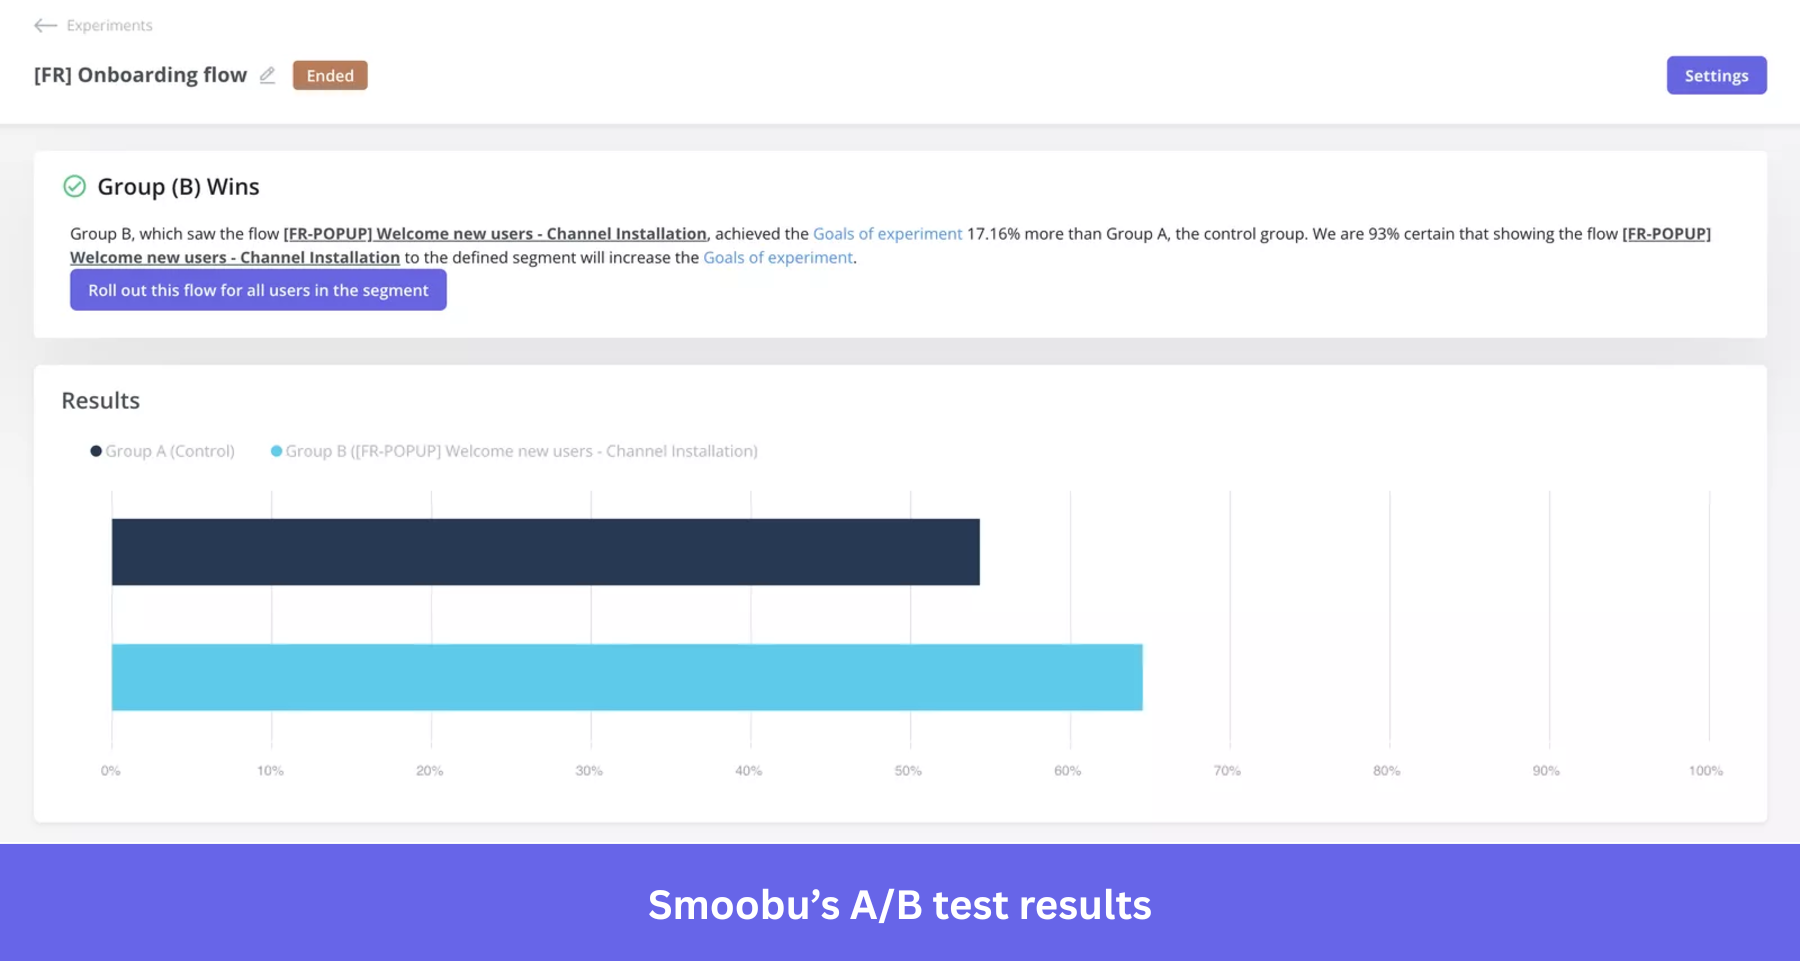
This is what Smoobu did. They tested two variations of their onboarding flow against each other and shipped the winner, which drove a 17% increase in conversions in their French market. The reason it worked wasn’t a better-designed tour. It was that they knew which version was better before they shipped it widely.
This is the part where Lia, our AI agent, does the work I’d otherwise procrastinate on. I’m bad at remembering to check the funnel a week after a test ships, and worse at remembering to check it again the month after.
Lia watches the cohorts in the background and pings me when there’s a real signal worth acting on, with the reasoning attached, so I’m not staring at a chart trying to figure out what changed.
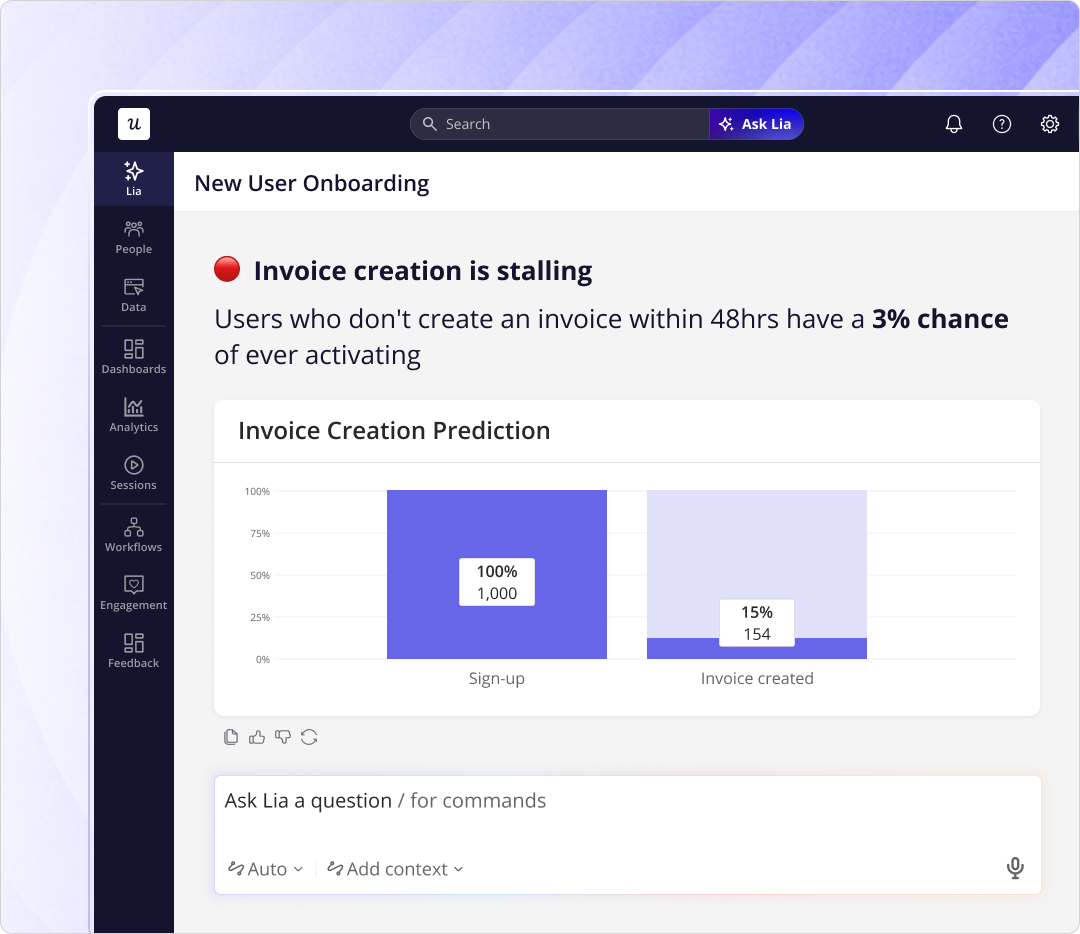
That’s most of what I want from an AI layer at this point: someone to do the slow, recurring work I keep promising to do and then forgetting about. Build the test before you build the redesign. That order is what keeps you from optimizing the wrong thing for three months.
How much choice should users get in the directions they receive?
If you choose to build a tour anyway, pause to consider how much control users should have over what directions they receive, and when and how they receive them.
What I can say is that my experienced PMs agree on one thing: the best default is not a mandatory tour, but a choice.
Skippable tours outperform mandatory ones by around 25% upon completion because users who feel in control are more likely to stay engaged. The dismiss option should never feel punishing, and users should always be able to return to the tour whenever they choose.
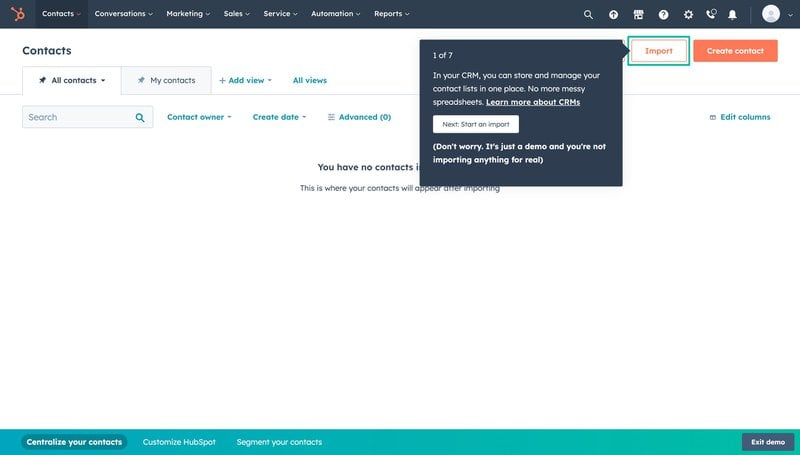
You can take this one step further by offering users three options from the start: talk to someone or book a demo, take a product tour, or explore on your own.
If they choose to explore on their own, you can still make the tour available on demand using tools like Userpilot’s resource center. This way, when the user gets stuck while actively working towards a goal, they can return to take a relevant tour. At that time, the tour will be more useful, and the user will be more engaged.
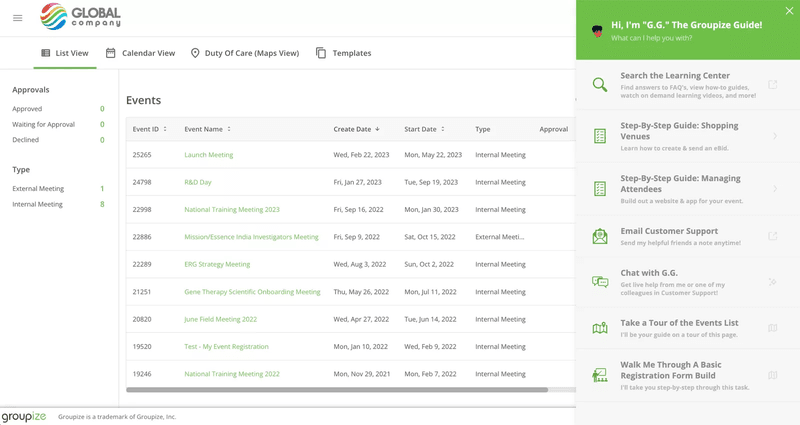
That’s the option one of our customers, Groupize, went with, though they had to learn it the hard way first.
When Justin Peticolas, their Manager of Implementation and Onboarding, first launched G.G. (Groupize Guide, their gamified Siri-style onboarding assistant), they had her pop up on every page. Users told them directly that it was a bit much. So instead of pushing G.G. into every screen, they tucked her into the resource center so users could summon her when they wanted help.
The result was qualitative and measurable. G.G. even ended up shortlisted for the Skift Idea Awards 2022, which is the kind of thing that only happens when users like the thing you built.
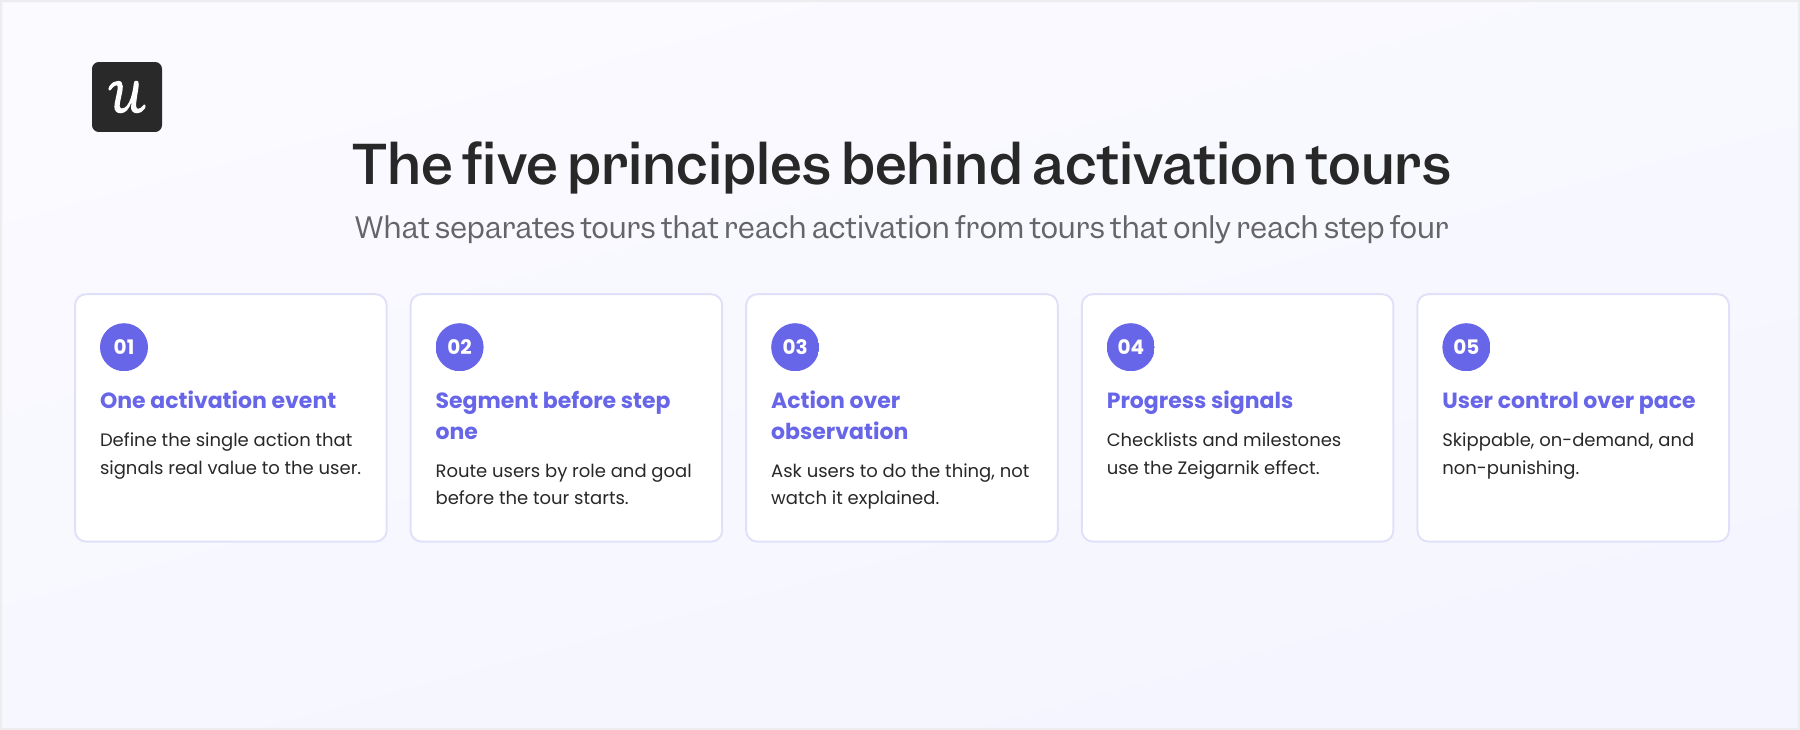
The five principles behind product tours that drive activation
There are five principles I’ve found that underpin the most successful product tours.
To build an effective tour, you must understand these principles and apply them to your product. Once you understand these principles, you’ll understand why the most successful tours look alike, even when the products are very different.
In this section, I examine each of these principles using real-life SaaS examples.
Principle 1: Anchor everything to one activation event
Every tour that works has a single north star: one action that signals the user got value.
UserOnboard founder Samuel Hulick framed the underlying logic this way: “People don’t want to use your software. They want to be awesome at what it helps them do.”
That “thing” they are trying to be awesome at is your product’s activation event. The most successful product tours I’ve seen do not actually tour the entire product. Instead, they focus on a single activation event built around the user’s goals.
Userpilot’s feature adoption data backs me up on that, too. The products with the highest adoption rates have tightly scoped onboarding.
Let’s see how that works in practice:
Loom
Loom’s activation event is the first video recorded. Every step in the tour points toward pressing Record, with no product showcase and no feature inventory: just the shortest path to the moment where users understand what Loom feels like in use.
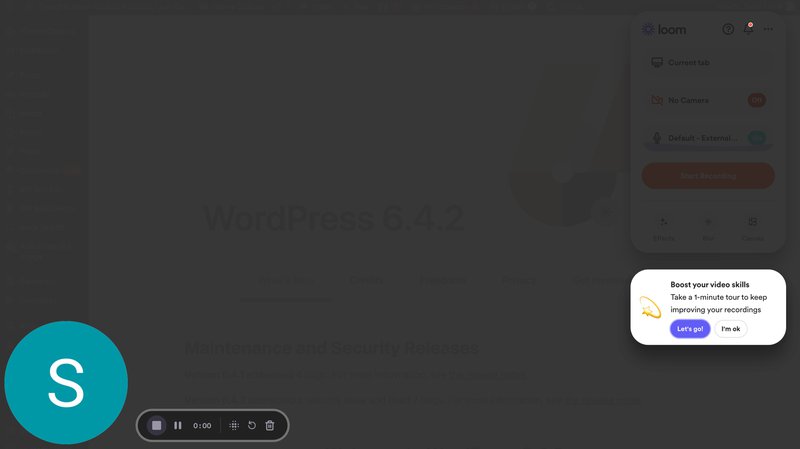
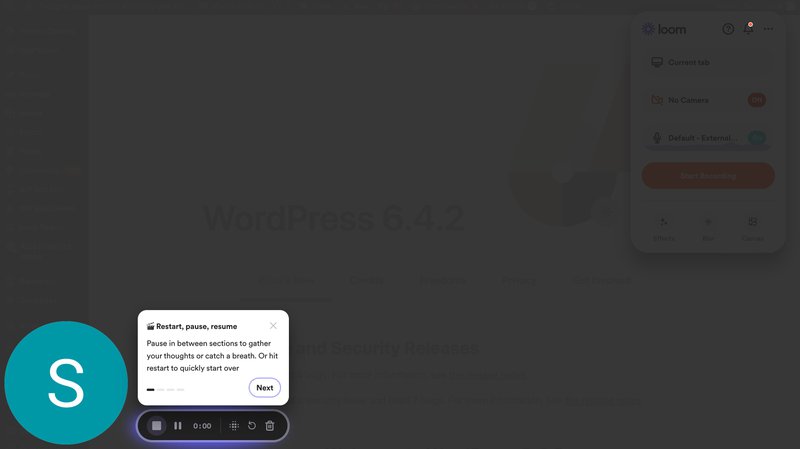
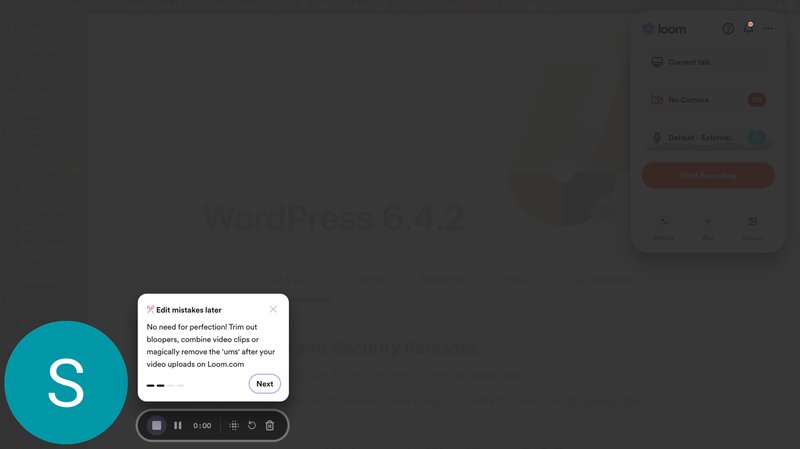
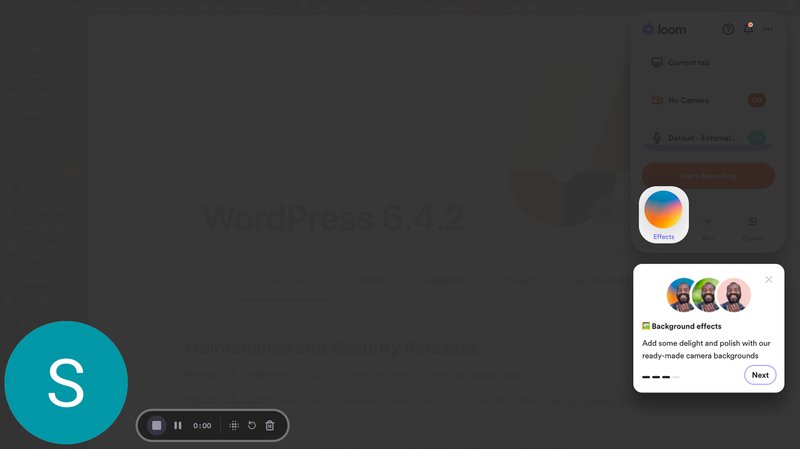
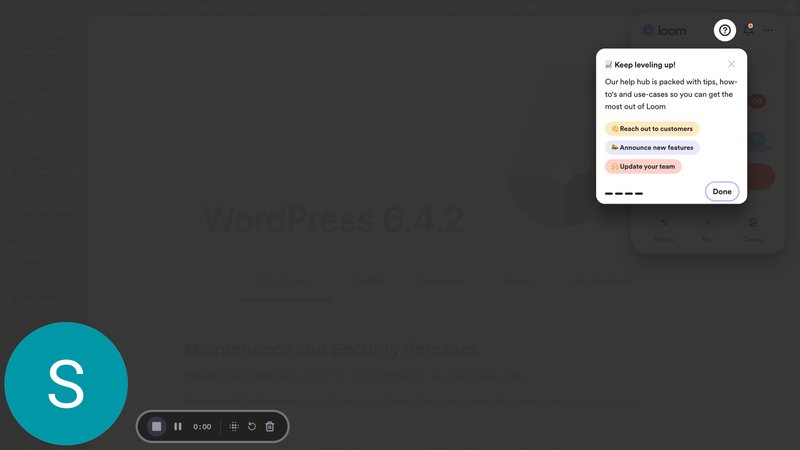
Notice how short the tour is? That’s deliberate.
Imagine if Loom decided to showcase its video editing tool suite as part of this tour. The tour gets longer, the user feels overwhelmed halfway through, and they never reach activation. By focusing on recording a video instead, the tour is a lot more useful to first-time users.
Rocketbots
I love the Rocketbots example for products where activation requires the user to complete a series of actions. They included the tour within a list of items the user needed to complete. Users who complete the tour immediately have to create a channel by repeating the actions described in the tour.
Importantly, completing every task on the checklist led the user toward one aha moment: creating a functioning workspace.
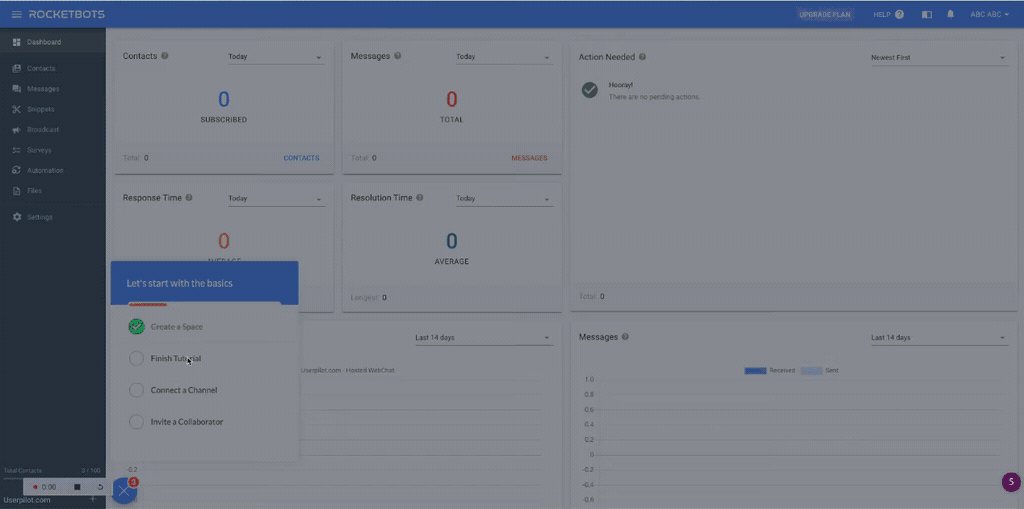
The result was striking. Shortly after they launched this checklist and tour, Rocketbot’s activation rate rose from 15% to 30%, conversion grew from 3% to 5%, and MRR increased 300%. Those results came from structural alignment: every step pointed at the same destination.
You can read the full Rocketbots case study here.
Google Analytics 4
GA4’s activation challenge was even more unusual. The product replaced Universal Analytics after 15 years, which meant onboarding wasn’t introducing something new, but overwriting established user habits.
For GA4, navigation confidence was the activation event. They needed users to confidently say, “I know where to find what I need,” after taking the tour.
Considering the circumstances, I can excuse their choice of an 8-step tour. The tour takes users from Home through Reports, Explorations, and Admin using contextual tooltips, with each step built around orientation rather than feature mastery.
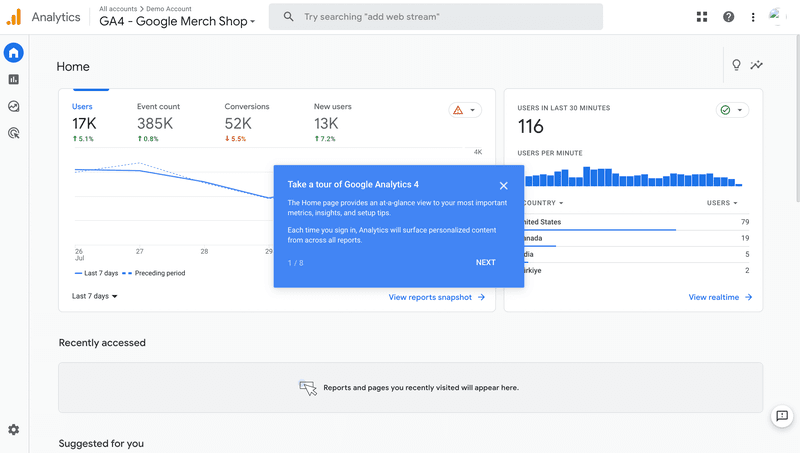

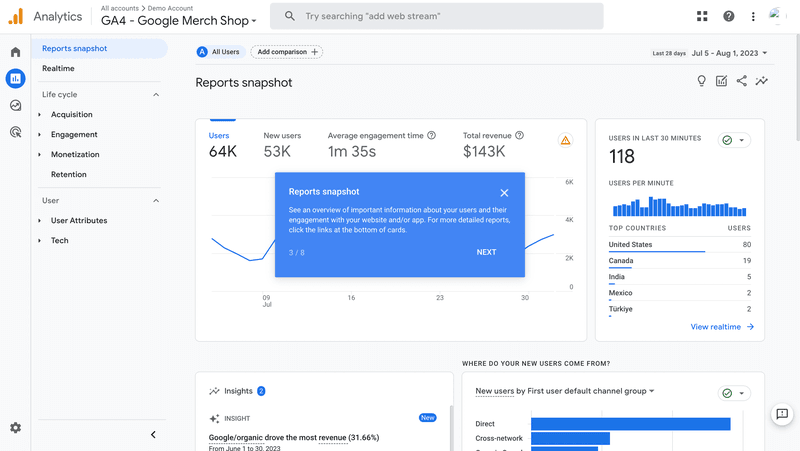
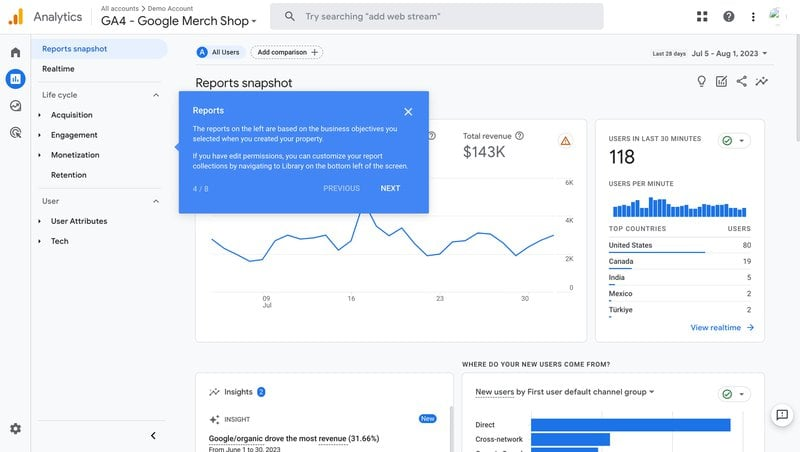
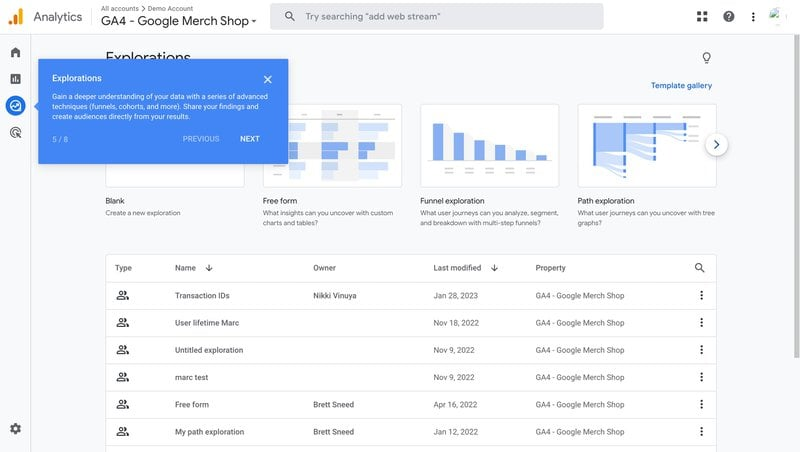
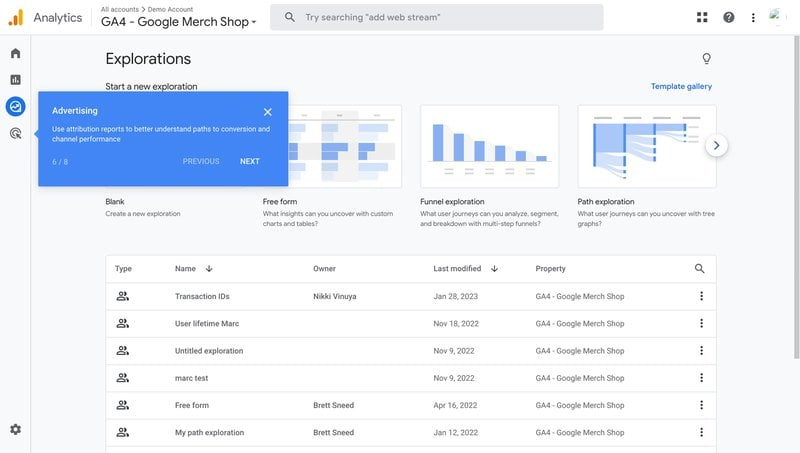
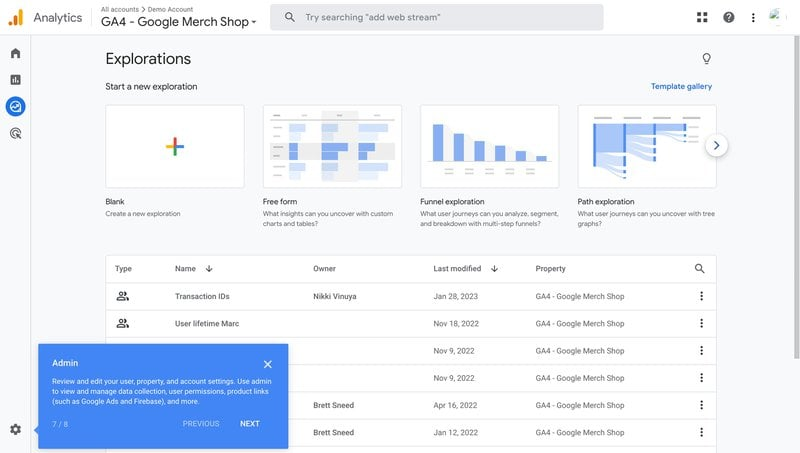
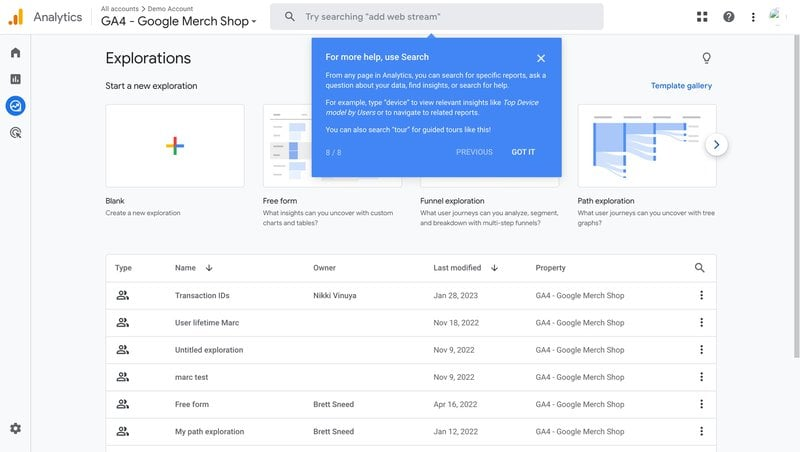
For products with genuine complexity, scoping the tour to “knowing where things live” is a principled decision and an activation goal itself. Skill-building can come later, through actual use.
Principle 2: Segment users before step one
This principle is non-negotiable for products with multiple potential use cases. A tour that starts before knowing who the user is and why they’re there will route at least some of them down the wrong path. With multi-role products like this, I never skip the opportunity to collect data via welcome surveys or the sign-up page and route users to role-based flows.
Whenever I think about this principle, it comes down to one question: “What’s the user here to do?” The answer to that question will define the flow they get.
I love Userpilot’s user segmentation tools for exactly this. It lets you define your segments around user goals and design the right flow for each one. You can then create a welcome survey in Userpilot that triggers the right tour depending on a user’s response.
Notice how each of these examples follows that principle.
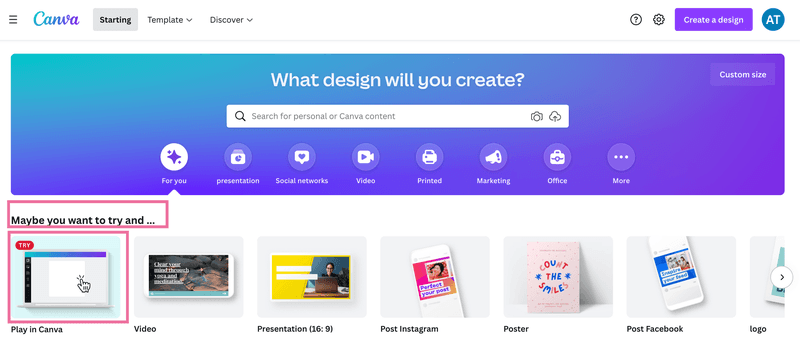
Canva
Canva’s onboarding stacks three distinct mechanisms, each doing separate work. SSO login removes the signup friction. A short survey immediately after login personalizes the dashboard before the user sees any product feature.
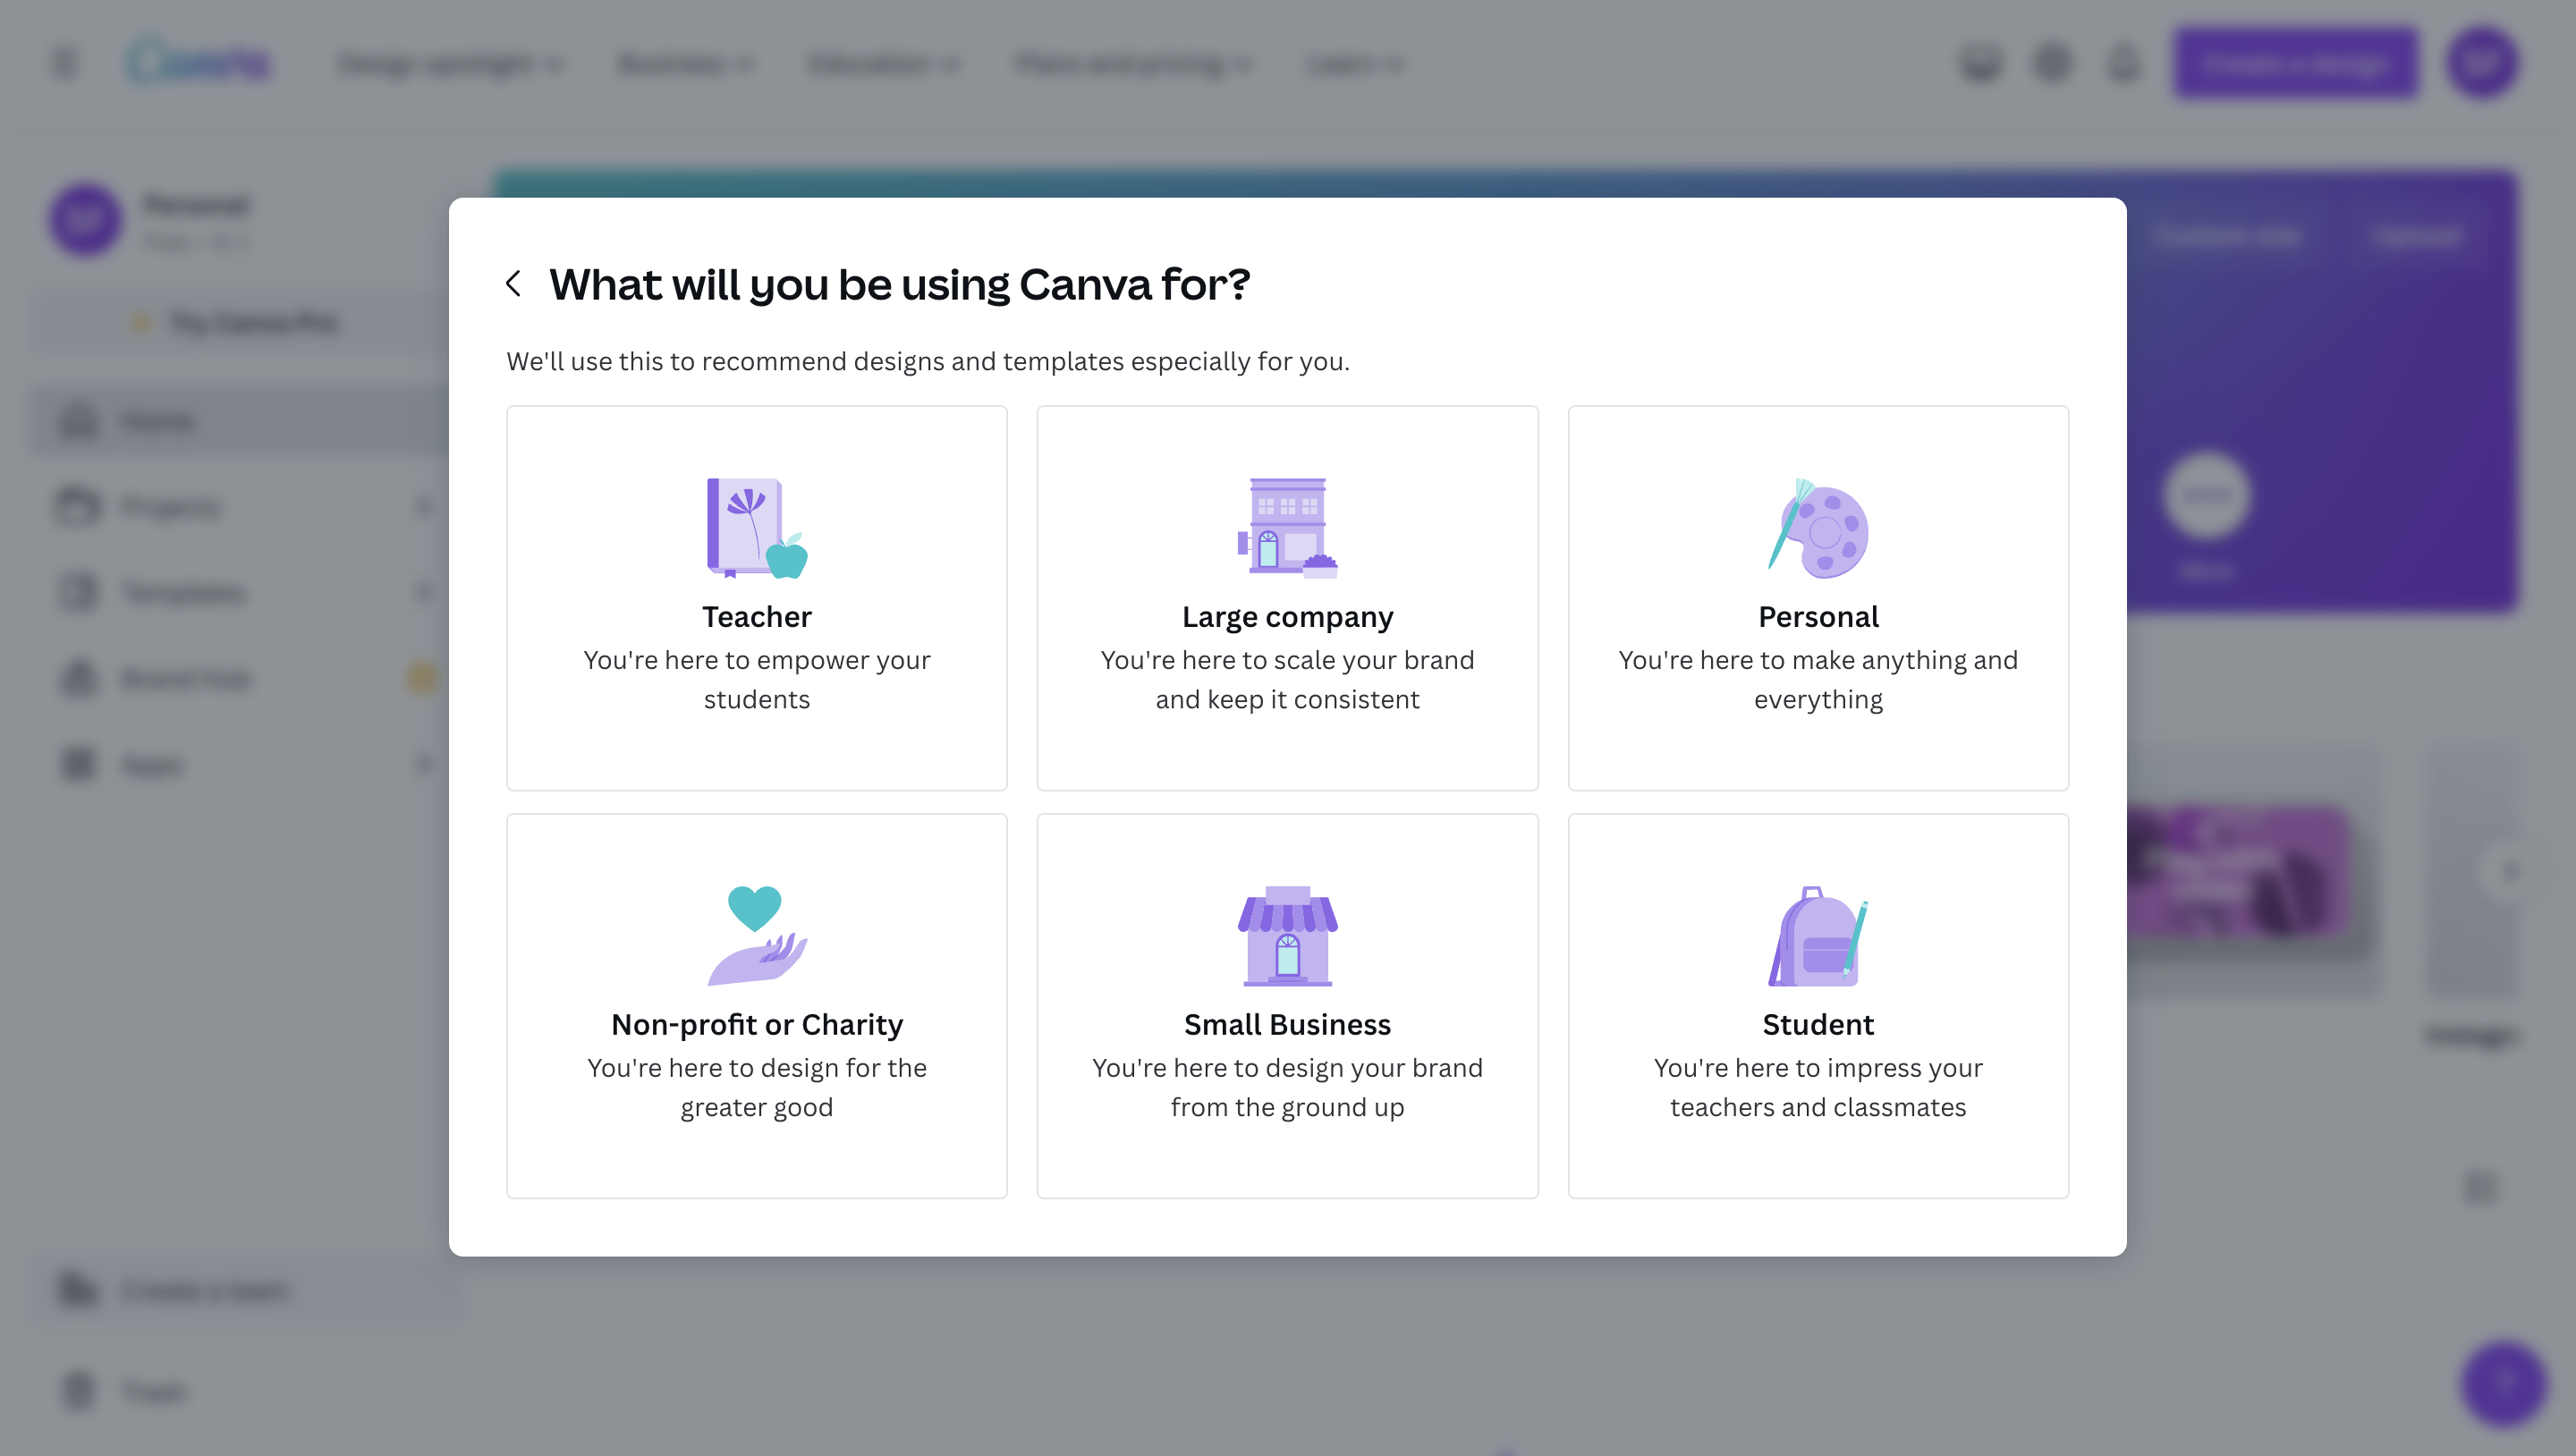
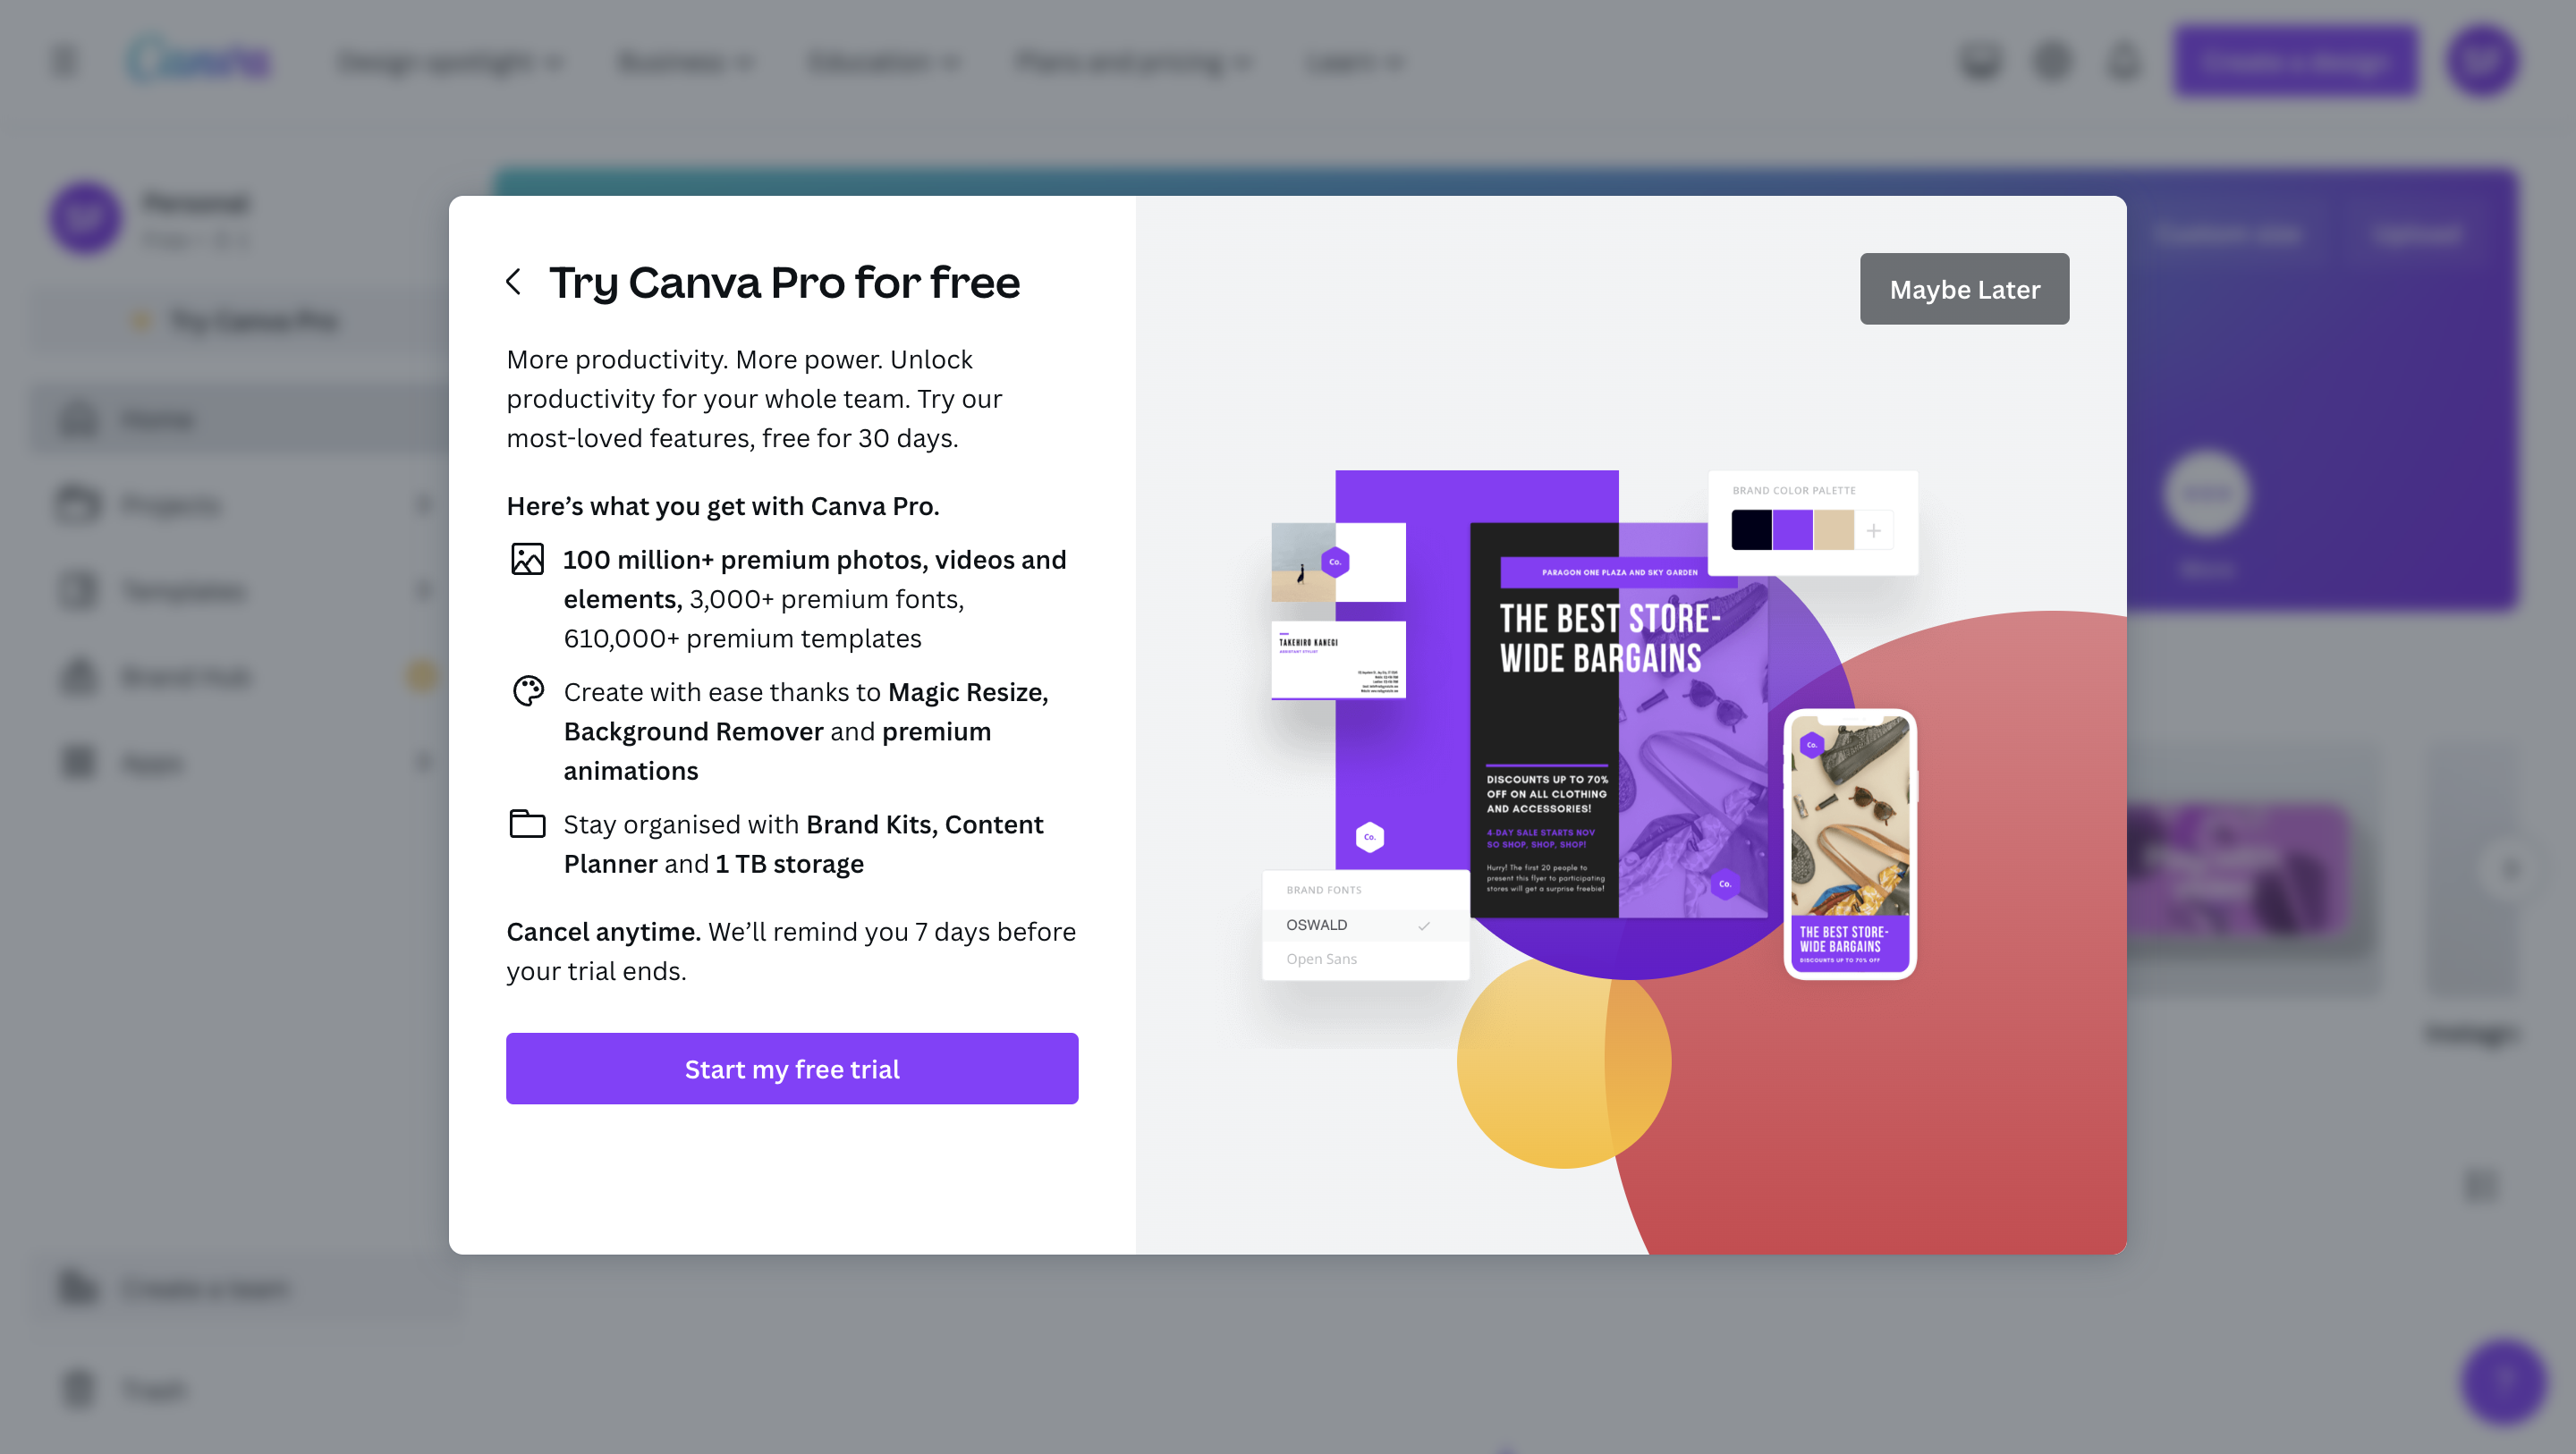
There’s so much I love about this flow beyond even the segmentation. For example, do you notice how Step 3 introduces a reverse trial to let users test Canva Pro from day one? This reframes the eventual downgrade as a loss rather than a saving.
Pairing segmentation with a premium-first trial means the user’s first experience is already personal and already at full product capability. That combination does a lot of work in the first five minutes.
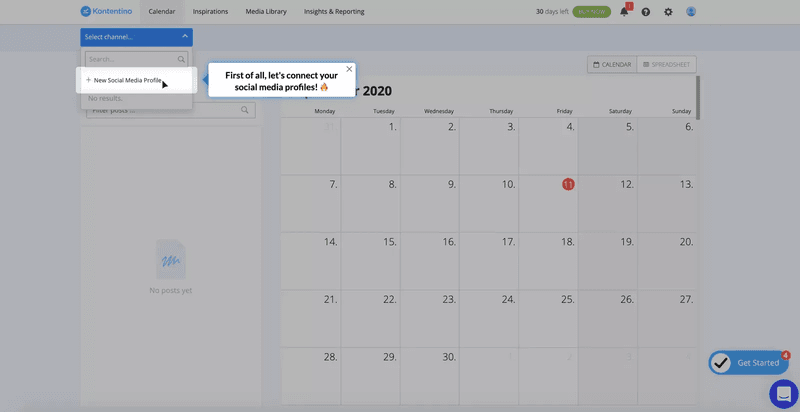
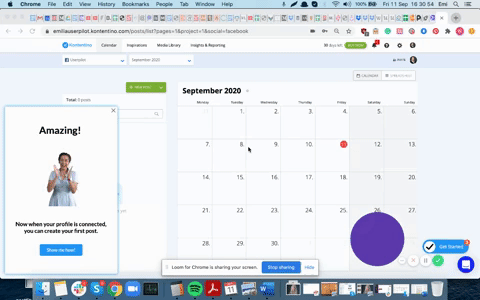
Kontentino
Kontentino’s welcome survey segments users by role before routing them into a tour scoped to their specific goal. On the next screen, the introduction of Hana from Customer Success adds a human-presence signal early in the flow.
Finally, contextual tooltips walk users through connecting their accounts, and celebration GIFs mark each task completion.
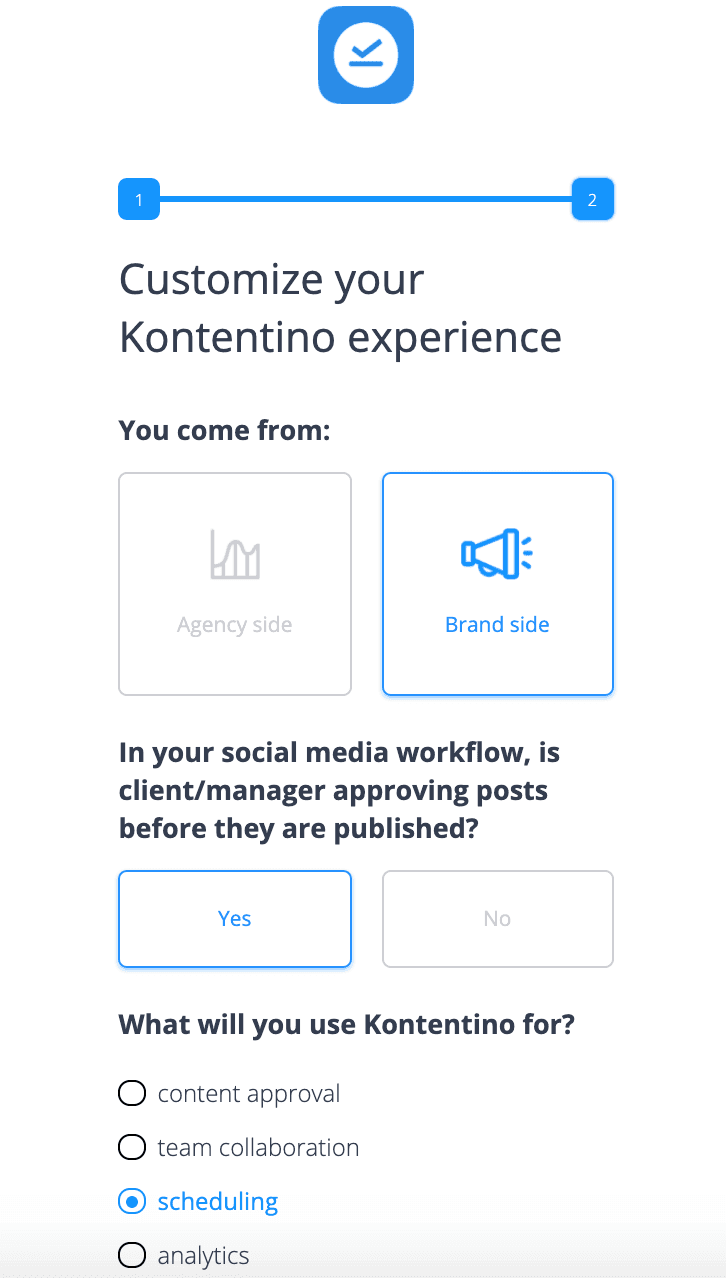
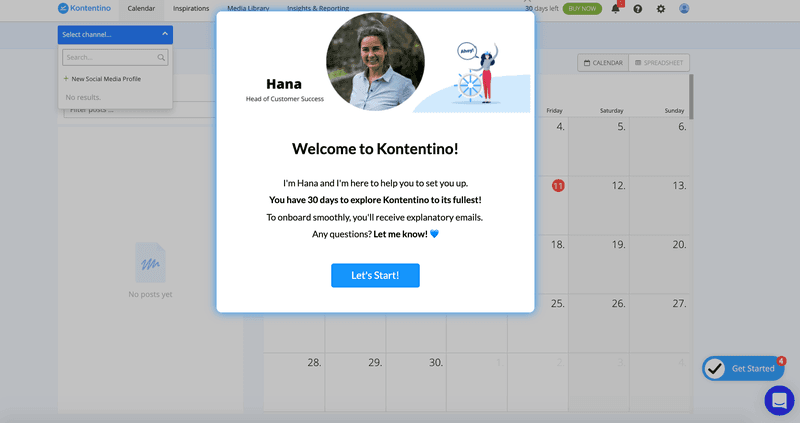
The result? Within the first month of implementation alone, Kontentino saw a 10% lift in activation.
The structural lessons are even more striking. Kontentino’s winning formula was sequencing: survey, human introduction, tailored task-by-task tooltips, and, finally, celebration at completion. Each step has a distinct job, but all work toward the same goal.
Read the full Kontentino case study here.
RecruitNow
RecruitNow operates across European markets, which means localization is a segmentation decision, not a translation task. A user reading onboarding content in their second language does not get the same experience as a native speaker. In B2B, that friction compounds into slower activation and higher support volume.
So, RecruitNow decided to treat language as a routing variable, the same way others would treat role or company size. Userpilot’s localization feature enabled RecruitNow to deliver video walkthroughs and self-service resources in multiple languages without any custom engineering.
The result was a dynamic flow that saved RecruitNow over 1,000 customer training hours and helped them scale into Europe successfully.
Full story in the RecruitNow case study.
Principle 3: Make users act, not just watch
If I were to propose one principle as the holy grail of product tours, it would be this: make users act, not just watch.
Passive tooltip sequences, where users click Next and watch the product demonstrate itself, teach almost nothing. Users’ attention shifts from the content to the next and exit buttons. As a result, dropouts from passive tours are high, reflecting boredom with the format rather than confusion about the product.
Action-based tours break that pattern by requiring users to complete a real task before the tour advances. Userpilot’s interactive walkthroughs use driven actions for exactly this: the flow waits until the user completes an action before moving to the next step.
This principle holds even if you were to use an AI onboarding agent. Airtable’s Omni-Assistant, for example, lets users interact with an AI agent during their onboarding. They can explore features through conversation and trigger actions without following a linear sequence of tooltips.
Whether you use driven actions, a demo sandbox, or an AI agent, users who interact with your product will always outperform those who watch someone explain it or who only click “Next.”
These examples show just how that works:
Impala
Impala’s segmented tour ends with a Driven Action: adding funders to a prospect list. A welcome modal establishes context, tooltips explain Suggested Funder and Match Score, and then the tour asks the user to use the feature it just explained. That action is the activation event, wrapped into the tour’s final step rather than left for later.
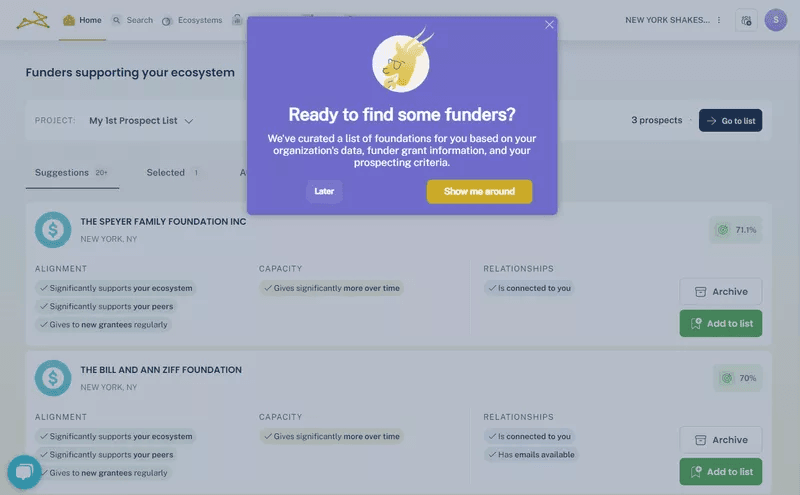
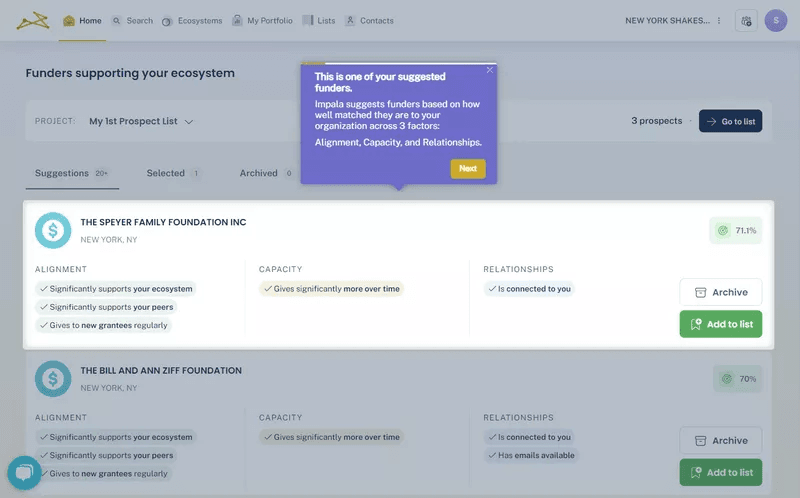
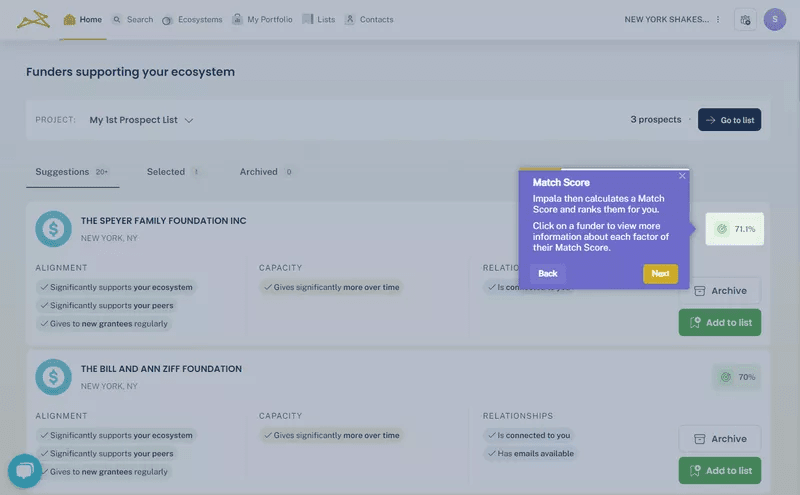
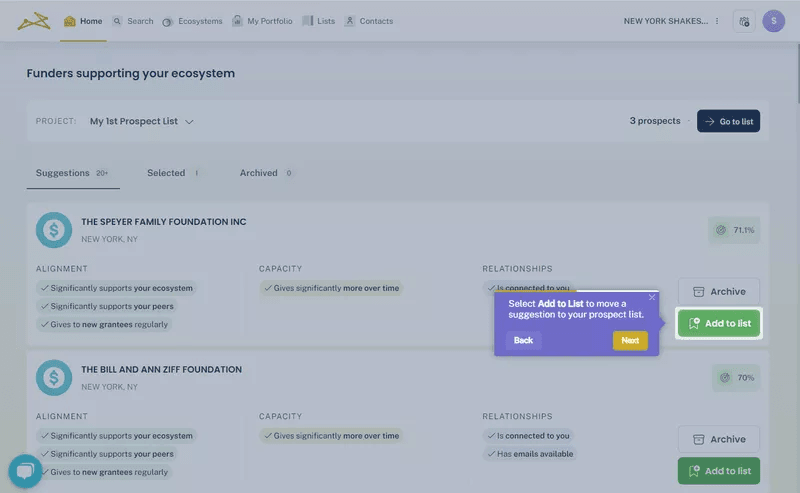
Closing the loop this way matters. A tour that ends with an explanation without asking the user to do anything has done half the job. Impala closed it, and activation doubled as a result.
Grammarly
Grammarly’s demo document is the tour. Users do not read about how to fix grammar; they fix grammar. The onboarding drops new users into a pre-seeded document with errors and lets them use the core feature to correct it.
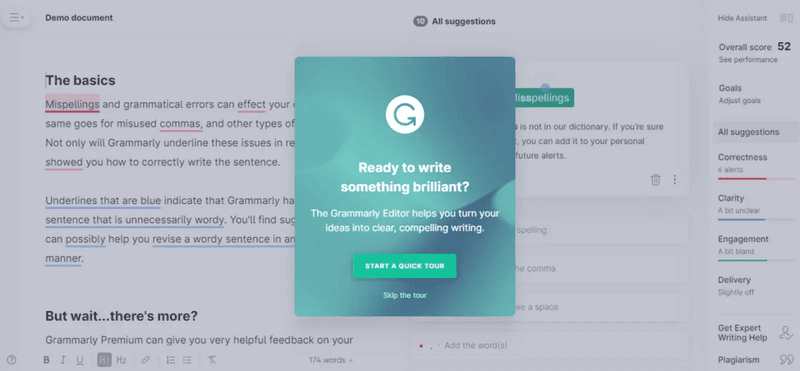
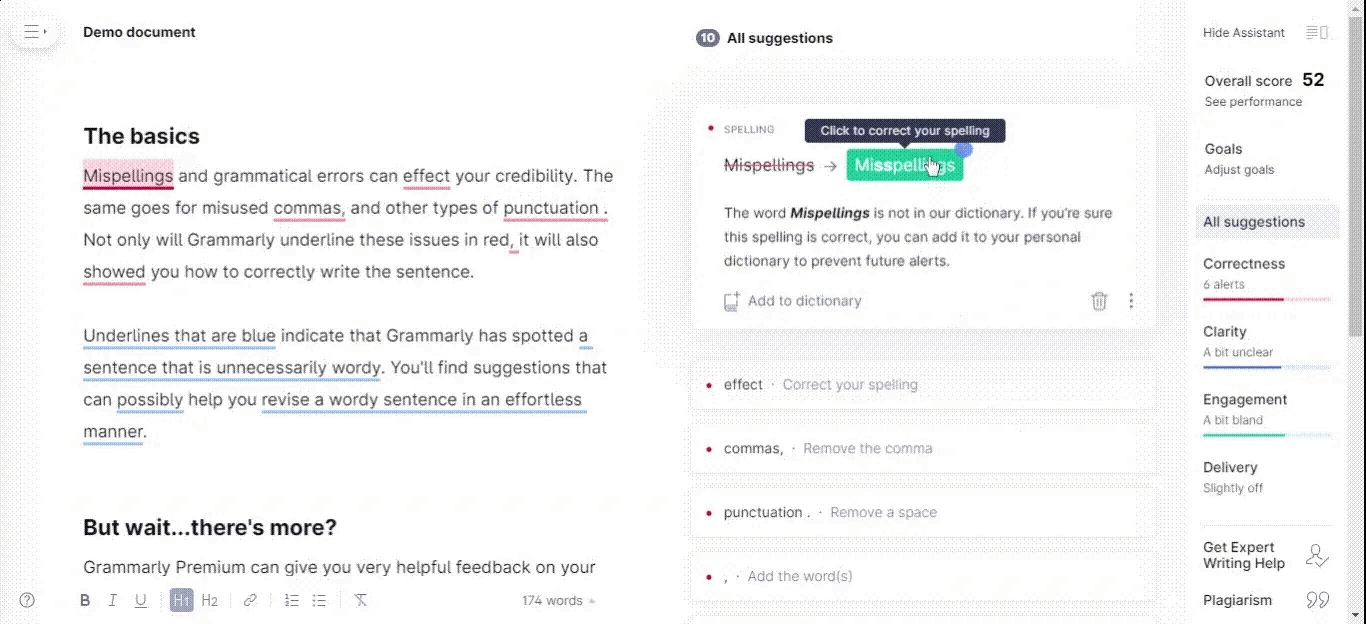
For Grammarly, the tour and the activation event are the same thing. Users who correct the demo document have already gotten value before they have touched their own writing, and that experience is significantly harder to forget than a tooltip walkthrough of the same feature.
HubSpot
HubSpot and Grammarly follow exactly the same playbook, but for different reasons. HubSpot’s CRM features are vast and sensitive. For new users, trying to figure out how the CRM works using live data can be devastating.
So, HubSpot creates a sandbox instead: a pre-populated demo account where users can try the CRM features at their own pace. Actions that are otherwise irreversible don’t matter in this environment, allowing users to build confidence before they touch real customer data.
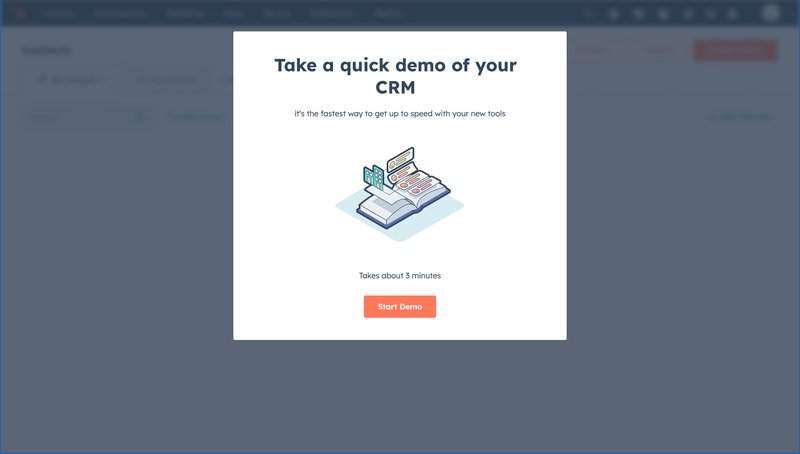
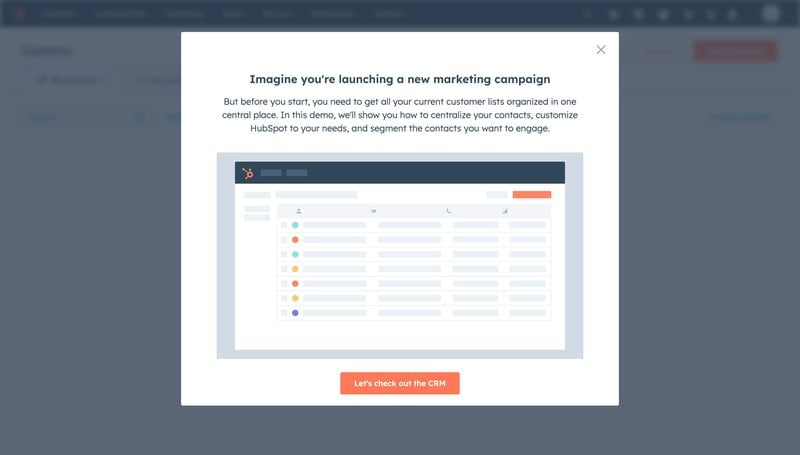
For complex products where users fear making mistakes in a live environment, making the demo the tour is my number one recommendation. I’d also suggest embedding an on-demand resource center that provides contextual help to users, based on the page they’re on.
Principle 4: Signal progress (optional, but worth it)
Progress signals, including checklists, completion bars, and milestone markers, are the most debated variable on this list. Some products activate users without them entirely, and there is no universal evidence that adding a checklist or progress bar improves every tour.
What is well-documented, however, is the underlying mechanism: people are pulled toward completing things they have started, and the closer they get to the end, the stronger the pull. So, by giving them a finish line to aim for, you tap into that desire to complete things. This sense of achievement is even greater when you celebrate them at the end of the process.
And this is not just a personal opinion. Developers and PMs consistently share experiences in which including a fake progress bar that doesn’t reflect actual progress reduces perceived wait time and abandonment. The signal works because users believe it is connected to something real, even if it isn’t.
The result is the same when you know the actual progress level. An onboarding checklist tied to real activation milestones, for example, motivates users to complete it. Similarly, a lengthy tooltip tour labeled by the number of steps left will outperform one lacking any such labels.
Let’s see this in practice:
Sked Social
Like many examples in this article, Sked Social’s onboarding flow marries a few principles. For example, they give users a clear choice to self-onboard or book a call with the team (more on that soon!). They also allow users who wish to self-onboard to select from three activation events.
What I’m most interested in, though, is what happens after the welcome screen. Users who choose the self-service path see a checklist, with a progress bar showing real percentage progress. Gentle nudges guided them through each step, and at the end of the list, users received a celebratory message.
After creating this flow, Sked Social saw a 3x lift in conversion rate. The full breakdown is in the Sked Social case study.
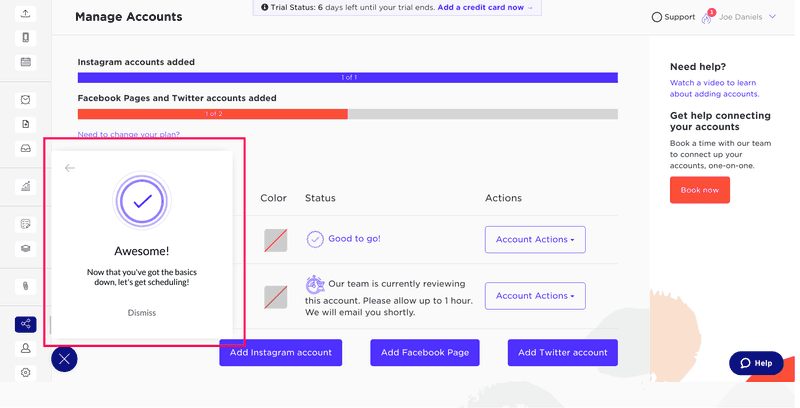
Attention Insight
Attention Insight combined two of the five principles: users had to act to progress, and they could always see how far they were from completing the process.
The checklist-progress bar combo made it clear what the user had to do and how far they were from the end. Clicking each checklist item took users to the target page, embedded with Driven Action tooltips and accessible video tutorials from a resource center designed to handle edge cases.
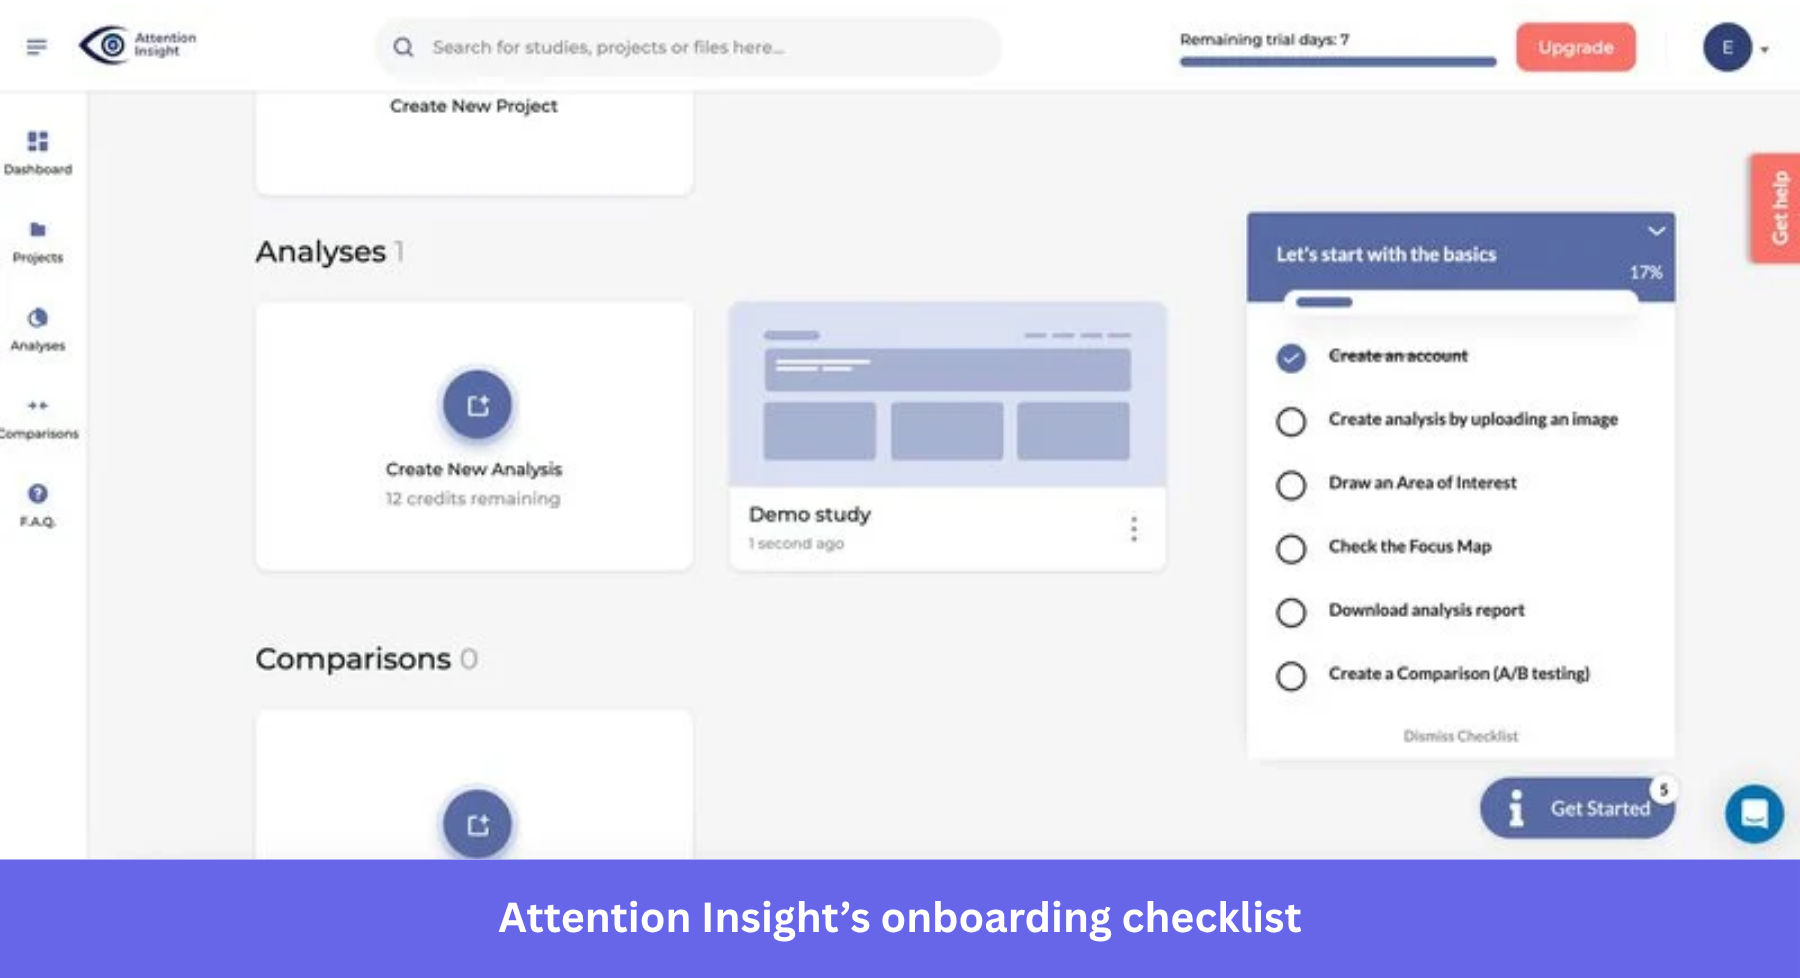
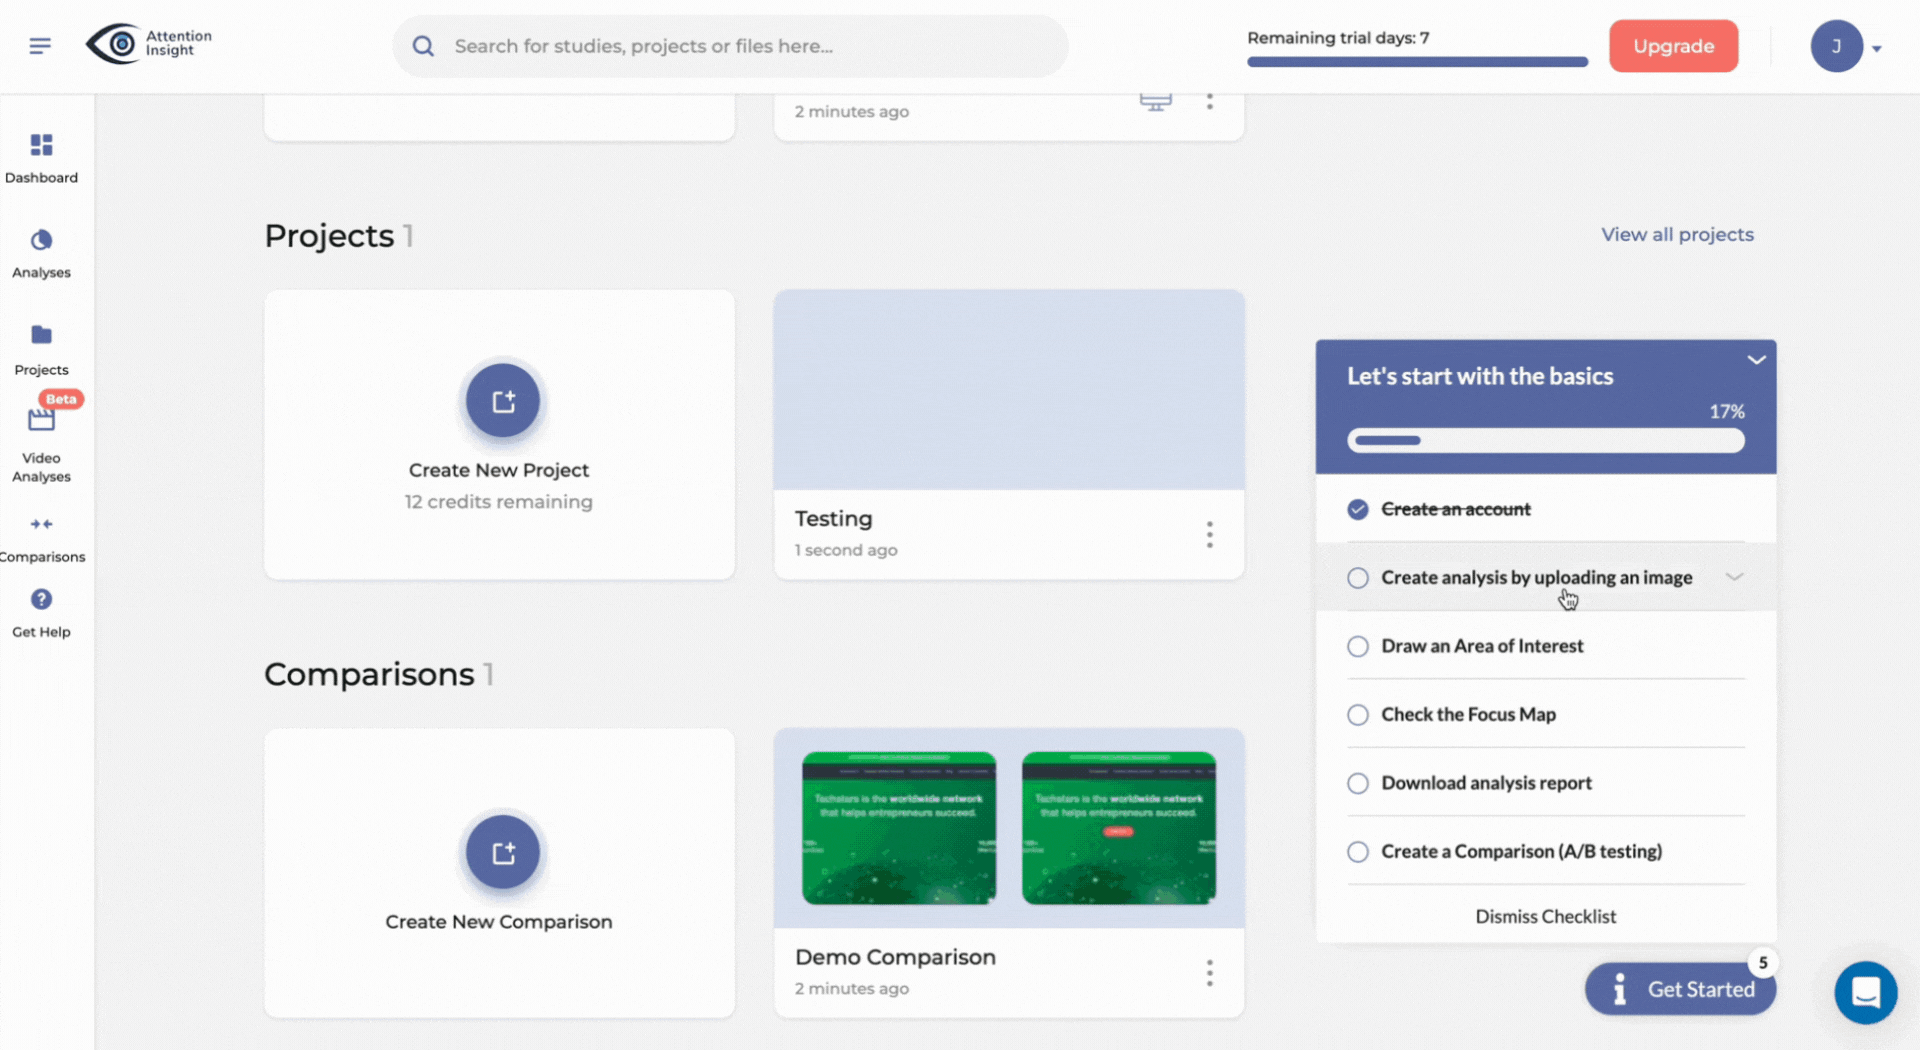
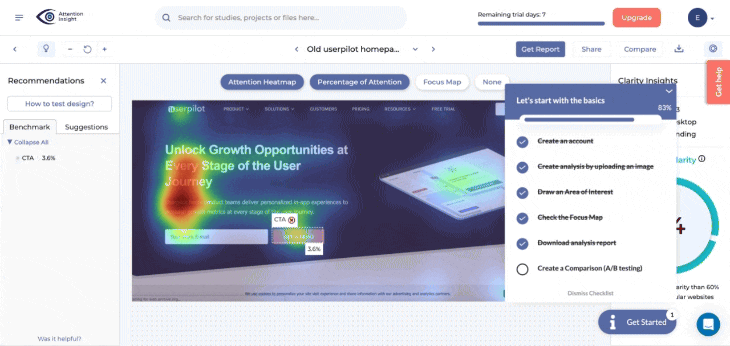

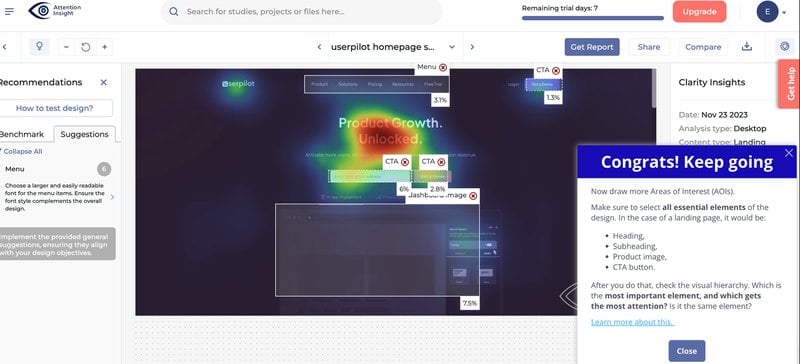
By the end of the flow, users had created their first analysis and tagged an area of interest. Little wonder, then, that the activation rate for both events jumped by 47% and 83%, respectively. Read the full numbers in the Attention Insight case study.
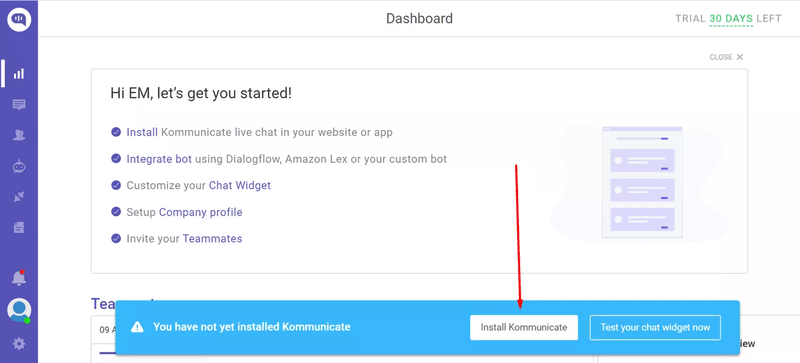
Kommunicate
Kommunicate also provided a checklist with a progress bar. Some of these items were tied to an action, while steps requiring detailed guidance included tooltip tours. In addition to both, they included a banner for the highest-priority first action (install the tool).
![]()
After this was launched, Kommunicate’s Chat widget customization completion hit 86%, feature usage lifted 3%, and adoption rate rose 4%. Read the Kommunicate case study here.
Principle 5: Give users control over pace and depth
Not every user who signs up is ready to be onboarded on your schedule. Some skip the tour on day one and come back a week later when they are actively trying to accomplish something in the product. Others are switching from a competitor and do not need the basics explained at all.
Skippable tours outperform mandatory ones by around 25% on completion, and that number reflects readiness more than preference. In fact, I find that users who feel in control of their experience are more likely to stay engaged than those who don’t.
Let’s see some examples of this:
Callbell
Callbell’s most complex onboarding step, testing a chatbot via browser or QR scan, required users to see the action performed before doing it themselves. Text guidance alone was not enough to carry that step without generating support tickets.
So, Callbell embedded a tutorial button. Users who need help can click it to watch a video showing how the feature works. Others who are familiar with similar features can skip the tour altogether.
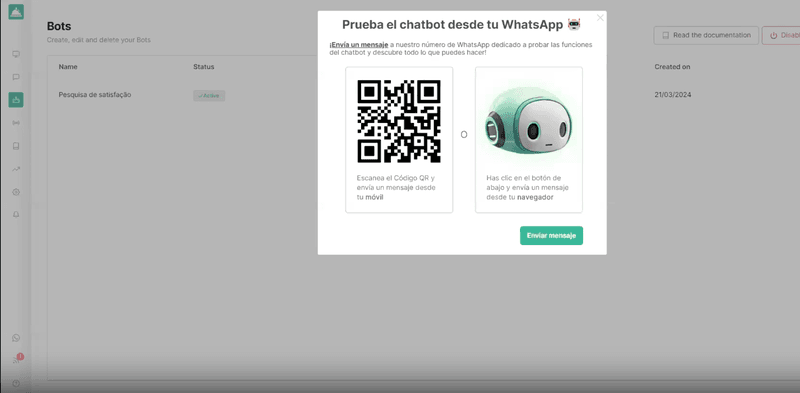
The Callbell case study covers the full details about the challenges they faced and how Userpilot helped reduce them.
Brevo
Brevo applies this principle in two ways. First, it makes sure its tour is fully skippable from the beginning and at any step in between. Then, it employs progressive disclosure rather than a comprehensive first-session tour.
This means users are shown one tooltip at a time, covering multichannel messaging and contact management. An in-app help center is also accessible at any point for on-demand support. This approach gives users just what they need to explore a feature when they’re ready.
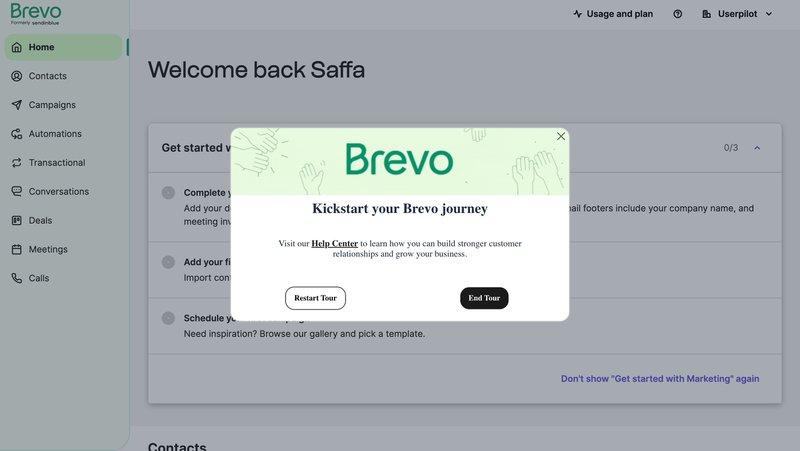
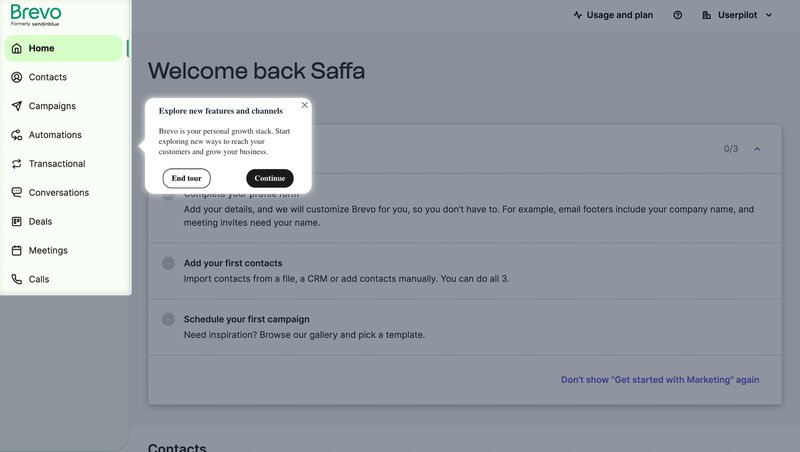
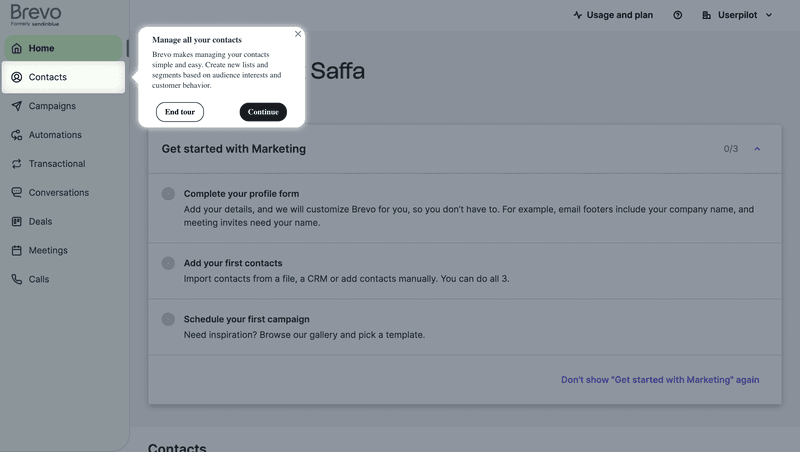
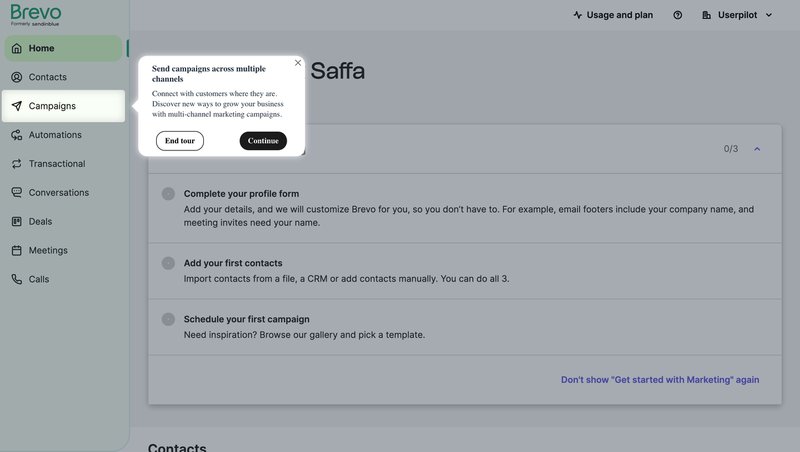
For most SaaS products, this approach of progressive disclosure plus in-app support always wins. Users are free to explore the product at their own pace when they need to achieve a goal.
Build product tours that push users towards activation!
If you have read this far and you are still not sure whether your product needs a tour, start with the experiment: one cohort with, another without, then compare activation rates.
If the data says build one, I hope the five principles above give you a balanced starting point for what to build and why.
Book a demo to see how Userpilot builds product tours and tracks product and tour analytics to ensure they remain successful.
FAQ
What is a product tour?
A product tour is a guided in-app experience that walks new users through a product’s core features or workflows during onboarding. Tours can take the form of tooltip sequences, modal walkthroughs, checklists, interactive demos, or AI-guided conversations. The goal is to reach the user’s activation event, the first moment they realize the product is worth keeping, as quickly as possible.
What are the benefits of product tours in user onboarding?
When scoped correctly, product tours reduce time to value, lower support ticket volume, and improve activation rates. Rocketbots doubled activation from 15% to 30% using a checklist-based tour; Attention Insight saw a 47% lift in first-analysis creation; Impala doubled activation with a tour ending in a driven action. The common thread is that every one of these tours was scoped to one activation event rather than built as a feature inventory.
What are the different types of product tour UI patterns?
Common patterns include tooltips (small overlays tied to specific UI elements), modals (full-panel interruptions for high-priority moments), checklists (progress-tracking lists), driven actions (guided interactions where the user completes a real task), video embeds (for steps where seeing the action matters), and resource centers (on-demand libraries). Choosing the right pattern depends on what the individual step requires, not on which format looks most polished in a design review.
How do you build a product tour without involving engineering?
Userpilot’s no-code builder lets you create tooltip sequences, driven actions, checklists, modals, and resource centers using a visual editor, with no engineering involvement required. Lia, Userpilot’s AI agent, builds onboarding flows autonomously from a written description of what you want users to accomplish. For most product teams, the limiting factor is not the tool; it is deciding what the tour needs to accomplish before opening the builder.
What are the best product tour software options in 2026?
Userpilot, Appcues, Pendo, Intercom, Userflow, and Chameleon are the main options. The differentiating factors in 2026 are whether the tool supports AI-driven flow creation, event-based contextual triggering, native A/B testing, and built-in analytics that make the “do we need this tour?” experiment straightforward to run. All of the case studies in this post were built on Userpilot.
About the author