How SaaS Teams Use Usability Testing to Decide What to Build Next


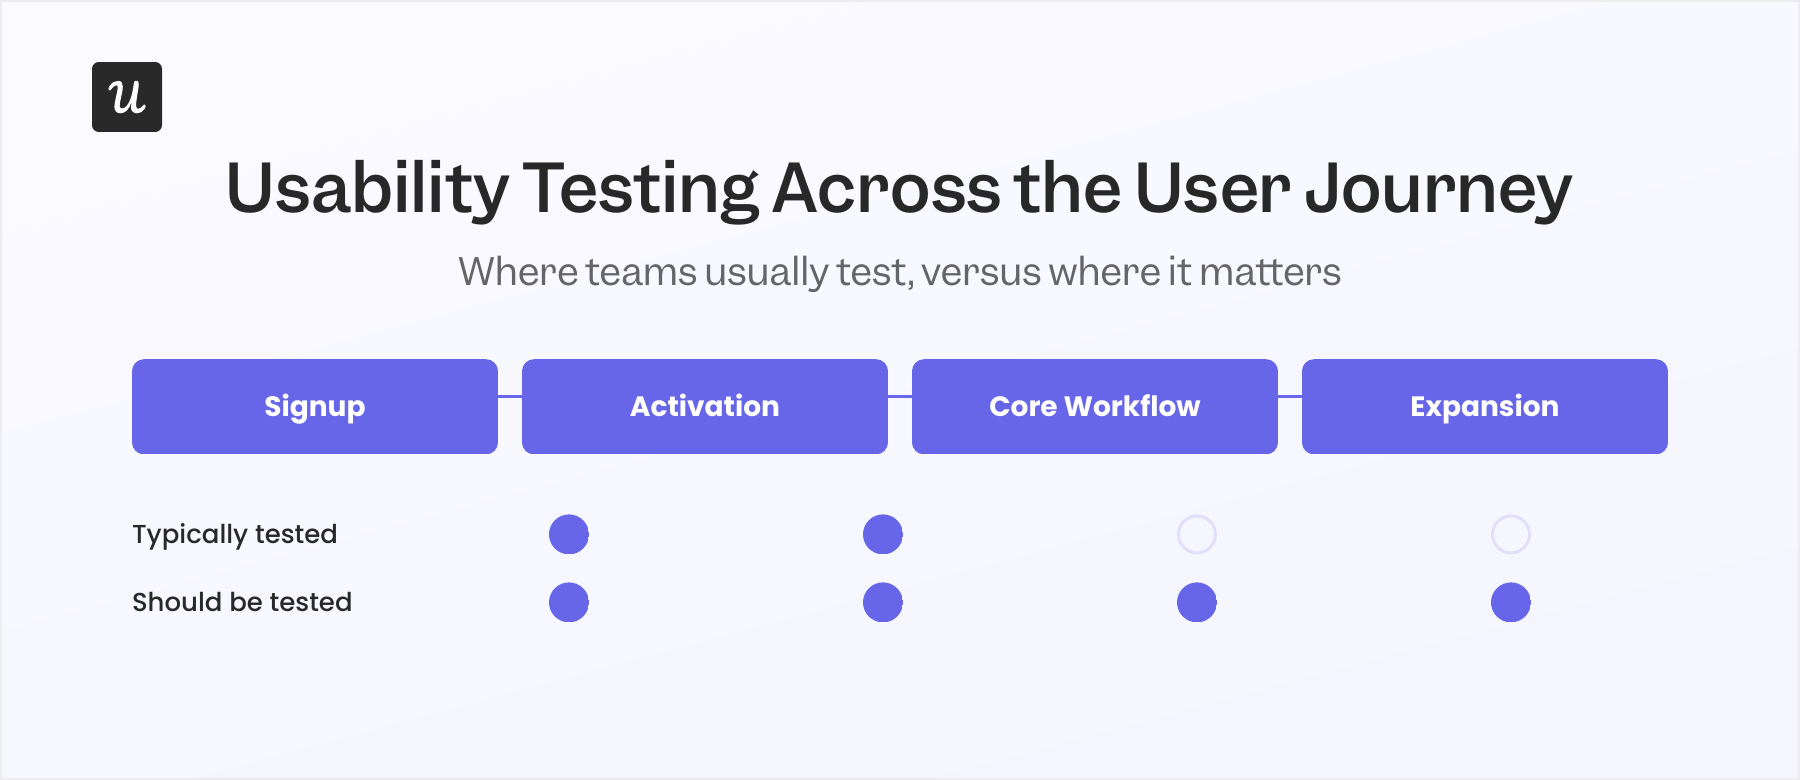
Usability testing means watching real users interact with your product and noting where they get stuck in their entire user journey. Most SaaS teams still conduct usability testing once, right before launch, as a final check before the release goes out.
By that point, the design and the engineering work are already done. Testing earlier in the development process, while a feature is still a prototype, gives the team a chance to change direction before that work happens.
This guide covers what makes usability testing important for SaaS teams, how to pick a method for the question you’re asking, who to recruit, and how AI changes the research process. Teams that treat testing as a recurring part of the build cycle ship fewer features that miss user needs and need a redesign six months later.
What usability testing actually tells you?
Usability testing focuses on a narrow question: “Can someone complete a specific task in your product without help, and where do they get stuck along the way?” It’s one type of user testing, and there are several types of usability testing, each measuring whether the product meets user expectations once a real person is using it in the real world.
The output is a record of what happened during the testing session, and answers questions like:
- Which step did they pause on.
- Whether they finished the task at all.
- How users navigate from one screen to the next.
Watching where users struggle is often more useful than asking afterward, because people don’t always notice or report their own hesitation.
Two key metrics come out of most sessions:
- Task completion rate (sometimes called task success): It shows whether people finished.
- Error rate: It shows how many wrong turns they took to get there, and together these numbers help with identifying usability issues on a specific screen or step, turning the session into actionable insights.
Usability testing evaluates how intuitive and efficient a product feels, and how satisfied people are with it, which can reveal design flaws that would otherwise go unnoticed. Rather than relying on assumptions about the design, it provides empirical evidence in the form of a record of what real users actually did. That evidence is what usability testing helps teams use to improve user satisfaction and build toward a positive user experience, instead of guessing.
When should you run usability testing?
Usually, the usability testing happens late in the product development cycle, after a feature is designed and built, when changes are expensive. Testing a prototype before engineering starts costs just a few days, but testing a shipped feature that needs rework costs a sprint, or more.
The process itself follows a similar shape whether you’re testing early or late. Here’s what the process looks like, irrespective of when you do it:
- Define what you want to learn.
- Run a quick pilot, recruit participants.
- Run the sessions and analyze the results.
- Write a usability testing script with specific tasks.
Depending on when you do the usability testing, the answers to these questions will change drastically. When you test in an environment that’s close to real-world usage, these questions reveal massively different results, much more fruitful than the test done while in the production cycle.
Amal Al-Khatib, Product Designer at Userpilot, ran into this while planning an approval system for in-app experiences. Testing an early prototype with three users showed the approval system would complicate the product and add friction. The team deprioritized it and redirected the work toward what became the notifications, signals, and alerts system.
Conducting usability tests at the prototype stage validated that finding by showing how real users interact with the proposed flow, before any of it reached the engineering team. The team redirected the work toward a notifications and alerts system instead, based on what the user research showed.
Her recruitment process runs ahead of the test itself, using research methods that filter for the right test participants before any session is scheduled. She screens candidates with a short survey, follows up over a call, and walks them through a Figma prototype before the team commits engineering time. She also tracks who from the target audience has been tested recently, so the same handful of customers aren’t fielding every research request.
Finding the wrong problem is what’s expensive, not the testing itself. Identifying the actual user problem and resolving usability issues before committing engineering hours is what turns a test into a roadmap decision rather than a confirmation of one.
How to choose your usability testing method?
Usability testing methods are generally grouped by three things:
- Where it takes place?
- Who facilitates the session?
- What type of data does it produce?
The types of usability testing that come out of those categories each fit a different question.
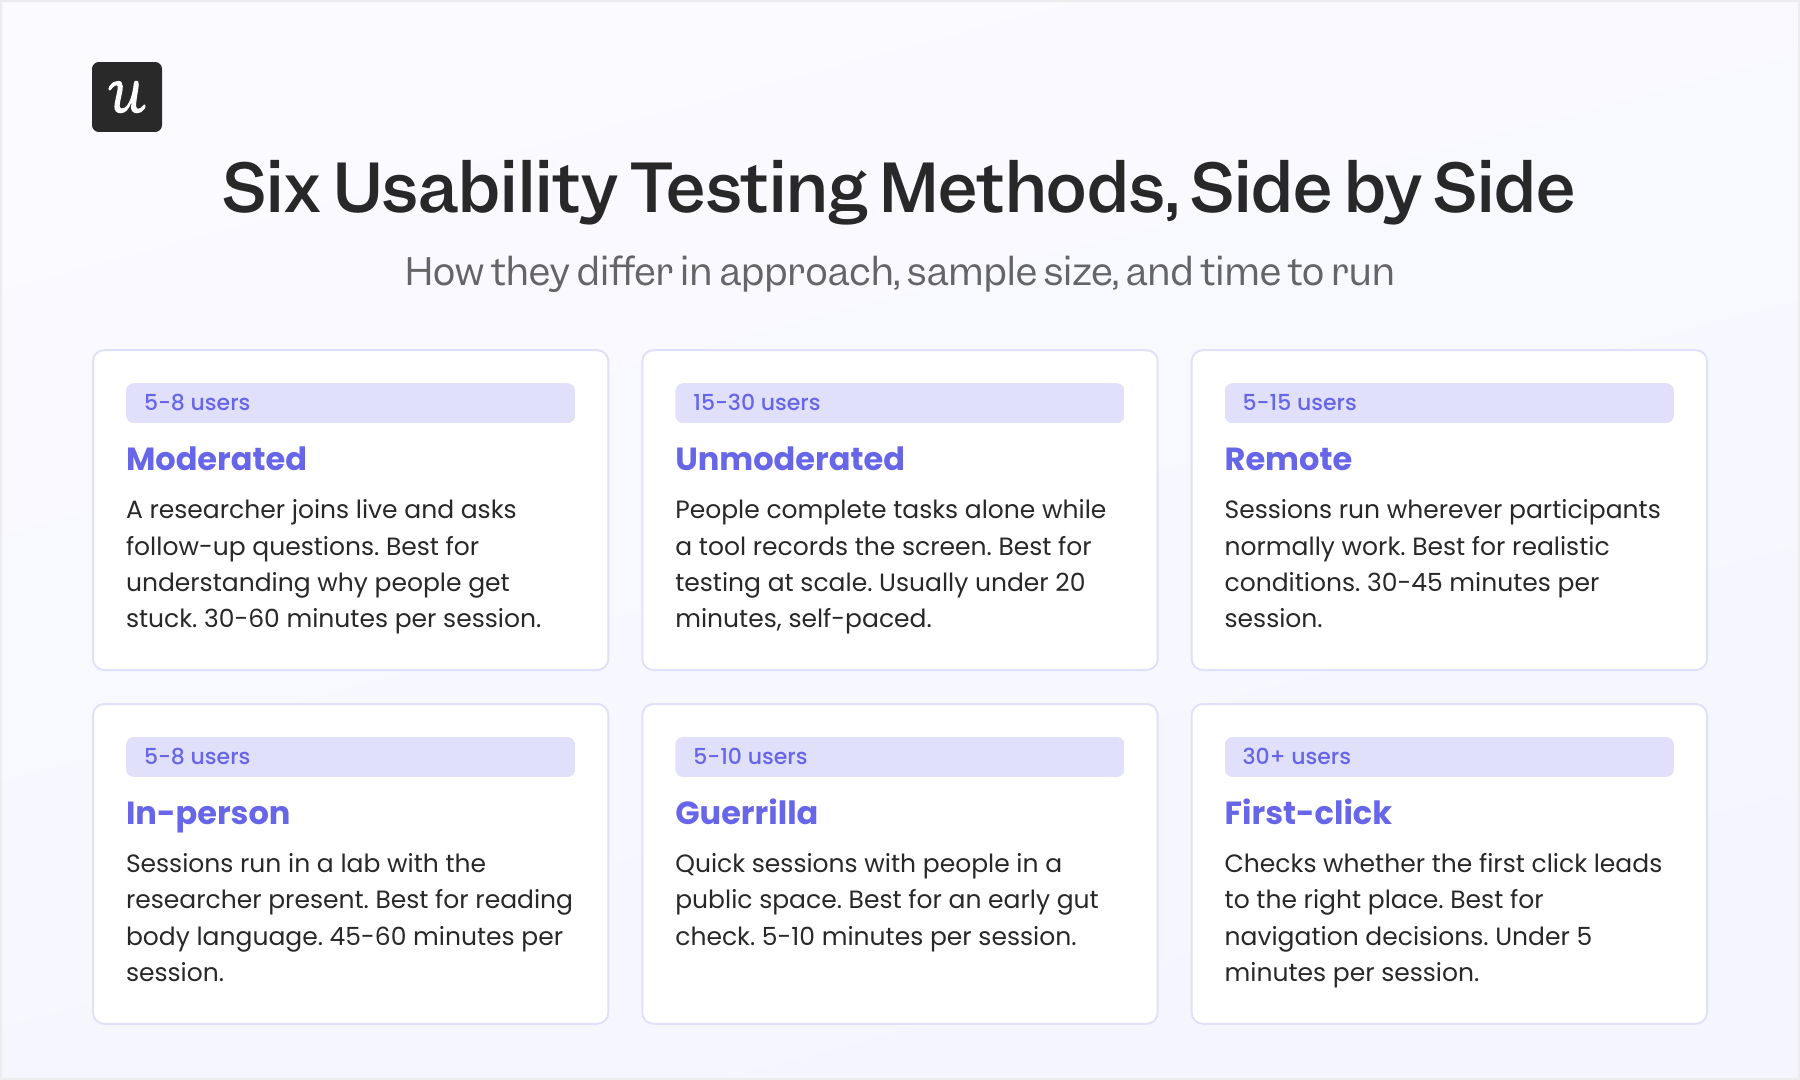
Moderated usability testing is when a researcher joins a call with the participant, asking follow-up questions that surface users’ thought processes as they work. Unmoderated usability testing records someone completing tasks on their own, usually through a tool that captures screen activity and any verbal feedback, without a researcher present. Moderated sessions surface the reasoning behind a struggle, while unmoderated testing is faster and more cost-effective to run across larger groups.
Remote usability testing removes the scheduling and travel overhead of in-person testing, which is why most SaaS teams default to it. Remote user testing can be synchronous, with a moderator on the call, or asynchronous, where participants complete tasks on their own time. Either form of remote testing lets people work in their own environment instead of a usability lab, which makes the testing environment feel more natural.
Guerrilla usability testing takes the opposite approach by grabbing a handful of people in a public space, like a cafe, for a quick 5 to 10-minute session to get immediate, informal feedback. It’s useful for an early gut check on a single screen, but it isn’t a substitute for testing with people who actually fit your target user profile. Keep in mind, guerrilla testing works best for a quick reaction, not for explaining why something is confusing.
First-click testing checks whether someone’s first click on a web page or screen moves them toward the right destination. It’s a fast way to test a navigation change or a new page layout without running a full task-based session, and it pairs well with the qualitative methods above when you need a quick signal before committing to a longer study.
Qualitative usability testing focuses on why something is confusing, using small groups working through open-ended tasks to understand user behavior in detail. Quantitative usability testing focuses on how often a problem occurs, using larger samples and measured metrics to tell you whether a change actually fixed it. Nielsen Norman Group’s guidance on this distinction is worth reading before you choose between a handful of interviews and quantitative testing at scale.
Split testing, also called A/B testing, takes a different approach. Instead of watching people complete tasks, it compares two versions of a page or flow and measures which one performs better in terms of conversion or engagement. It tells you which version wins, not why, so teams often gather feedback through a moderated session to explain the result.
Recruiting the right participants for usability testing
Five users is the number most people associate with usability testing. It comes from Jakob Nielsen’s original research, which found that testing with five participants in a qualitative study typically surfaces about 85% of usability problems.
That guidance applies to qualitative studies aimed at finding problems, not to quantitative studies that measure something like task completion rate across a population. Nielsen Norman Group’s later guidance recommends 30 to 40 participants when you need a reliable percentage or benchmark, so the right sample size depends on what you’re trying to prove.
Sample size is only part of recruitment quality. The World Health Organization estimates that 1.3 billion people, or 16% of the world’s population, live with a significant disability. If your test panel never includes anyone using assistive technology, you’re not testing for a sixth of your potential users.
Research also indicates that users with disabilities often identify a wider range of usability issues than non-disabled users do, which makes inclusive testing both more representative and more efficient. Testing with people who use assistive technology can surface barriers that affect everyone, and that’s part of how usability testing can enhance accessibility across a product.
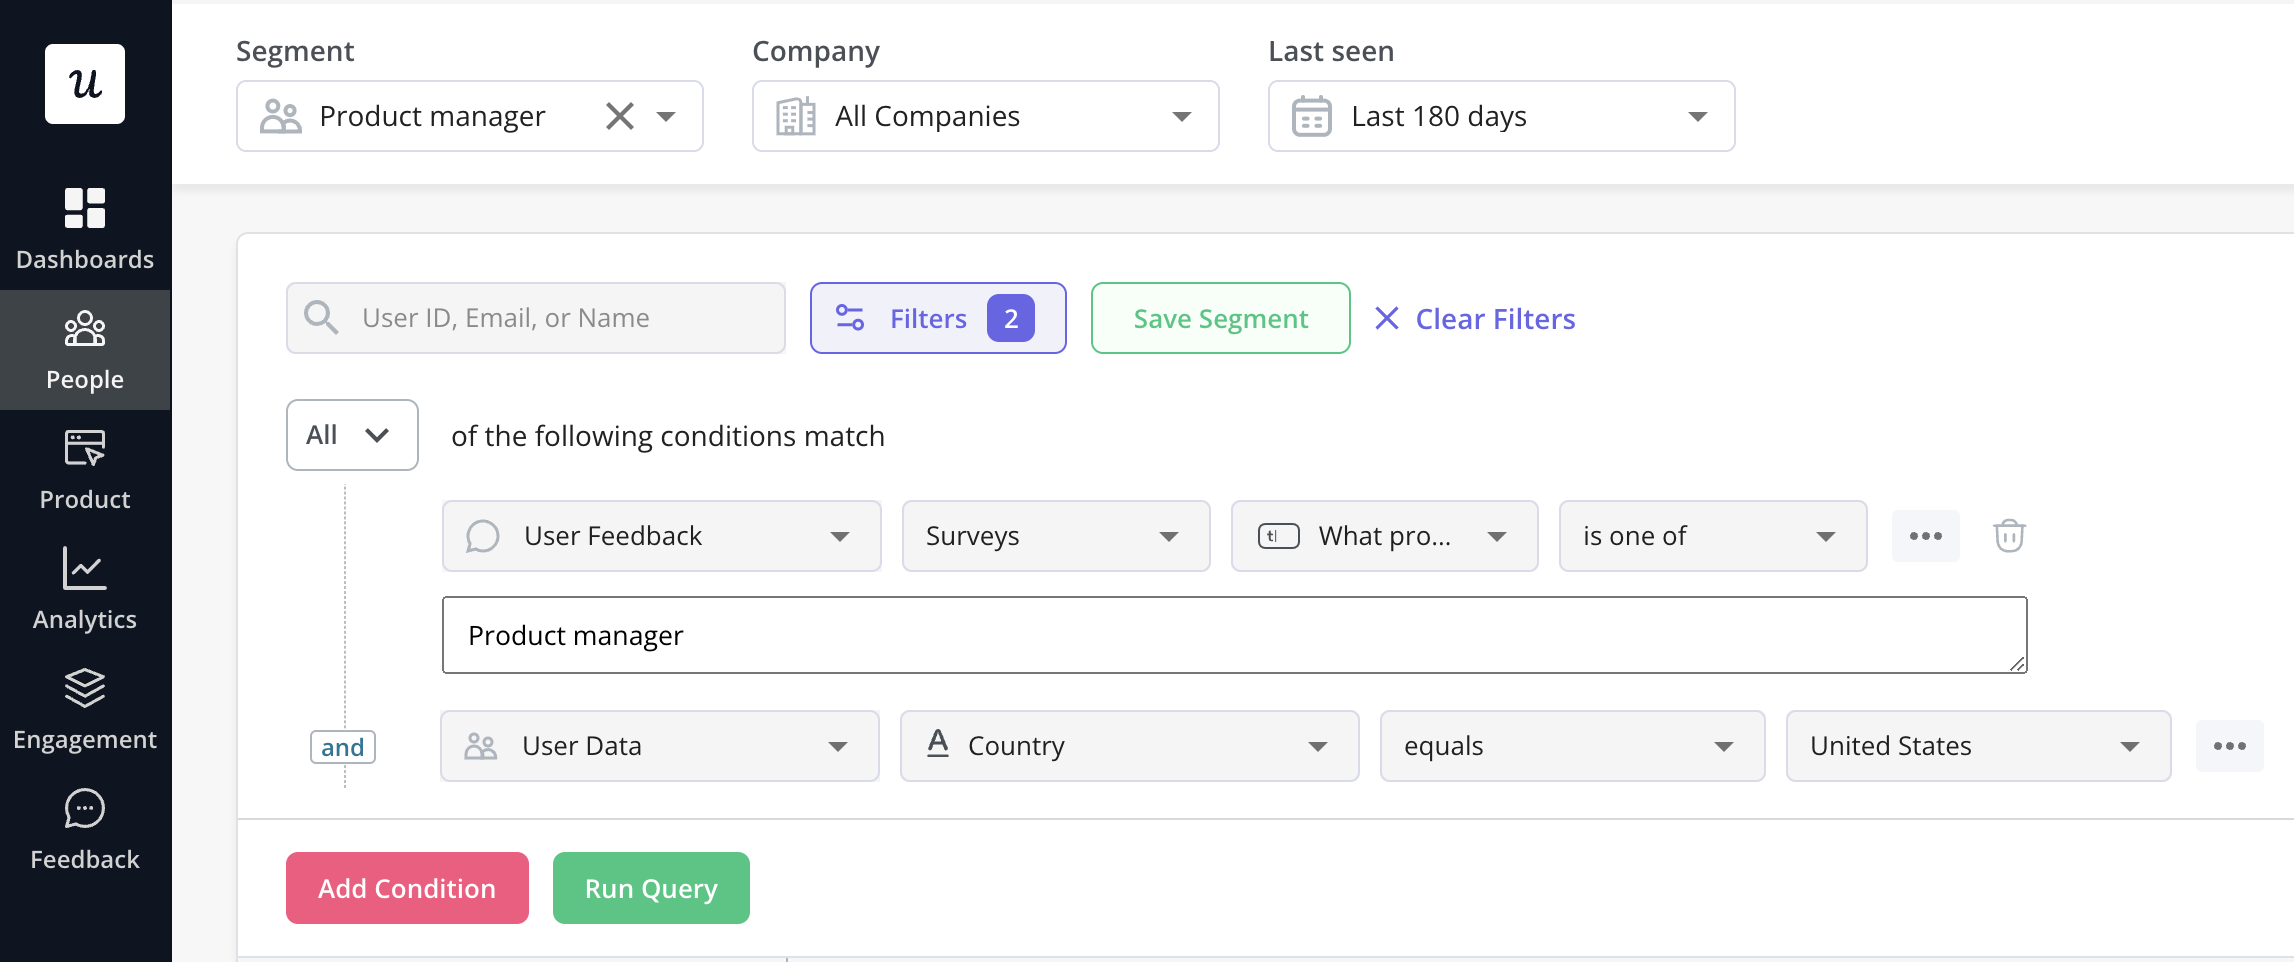
Most research panels also skew toward a narrow demographic. A widely cited review found that 96% of participants in behavioral science studies came from countries representing just 12% of the world’s population, a pattern researchers call WEIRD sampling bias (Western, Educated, Industrialized, Rich, and Democratic), with the US alone supplying nearly 70% of subjects. Recruiting test participants from your existing user base, segmented by role, plan, or region, helps match your target audience without adding much to your recruitment process.
Testing workflows across the product
SaaS products are used across multi-step workflows that span several screens, often pulling in data from integrations or other tools. Testing one screen in isolation misses friction that only shows up across a longer chain of user interactions, like moving between steps, switching context, or waiting on data to load.
Session replay and click tracking fill part of this gap by showing where users get stuck during normal use, not just during a scheduled test. Click tracking for SaaS products can flag rage clicks, repeated backtracking, or drop-off points in a flow, which gives you a shortlist of usability issues worth testing in the first place.
A task-based test that follows someone through an entire workflow, not just the screen you redesigned, will often surface a problem in a step nobody touched. The fix sometimes isn’t in the screen being tested at all.
Mistakes that skew usability test results
Leading questions steer participants toward the answer the moderator expects, so asking “Did you find that easy to use?” gets a different response than asking “Walk me through what you’d do next,” and the second version produces more useful findings.
Testing with employees, friends, or people who already know the product removes the confusion a new user would feel. Their familiarity with similar tools, or with your product specifically, means they fill in gaps that a real first-time user wouldn’t.
Testing a polished prototype instead of the real build can also hide problems that only appear with real data, such as empty states, loading delays, error messages, and slow API responses. A flow that feels smooth in a design tool can feel completely different once it’s running against a live database, so the testing environment should closely match production to produce realistic user interactions.
What AI changes about usability testing
AI now handles a lot of the manual work in usability research, like transcribing sessions, tagging recurring themes across interviews, and drafting summaries of findings.
Katie Kelly, UX Researcher at Userpilot, found this useful but not reliable enough to skip a manual check. When she used AI to synthesize survey responses, it hallucinated one or two answers that no participant had actually given, so she now checks the full list manually before the counts go into a report. Also, reading a participant’s tone, body language, or frustration during a live session is something Kelly still does herself, and it’s part of how she decides which follow-up question to ask next.
This mirrors a broader shift in how research and feedback work gets split between people and AI. Userpilot’s approach to user feedback uses AI to process incoming feedback at scale, while researchers focus on the responses that need a human read.
Building a habit of continuous testing
Teams that test once before launch treat usability testing as a checkbox. Teams that test continuously treat it as an iterative process, a recurring slot on the calendar, a standing pool of participants, and a lightweight process for recruiting them, regardless of what’s shipping next.
Usability testing works best as part of a broader SaaS UX design practice, where test findings feed directly into onboarding, navigation, and layout decisions rather than sitting in a separate report.
Continuous testing also covers things that aren’t new features, like an onboarding flow that hasn’t changed in a year, a settings page nobody has looked at since launch, or a workflow that keeps showing up in support tickets. Addressing usability issues in places like these, the ones nobody is actively redesigning, is sometimes where the most significant improvements turn up, simply because nobody has tested them in a long time.
In-app surveys are one way to record feedback and keep a feed of signals running between formal test rounds. The qualitative feedback from open text fields often gathers valuable insights you wouldn’t get from a rating alone, and together these signals flag where to point the next round of usability tests, based on what users are already telling you is off.
If you want to see how in-app surveys and session data can feed into your usability testing process, book a demo and walk through it with the team.
About the author