Hypothesis Driven Product Development Explained

I’ve watched too many smart teams build products nobody wants. Either they were solving a problem that didn’t really exist, or solving it in a way that didn’t click with users.
And this is not a problem happening only to inexperienced teams. According to Clayton Christensen, a professor at Harvard Business School, 30,000 new products launch every year, and 95% of them fail. Even tech giants like Google can’t avoid that.
So what’s going wrong? This is simply because most of us build first and ask questions later. We have an idea, we get excited, we start coding or designing, and before we know it, we’ve invested tons of time and money into something we hope will work.
That’s when hypothesis-driven product development comes in handy. In this guide, I’ll show you how this works and how you can use it to avoid becoming part of that 95%.
What is your biggest bottleneck in hypothesis driven product development?
How do you currently test new feature assumptions?
When an experiment fails, what is your team’s usual reaction?
Scale your experiments without engineering bottlenecks
Userpilot helps you run no-code experiments, track feature adoption, and pivot faster.
What is hypothesis-driven development?
Hypothesis-driven development (HDD) is a mindset shift that treats software development as a series of experiments. Instead of assuming you know what the customer wants, you admit that you are making assumptions. You then structure your work to validate those assumptions as cheaply and quickly as possible.
It applies the scientific method to product management:
- Observe a problem.
- Formulate a hypothesis.
- Experiment to test it.
- Analyze the data.
- Decide to pivot or persevere.
This sounds academic, but in practice, it is incredibly freeing. By testing small iterations, we minimize the risk of product failure. We stop wasting engineering hours on features nobody wants.
Why use hypothesis-driven product development?
- It helps you move from gut instinct to data-driven decisions by validating ideas before you invest time and resources.
- You reduce risk by testing assumptions early rather than building features based on untested assumptions.
- It keeps the development team focused on solving real problems with a clear expected outcome.
- You can run experiments with minimal effort, learn faster, and minimize waste.
- It creates a repeatable learning cycle rooted in the scientific method.
- You align product strategy with measurable business outcomes, so every experiment pushes you in the right direction.
![]()
Scale Hypothesis-Driven Product Development Effortlessly with Userpilot
The 5-step framework for HDD
I have broken down the process we use. You do not need a PhD to do this; you just need discipline.
1. Identify the right problem
Before you write a single line of code or design a single screen, you must understand the problem. This requires digging into your data.
I spend a lot of time looking at our product analytics as a research method. I look for friction. Where are users dropping off? Which features have low engagement? For example, if I see a high drop-off rate on a specific settings page, that is an observation.
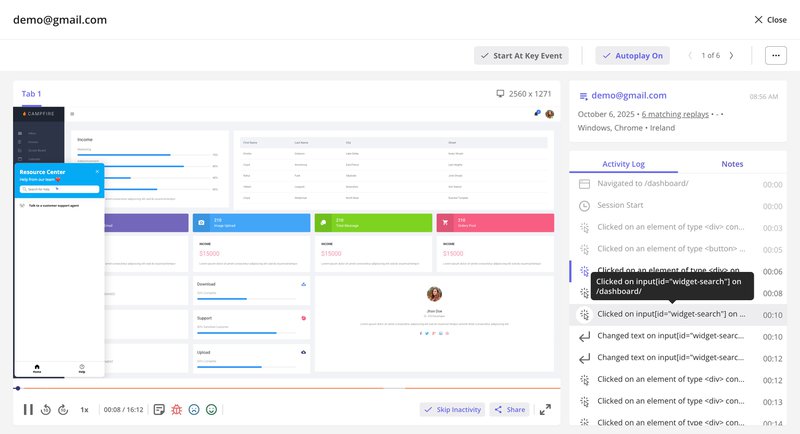
But data only tells you what is happening, not why. To understand the “why,” you need qualitative data. I often use session recordings to watch real users struggle with a workflow. Seeing a user rage-click on a non-interactive element is infinitely more valuable than a spreadsheet of numbers.
Combining these insights allows you to define a product problem worth solving.
2. Construct a strong hypothesis
It is vital to understand what makes a good hypothesis. A hypothesis is not a guess or one of many vague ideas. It is a testable statement. If you cannot test it, it is useless.
Successful hypothesis-driven product development relies on four pillars:
- Testability: Can you realistically design an experiment to prove or disprove it?
- Falsifiability: Is there a clear condition under which the hypothesis fails? If it can’t fail, it’s not a test-it’s vanity.
- Scalability: Does the insight gained from this hypothesis apply to a significant segment of your user base?
- Alignment: Does proving this hypothesis move the needle on your core business outcomes (e.g., ARR, Churn, LTV)?
I often use a standard structure for this:
“We believe that [change] for [persona] will result in [outcome]. We will know we are right when we see [metric].”
Let’s look at a practical example. Suppose we want to improve our new user activation. A weak hypothesis would be: “We should add a checklist.”
A strong hypothesis looks like this:
“We believe that adding an onboarding checklist for new trial users will result in higher engagement with core features. We will know we are right when we see measurable outcomes like activation rates increase by 10% within the first week.”
Notice how specific this is? It forces you to define your product persona and set a clear success metric before you start.
3. Design the experiment (The MVP)
This is where many teams go wrong. They think “hypothesis testing” means building the full feature and releasing it. That is too expensive.
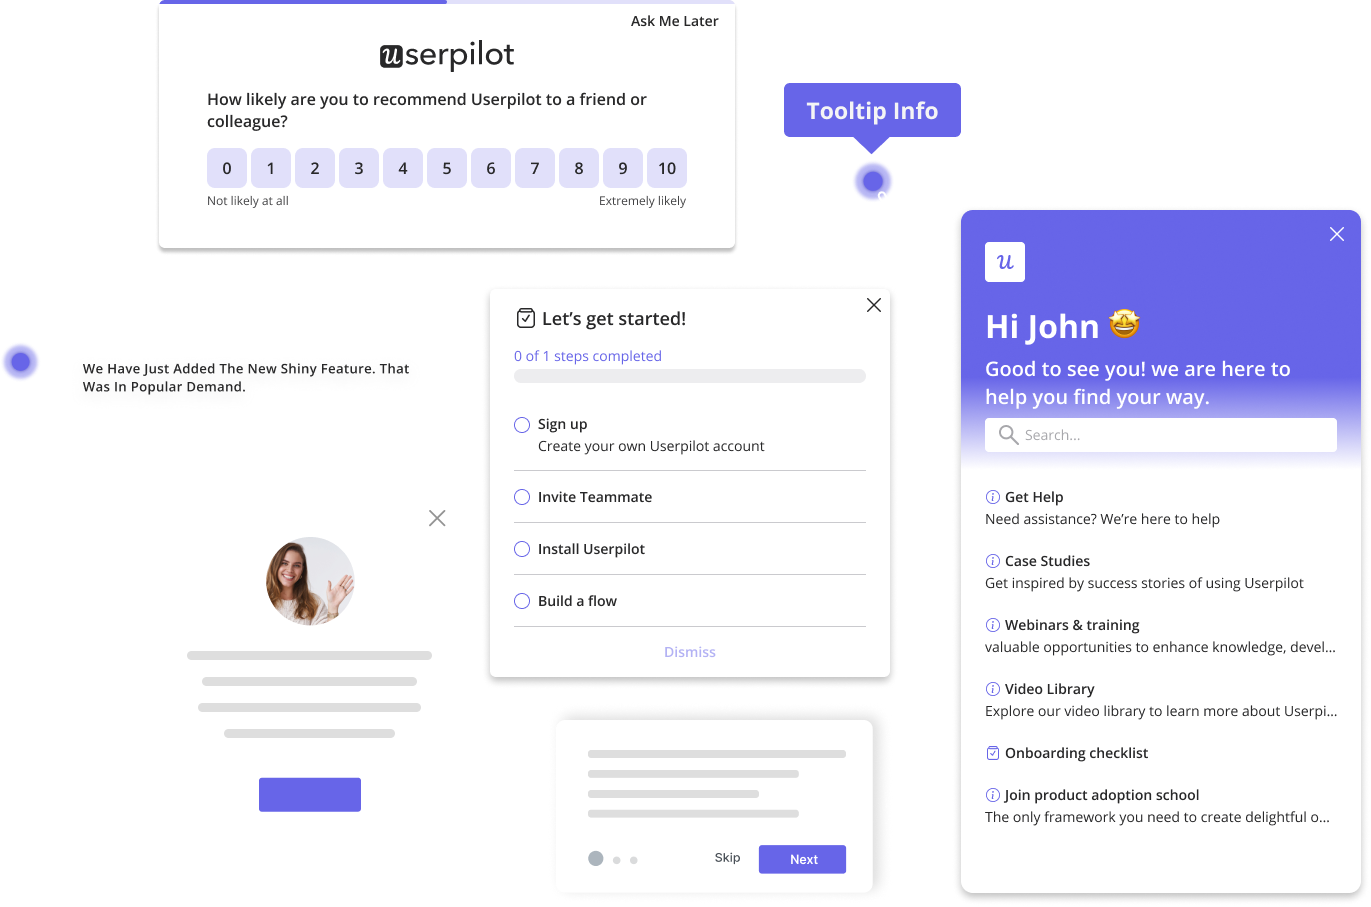
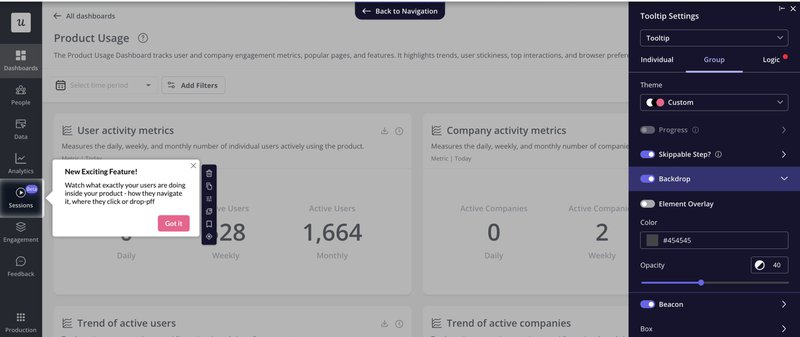
In hypothesis-driven development, we want to maximize learning with minimal effort. We often use fake door testing. This involves adding a button or a menu item for a feature that doesn’t exist yet. When the user clicks it, we show a message saying, “This feature is coming soon! Thanks for your interest.”
We track those clicks. If nobody clicks the button, we just saved ourselves months of development work. If thousands click it, we move forward and refine our hypothesis statements.
I can create a tooltip or a hotspot highlighting a “new feature” concept and measure engagement immediately. This allows us to validate ideas in hours.
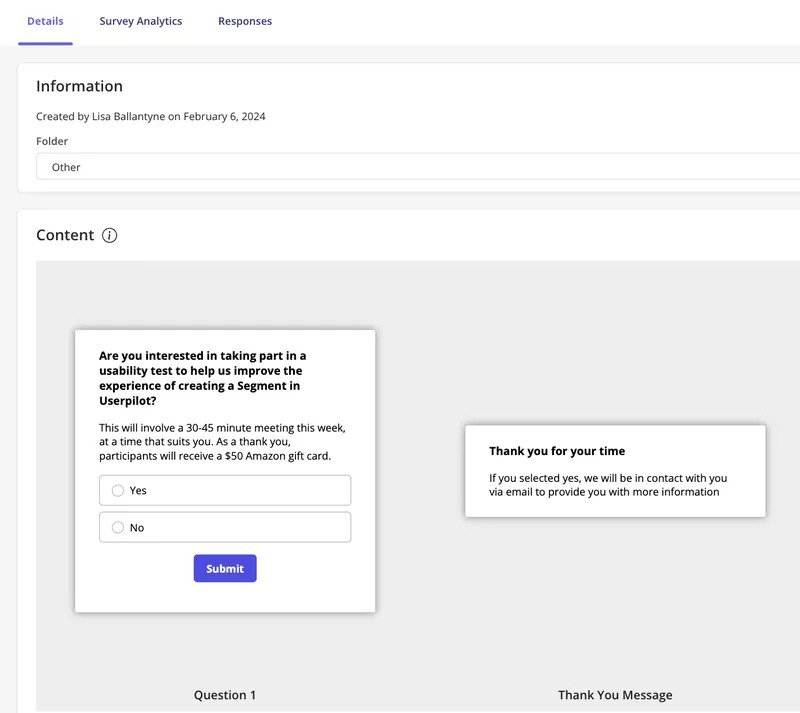
Once you’ve validated demand, you move to building a beta version and recruiting the right test participants. Our UX researcher Lisa experienced this firsthand.
She attempted to recruit beta testers via email for our segmentation feature but received almost no responses.
So she switched to in-app surveys, targeting only users who had already used the feature. This has proven effective and got her 4x better response rates with more relevant feedback.
4. Test and measure
Once the experiment is live, you need to trust the data. You must resist the urge to peek at the results after one hour and call it a success.
Start by defining the right metrics. Each experiment should have a primary metric tied to the expected outcome. For instance, feature adoption, activation rate, or task completion. You should also track secondary (or guardrail) metrics to monitor unintended side effects and other factors. A boost in engagement might, for example, coincide with a drop in speed or usability.
Think through what data you’ll need before launching the test because you can’t add tracking after the experiment ends.
At Userpilot, we combine multiple data sources to get the full picture.
- Surveys help assess metrics like user effort score (e.g., “How easy was it to complete this task?”).
- Session replays show us how users interact with a flow, exposing points of confusion.
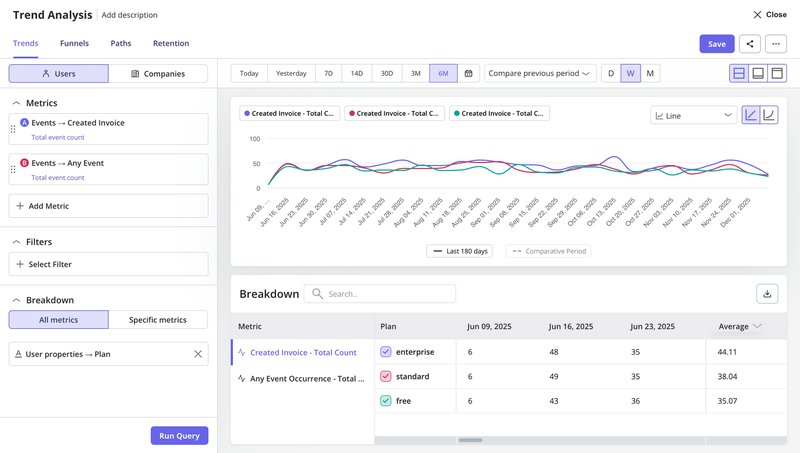
- Analytics dashboards let us break down success rates by cohort, time period, or feature usage patterns. For example, trend analysis lets us track a success event (like “invoice created”) and compare how it performs across different user segments. This tells us if a feature works better for certain groups or if we need to adjust our approach.
This is the same approach our successful customers are adopting.
Zoezi, a platform for the wellness industry, struggled before implementing Userpilot because they had no visibility into user behavior.
Isa Olsson, their UX Researcher, describes the shift:
We were in a pretty bad state before Userpilot because we didn’t even know what pages people visited. Now we can just look at the pages tab and understand that people don’t use this stuff, so let’s not focus on that.
And we’re taking this even further. With our upcoming AI-powered insights, Userpilot will soon help you spot patterns and opportunities automatically. If you’re already using Userpilot and want to amplify your experiments with AI, you can join the beta here.

5. Pivot, persevere, or iterate
When an experiment concludes, your next step depends entirely on what the data reveals. There’s no room for gut decisions in hypothesis-driven development.
- Persevere: The data supported the hypothesis. Great! Now build the robust, scalable version of the feature.
- Pivot: The data proved you wrong. Users didn’t care. This is not a failure; it is a success because you didn’t waste time building it. You pivot to a new hypothesis.
- Iterate: The results were mixed. Maybe the value proposition was unclear. You might need to refine the design and run another test.
Often, I will use microsurveys triggered immediately after the interaction to gather qualitative feedback. If a user didn’t complete the task, I want to know why. Asking “What stopped you?” right at the moment of friction provides insights that numbers alone cannot.

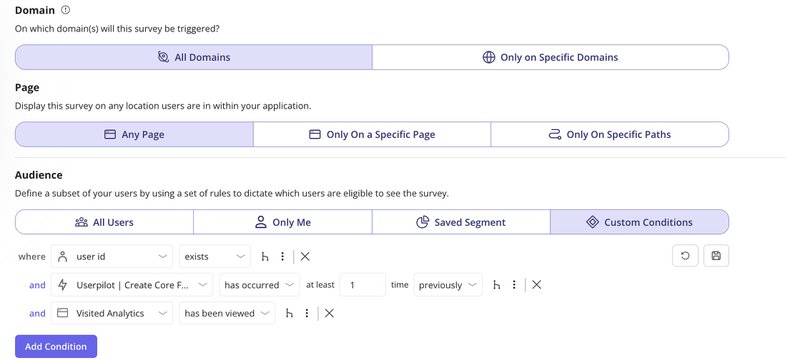
Userpilot makes this simple with pre-built survey templates and precise triggering conditions. You can show surveys only to users who completed specific actions, visited certain pages, etc.
This means you’re asking the right questions to the right people at exactly the right moment to inform your pivot, persevere, or iterate decision.
How to apply HDD to your product pipeline
So, how do you turn hypothesis-driven development into something your team practices and not just talks about? It starts with building hypothesis-driven development into your product development process step by step, from strategy to execution.
Continuous design
Start with customer discovery by talking to customers. You’ll need to create a screener question to make sure you’re talking to the right people. Something like “How many projects did you manage last month?” helps filter out people who aren’t actually your target users.
Once you’ve got the right people, ask non-leading questions like “What are the top 5 hardest things about collaborating with your team?”
The key is avoiding questions like “Would you use our collaboration tool?” because people will say yes to avoid awkwardness.
After you understand the real problem, you can test if people want your solution using Lean Startup MVPs. The correct steps are: learn first (who your customer is and what matters to them), build an experiment (not a real product), then measure the results.
Write a testable hypothesis like “If we offer [X] to [specific persona], they will [do specific measurable thing]” and set a kill threshold before you start. This makes it much easier to pivot when things don’t work because you’ve already decided what “not working” means.
For usability testing, you’ll want to write user stories in this format: “As a [person], I want to [do something], so that I can [achieve a testable result].” Then put prototypes in front of users early and often to see if your interface patterns work.
Application development
You can start small here by using your existing retrospectives to review how your hypothesis testing went. The main goal is moving fewer, but better-validated, designs into development, so you’re only building features you’ve already tested with non-product MVPs.
I like pairing each user story with one analytical question, like “Did users export their reports to PDF?” This gives you a clear signal about whether the story is truly done from a user behavior standpoint.
You should also track your ratio of successful releases, basically the percentage of features that meet their target user behavior metrics.
Continuous delivery
You’ll want to build your test pyramid with lots of unit tests at the bottom, fewer integration tests in the middle, and minimal system tests at the top. The reason for this shape is that higher-level tests are more expensive to create and maintain, plus they give you less isolation about where bugs live.
In every retrospective, ask “What’s the lowest-level test that could have caught this bug?” and then write that test. This helps you iteratively focus your test investments where they matter most.
You should also automate your deployments and use feature flags to enable new features for small user segments first.
This lets you verify nothing breaks and that people are using the feature before rolling it out to everyone. Teams that do this well end up shipping faster while encountering fewer bugs, which sounds backwards, but the research consistently shows it’s true.
Nevertheless, feature flags are most relevant to teams that release code frequently and need control over who sees what in production. They’re commonly used in environments where continuous integration and constant iteration are the norm.
A famous example is Amazon, where engineers deploy new code to production every ~11.6 seconds on average. A cadence made possible by automation, strong test coverage, and small incremental changes.
What’s our approach at Userpilot?
We take a slightly different but related approach at Userpilot. Instead of traditional feature flags, we use targeted segments to control who sees a beta feature. For example, when we launched our email feature, we first invited users who expressed interest via a survey. Those early adopters got access first. We also added a self‑serve button in the navbar so users could opt into the beta themselves.
When someone clicked that button, we would enable the feature for them. For other betas like session replay, we combined an invite survey with follow‑up engagement to guide rollout. This method gives us controlled exposure without flag infrastructure, while still ensuring that tested features reach users who are most likely to provide meaningful feedback.
Test and measure your hypothesis with Userpilot
Hypothesis-driven development is about building a system where ideas are tested, measured, and refined. At Userpilot, we’ve embedded this mindset into how we plan, ship, and improve. It supports our agile product development cycle, ensures we learn from every release, and helps us turn assumptions into validated learning.
Whether you’re tracking adoption, running experiments, or rolling out updates gradually, Userpilot gives you the tools to act on insights. You can easily manage test-driven development workflows, prioritize based on evidence, and revisit all the hypotheses that didn’t pan out.
Ready to see how this looks in practice? Book a demo, and we’ll walk you through it.
![]()
Drive Faster Growth with Hypothesis-Driven Product Development in Userpilot
About the author