The Ultimate Guide to Self-Serve Onboarding in the Product-Led Era


In the Product-Led Era, it’s not great marketing and sleek sales pages that determine the success of your product. Rand Fishkin, the founder of MOZ, learned the hard way:
Simultaneously two competitors in the market – one, a secretive operation based in the Ukraine and Singapore called “Ahrefs”, and the other, a British firm founded by a passionate Russian engineer whose initial goal had been to build an alternative to Google’s search engine called “Majestic” – grew to market dominance. After years of leading the industry, Moz became and also-ran in the field of link data”.
(A fragment from ‘Lost and Foundr’)
The reason why Moz lost market dominance out to its competitors is that it didn’t manage to keep their product giving the best value to their target users – despite great marketing and a large investment.
But even if you get your product right – you may still fail if your users don’t experience the value fast enough, or fail to discover certain key features. One of our clients, Kommunicate.io – noticed that their customers kept asking for features that were already there.
60-70% of users were using only 3-4 major aspects of the product. And because people were not realising what they needed was already there, they didn’t understand the full value of the product.
What was the solution that helped Kommunicate boost feature engagement by 41%, and grow revenue by nearly 3% as a result?
You guessed right: nailing their self-serve onboarding.
Also, when you look at these survey results:
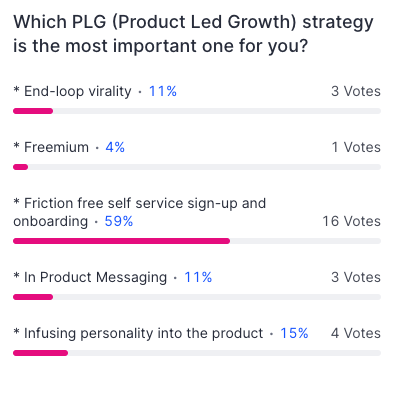
If the vast majority of SaaStock Remote 2020 attendees pointed to self-serve onboarding and frictionless signup as the most important Product-Led Strategy: know this is serious.
So in this post, I am going to show you how you can nail it too. I will explain everything I have learned about self-serve onboarding over the last 2 years as a Head of Growth at Userpilot.
You will learn everything you need to set up self-serve onboarding in your SaaS right – from why it’s important, to what to do at every step of the user journey to get the highest levels of user activation, engagement, and retention.
I will explain it on an example of our client I have been working closely with, so you can see everything you need to know in practice from A to Z.
Finally, I’m going to discuss some tools and best practices from other businesses that did self-serve onboarding well.
You can read the whole post (recommended) or jump to the relevant section from the table of contents below. You will also find a summary of the key takeaways from this post at the very bottom of it.
Contents
- What is self-serve onboarding?
- Proactive vs reactive onboarding
- Understanding the user adoption journey
- Preparing for self-serve onboarding
- Adding self-serve onboarding to your product
- Define Jobs-to-be-Done
- Key Takaways
What is self-serve onboarding?
Before I go into all the details about how to start adding self-serve onboarding, I thought it best to explain exactly what it is.
As the name suggests, self-serve onboarding is a way of enabling your users to onboard themselves.
This means rather than being funneled down a certain path, users can learn about your product as they go. If they need help, they can find it.
Self-serve onboarding is driven by the product itself. That’s why it fits with the product-led era we find ourselves in.
There are a number of reasons why a self-serve onboarding approach works better than traditional customer onboarding.
Self-serve onboarding scales better
Firstly, self-serve onboarding is designed to scale. Your product onboards your users for you. This frees up valuable time for different teams.
For sales teams, it means that they no longer need to do an in-depth product demo. Instead, you could simply provide prospects with a trial of your product. Your product will then guide them through the onboarding process.
For CS teams, it means they no longer have to show users how to get value from the product. The self-serve onboarding process takes care of that for you.
Ultimately, the self-service model scales because it doesn’t use up any time or effort once it’s in place.
Self-serve onboarding is more effective
‘I love long product tours showing me all the features I don’t need at the moment!’ – said no-one ever.
And that’s exactly the reason why traditional user onboarding approaches don’t work very well. They force the users down a certain direction – showing them all the features of the product instead of the ones that the user needs to experience the ‘AHA moment’. This can add friction and reduce the value your users get from your product.
A lot of them won’t even make it to the end of your user onboarding flow.
It also means users don’t tend to learn by doing. A traditional product tour, shown to users when they first sign up is a series of screens that shows users the various features. Once it’s over, users have to find their own way around.
Do you even remember half of it once it’s done without implementing the knowledge (assuming you didn’t just click ‘NEXT’ without even reading the messages)?
This is extremely ineffective. There’s no way your users can learn your product like that.
A self-serve onboarding approach, however, lets your new customers decide what to do. If they’re interested in a specific feature, they can start using it, and your product will onboard them, ensuring they have the information they need.
For a number of reasons (which I’ll come to later), self-serve onboarding is far more effective than traditional approaches.
Self-serve onboarding is product-led
As I’ve already mentioned, we live in the middle of the product-led era. Your product is your company.
Nowadays, people don’t particularly care about shiny sales pages, or clever marketing campaigns. They don’t want to talk to salespeople or read through page after page of documentation.
They want one thing: To start using your product.
Self-serve onboarding enables customers to start using your product sooner. This, in turn, means that they start getting value from your product sooner.
By reducing the time-to-value, and showing your users your product’s Aha! Moment, you’re drastically increasing the chances of them becoming paying users.
Self-serve onboarding is product-led onboarding, and that’s why you need to use it.
Want to learn more about how Userpilot can help with building the best self-serve onboarding for your users? Click the banner below to book a free demo!
Proactive vs reactive onboarding
Onboarding can be separated into two types: Proactive and Reactive.
Each of these types has its pros and cons, and most products should use a combination of the two.
What is proactive onboarding?
Proactive onboarding requires you to understand the journey your users take to get from the Aha! Moment to Activation.
You then engage the user with predefined onboarding flows that they work through to progress through the journey and learn about your product.
As a result, proactive onboarding is usually the first stage of the onboarding process. It governs the initial interactions your users have with your product.
What is reactive onboarding?
Reactive onboarding, on the other hand, tends to take place after a user has activated.
With reactive onboarding, you provide guidance as and when the user needs it. This is how they’ll learn about more advanced features and become a “Pro” user.
Reactive onboarding tends to take place after users have experienced proactive onboarding.
Self-serve onboarding is reactive
As you may have worked out, self-serve onboarding is mostly reactive onboarding. It’s where a user is able to learn as and when they need to.
That’s why for the purposes of this guide, I’ll mostly be referring to reactive onboarding.
Having said that, it’s really important you use a combination of proactive and reactive onboarding for your product.
Understanding the user adoption journey
But before you roll up your sleeves and start building, there’s another thing you need to know to design your self-serve onboarding flows correctly to improve the overall customer experience.
How your users adopt your product aka the user adoption journey.
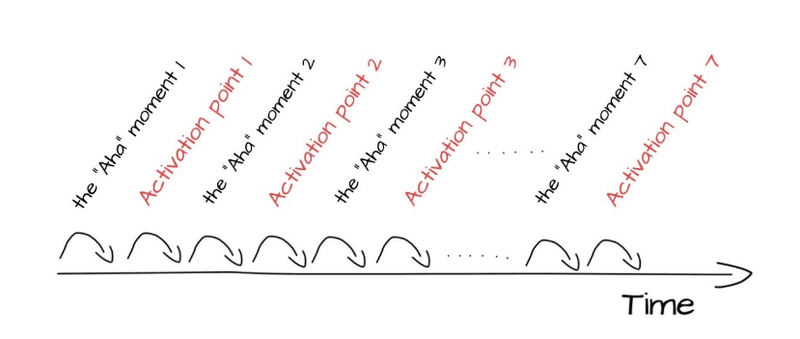
It’s critical that you understand how your users get to the point where they see the value of your product, experience the AHA moment, move on to being loyal users or even advocates – or the other way round – become disengaged and churn.
This is because you want to reduce time to value and get your users to experience the AHA moment asap – without showing them any secondary features at this stage.
And in fact – onboarding shouldn’t end at the first ‘AHA’ moment.
So – now that I’ve convinced you to read on – let’s see how to best understand your user journey.
It’s best to think of it as a fly-wheel, with various stages around it.
Let’s dig into it.
Self-serve onboarding and the user journey
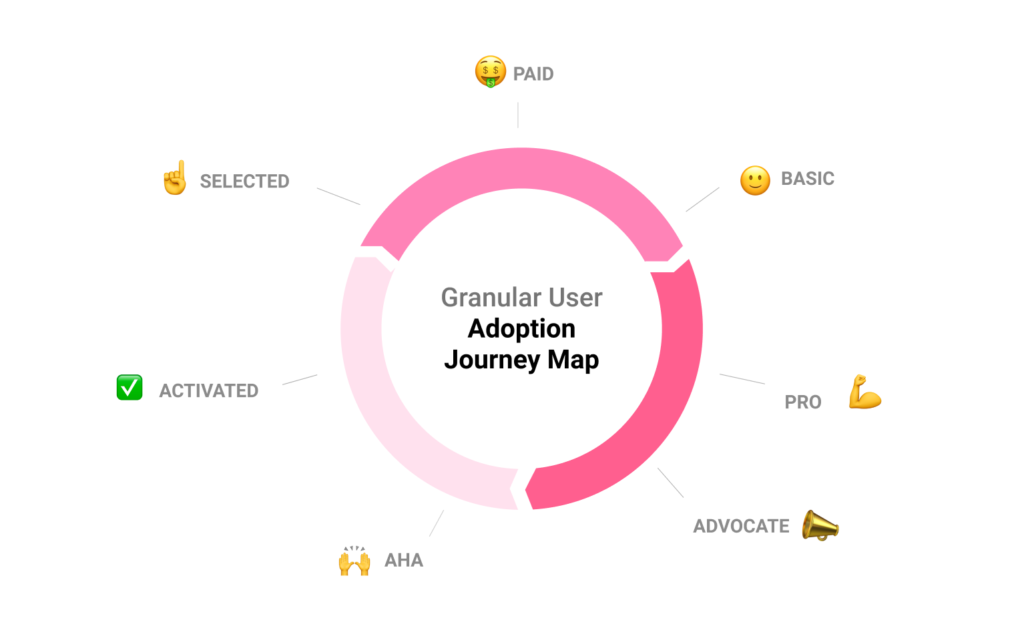
The goal of your self-serve onboarding is to help users progress through the various stages of the user journey.
Primarily, your onboarding will focus on driving users to your product’s Aha! Moment, and then onto activation.
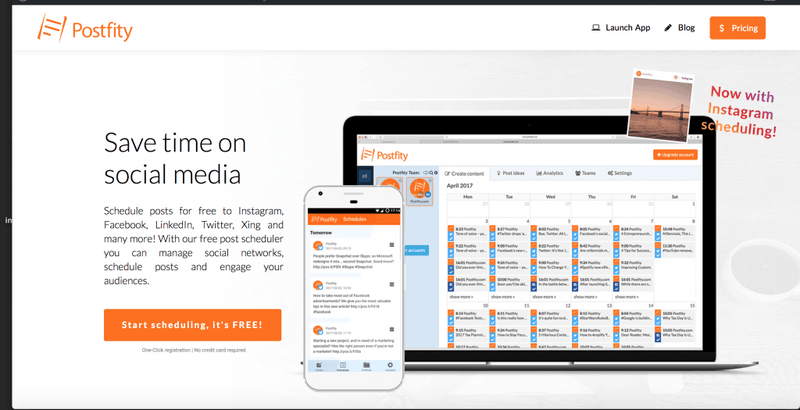
OK, looks complicated? Let me explain it on an example of one of our users – Postfity.
Postfity is a simple social media scheduler for individuals and SMBs. You know, the kind you use to cross-post your content on various social media platforms and plan them into the future.
Imagine you sign up for a tool like that.
You begin as a “New” user – someone who has just signed up.
What do you do when you’re at a party and a new person shows up?
You say ‘hi’.
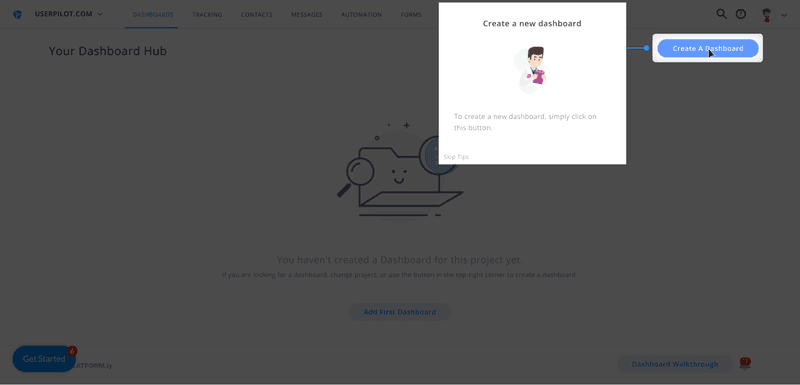
Your app should also say ‘hi’ to the New User on the welcome screen. That’s exactly what Postfity did using Userpilot:
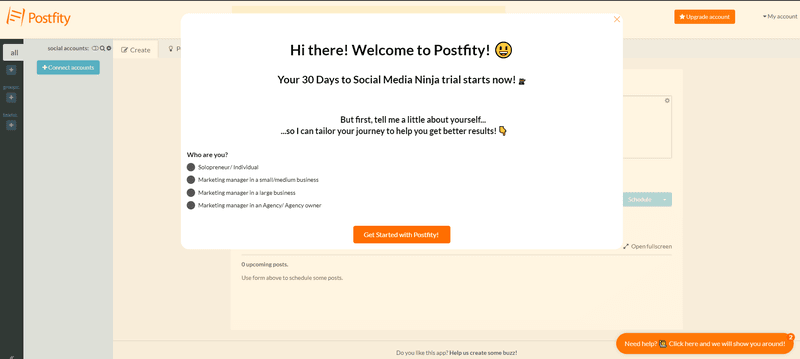
What’s the next natural thing to do when you meet a new person at a party?
Ask them a few questions, right? What they do, where they are from etc. – so you can actually start a meaningful conversation with that person.
And that’s exactly what you should do as well when greeting a new user on your welcome screen. Your onboarding should be like that first conversation: based on what you know about the user.
That’s why you should know their use case and goals, at the very least. Moreover: this will allow you to not only tailor your onboarding but also cross-reference this information with NPS scores and include it in your cohort analysis.
Once the user goes past the welcome screen, they are ready to start their trial.
What is the first thing you need to do to use a social media scheduler?
You need to link your social accounts, right?
What if you can’t figure out how to do it?
That’s when self-serve onboarding comes in.
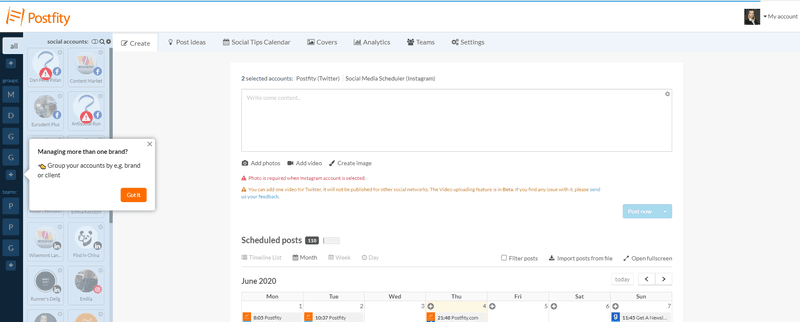
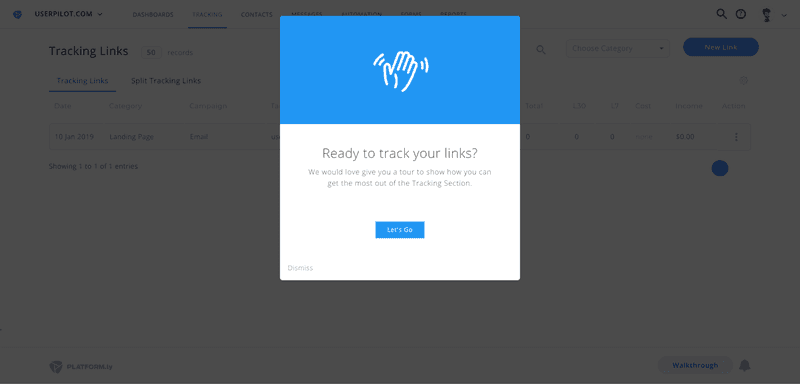
Look at what Postfity did:
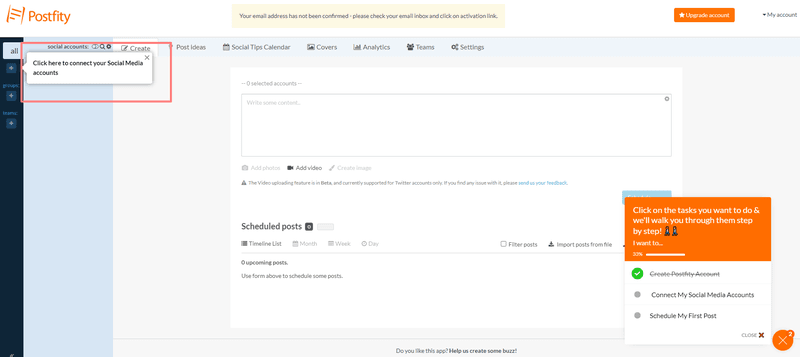
A checklist at the bottom of the screen triggers experiences gently guiding the user to connect their social media account to Postfity.
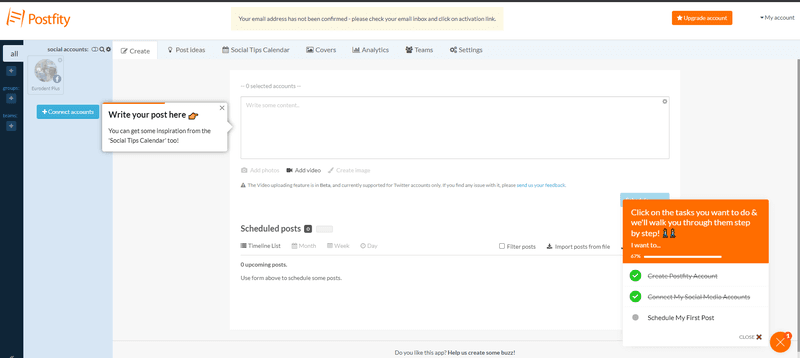
Once the user has connected their accounts, what happens next?
You need to schedule some posts, right?
What if you don’t know how to do it again?
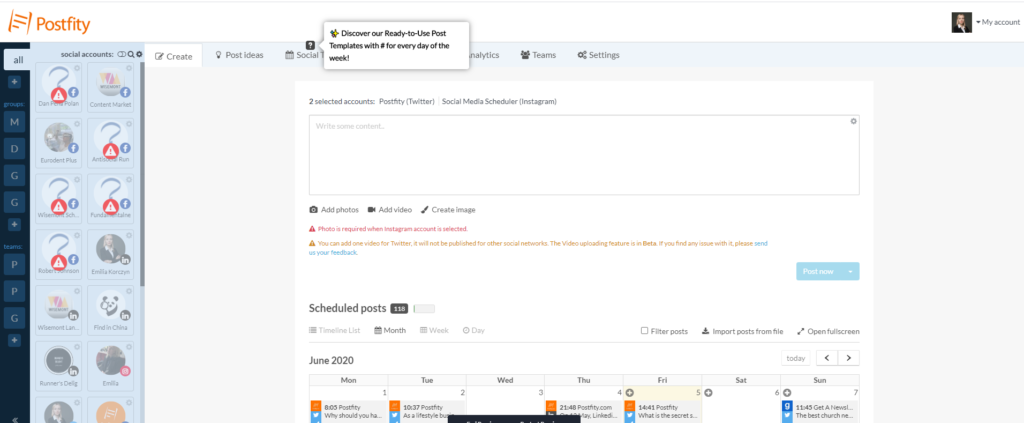
You click on the second prompt on the checklist, which triggers another set of tooltips guiding you through scheduling your first post:
Once the user has scheduled the first post – they get a success message + an incentive to upgrade:
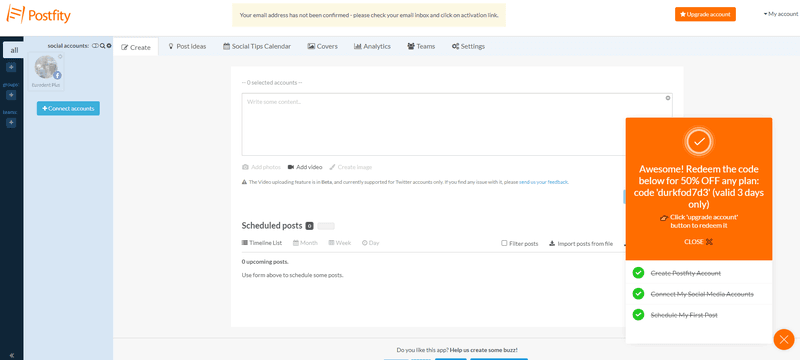
Why? At this point, you have got to the ‘AHA moment’ – you’ve essentially done everything you need to do to use a social media scheduler successfully.
But you may be now asking yourself – what exactly is the ‘AHA! Moment’?
Your product’s Aha! Moment is the point at which a user understands the value they can get from your product.
It’s the part where their eyes widen and they think, “Wow, I have to buy this!”
It’s a defining moment in your product’s user journey. It’s generally the spark that leads to user activation (which I’ll get to in a minute).
At Userpilot, for example, our Aha! Moment is when a user first plays around with our Chrome extension.
It enables them to quickly and easily build onboarding experiences. They immediately see the value that Userpilot provides.
Let’s go back to our social media scheduler though.
The primary goal of any social media scheduler is scheduling posts. You’ve done that. Anything else you do with the tool – analytics, editing images, adding posts to queue, changing timezones – is secondary.
And you don’t need to know all the secondary features to become an activated user.
In fact – you shouldn’t learn it all at once.
So – in two simple steps of the self-serve onboarding Postfity moved you from a trial user to an activated user.
You may ask now:
What is activation?
Activation is the point at which the user not only understands the value but also actually experiences the value of your product.
This is what happens when Postfity user repeatedly schedules social media posts to several accounts – and sees how much time they can actually save that way.
After activation, the user becomes an active user.
The difference here is that before activation, a user may still be trying out different tools and is still making up their mind. After activation, the user has decided that your product is the right choice.
This is also why activation is a key metric for any SaaS company. It’s one of the 5 pillars used in the pirate metrics (AARRR). Arguably, it’s central to the success of your SaaS. If your users don’t activate, they probably won’t become paying users. That means your SaaS is in trouble.
At Userpilot, our activation is when a user installs the Javascript widget to their app. This enables them to see the onboarding experiences they’ve made on their own product. That’s when they become an active user.
Now that you are activated – it’s time to gently nudge you to pay.
If you don’t – and thus don’t become the paid user yet – you still have the 30-day trial to evaluate the product and select the best plan for you.
Once you have become the paid user though – Postfity doesn’t stop and shows you some secondary features through more tooltips and native tooltips:
These allow you to schedule posts with even greater ease and get better results with your social media marketing. And – hopefully – they will make you become a loyal user, and eventually even an advocate.
It’s important to note that users won’t necessarily go through each of these stages. Depending on your product and user journey, users may combine stages together or skip some entirely.
Preparing for self-serve onboarding
You can’t simply start adding self-service onboarding to your product if you haven’t prepared for it first.
There are a number of things you need to take care of before your self-service model will work effectively.
You need to:
- Set and manage expectations
- Be ready to do things that don’t scale
- Understand your user journey
- Define your Jobs-to-be-Done
- Talk to your users
- Set up product analytics
Let’s look at each in turn.
Set and manage expectations
I want to share with you a story from AdBadger.
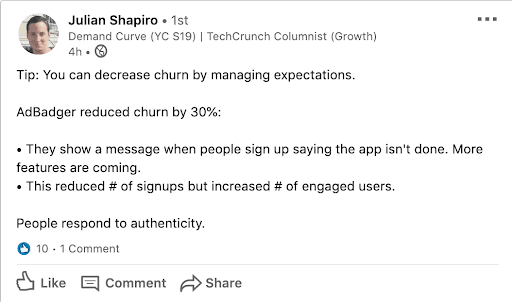
They were able to reduce churn by 30%. How? By being honest and upfront with their users.
They simply added a message to their signup page saying that their product wasn’t finished yet, and they would be adding more features.
The result? A drop in the number of signups, but a big increase in engagement in the users that did sign up.
The reason this worked so well is that people don’t like to be lied to. If your site promises a lot of exciting features but then your product doesn’t deliver on those promises, then users will quickly leave and may never come back.
You need to set and manage your users’ expectations from day one. Don’t over-promise and under-deliver. That won’t get you anywhere.
Make sure that users know what they’re getting when they sign up for your product.
Be ready to do things that don’t scale
Though this might sound nonsensical, the fact is that if you really want to scale, you need to do things that don’t scale.
In the long-term, sure, you want your onboarding to run on autopilot, that’s the point of self-serve onboarding. But when you’re first starting out, going the extra mile for your users can make all the difference.
Here at Userpilot, for example, I send each of our customers a personalized video in the introductory email they get when they sign up.
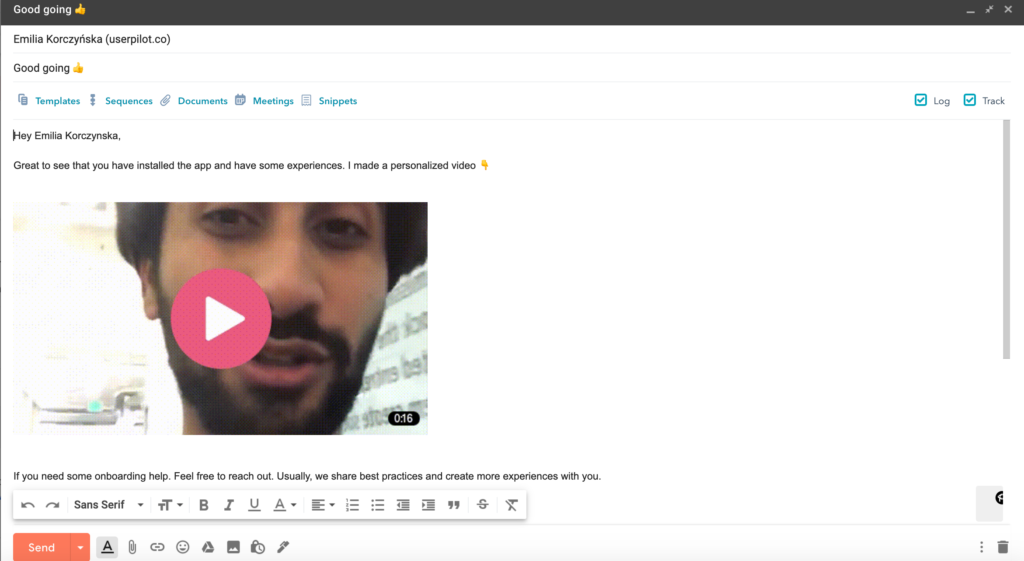
It’s a little touch that goes a long way. Our customers often tell us how much they love the video message. It’s a great way of strengthening the relationship from day one and, eventually, turn them into power users.
Another example is from Baremetrics. Corey offers personalized demos to users.
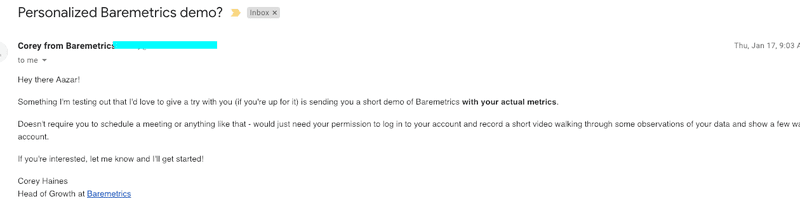
That’s a lot of work when he could just automate it. But it works. He gets a 60% open rate and a 20% reply rate.
When it comes to self-service options, think of how you can add extra value to your customers, even if you don’t think it’ll scale. As long as you still have time to do it, you don’t have to worry about it not scaling.
That’s a problem for the future.
Understand your user journey
The user journey fly-wheel I shared with you earlier is crucial to the success of your self-serve onboarding.
You need to understand the various journeys your users might take. Where do they enter the fly-wheel? What’s your Aha! Moment? At what point are users activated?
By understanding your user journeys, you’re able to map out how your self-serve onboarding can help them progress from one stage to the next.
If, for example, you know that users tend to skip a certain stage of the user journey, then you don’t need to waste time adding onboarding to it.
It also means you know when your users are ready to become advocates and help spread the word about your product.
I witnessed first-hand how powerful this is when I started using Descript, the podcasting tool. I was so impressed with it that I tweeted about it.
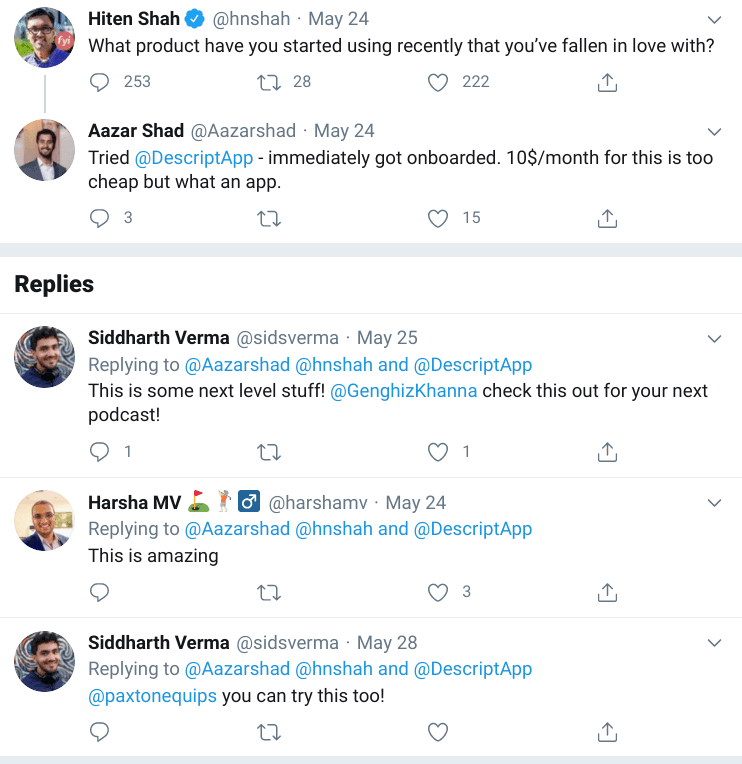
That tweet got 15 likes and 3 replies. That’s 15 more people who may now go and try Descript, all because I posted a tweet.
But there’s more to this than simply plotting out user journeys on the fly-wheel. You need to dig deeper and understand why users need your product in the first place. To do that, you should use Jobs-to-be-Done.
Define your Jobs-to-be-Done
The Jobs-to-be-done (JTBD) framework has helped hundreds of successful SaaS companies to fully understand their users’ motivations when it comes to their products.
There are three aspects to your JTBD:
- Don’t just describe a task.
- Understand how customers have solved the problem previously.
- Learn what motivates your customers.
A good example of a JBTD is this one that Justin Jackson provides on his excellent JBTD guide:
“Free me from the agony of creating and tracking invoices manually so that I can get paid faster.”
That’s the JBTD for Freshbooks, the accounting software. Notice how it focuses on a specific pain point and the value that customers get. It doesn’t describe what the product actually does, but what the customer gets from it.
Defining your own product’s JBTD is really important, as it then dictates how your self-serve onboarding will develop.
Start by observing your target users and ask yourself two questions:
- How do they want their lives to be better?
- What’s standing in their way?
This will help you understand your users’ pain point and their motivation. You can then work on figuring out the solution to help them overcome the obstacles and improve their lives in some way.
Once you know that, your self-serve onboarding should fall neatly into place. Every onboarding interaction should help your users to overcome the obstacles they face, and bring them closer to improving their lives.
Talk to your users
Talking to your users at all stages in the user journey is one of the best things you can do when it comes to improving your self-serve onboarding.
For some reason, however, a lot of SaaS companies don’t seem to be doing it.
The way I see it, why would you spend ages trying to guess what your customers feel when you could just ask them directly?
Take the time to sit down and talk with your users, no matter what stage of the journey they’re at.
Learn what they like about your product so far, what blockers are in place that lead to a poor user onboarding experience. Ask them about the other tools they’re evaluating, and what they do better than yours.
Ultimately, you want to learn what you could do better. Most users will be more than happy to tell you. But if you don’t ask, you’ll never know.
Set up product analytics
As you move forward and start implementing your self-serve onboarding, you’ll need to know whether it’s working or not, right? Otherwise, you’re just stumbling around in the dark.
That’s where product analytics comes in. It gives you the data you need to understand how you can improve your self-serve onboarding (and your product more generally, in fact).
Fortunately, it’s fairly easy to get up and running with product analytics. For starters, it’s possible to use Google Analytics to measure product usage, provided your SaaS product works in a similar way to a website.
Generally, however, SaaS businesses prefer to use an actual product analytics tool. The two most popular options are Heap and Mixpanel. Both are relatively straightforward to set up.
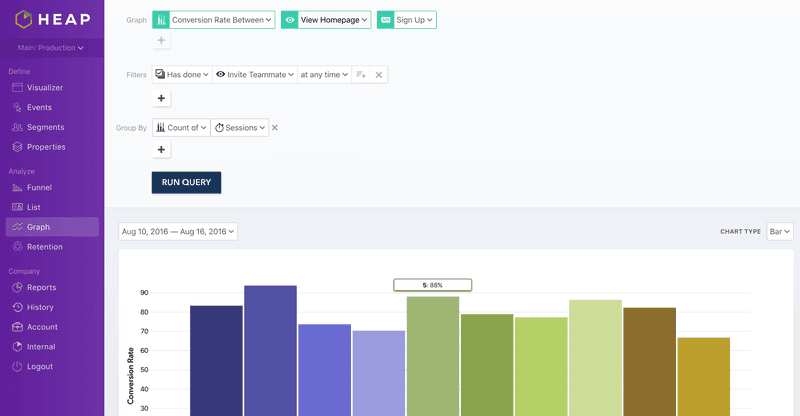
Personally, I find Heap to be the best of the two. The main reason is that it starts collecting customer data a lot faster than Mixpanel, and is generally more flexible.
I should also add that Userpilot’s onboarding analytics would be able to help you understand which parts of your self-service approach need improvement to improve the customer experience.
But either way, you need to pick one and use it to start tracking product usage analytics.
This basically gives you superpowers. You can see where users are dropping off as they progress along the user journey.
If, for example, only 10% of your users progress from being basic users to being pro users, then that suggests a major issue with your self-serve onboarding content. You need to work on showing users how to get value from your more advanced features.
Product usage analytics can show you what works and what doesn’t when it comes to your self-serve onboarding. This means you can focus on your weaker areas and improve your onboarding flows.
Adding self-serve onboarding to your product
Now that you’ve got everything in place, it’s time to look at how you can actually add self-serve onboarding to your product.
In this section, we’ll look at the methods you can use to help guide your users through your product. I’ll then run through some best practices to help make your self-serve onboarding as effective as possible.
Types of self-serve onboarding
First up, let’s look at the different types of self-serve onboarding.
In this section, our main focus will be on:
Interactive walkthroughs
A common debate when it comes to SaaS onboarding is whether you should use a product tour or interactive walkthrough.
A product tour is a brief guide that shows new users around the product and then leaves them to their own devices to explore the initial experiences your product offers.
Interactive walkthroughs, on the other hand, encourage users to learn by doing. Users have to engage with your product in order to progress through the walkthrough.
I’m a firm believer that interactive walkthroughs are more effective. Why? Because learning by doing is always better than simply looking at a screen.
Plus, it means you aren’t front-loading all the information about your product. I don’t know about you, but if your product tells me everything I need to know all at once, I’m probably not going to remember it all.
Interactive walkthroughs are commonly used as the first thing that users see. They act as an introduction to your product. However, they can be used as part of your self-serve onboarding as well.
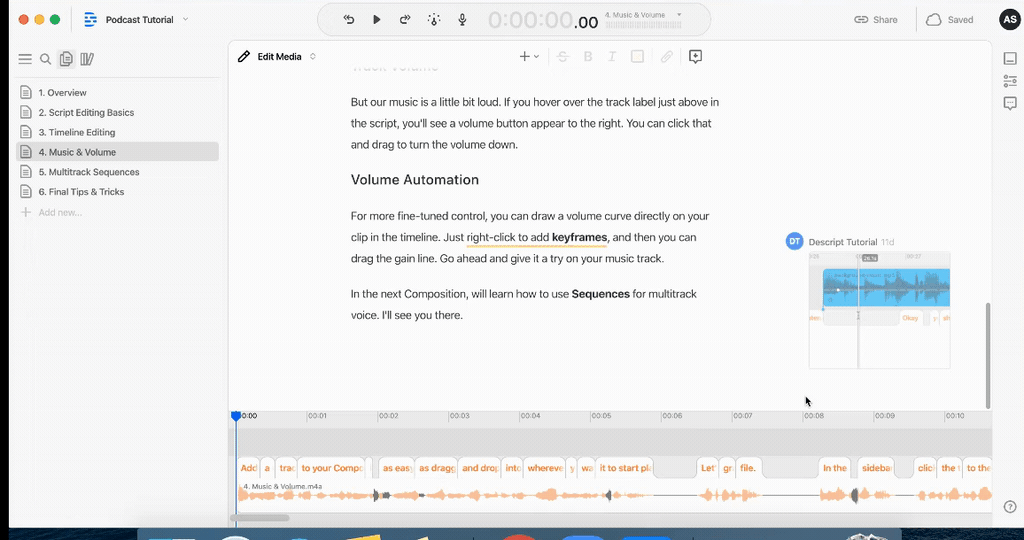
One of the best examples of interactive walkthroughs I’ve seen recently is from Descript. It’s a podcasting tool that enables you to see a transcript and then edit the podcast as if it’s a word document. Clever, huh?
But their onboarding is even better. Users are given a sample recording which they can play around with.
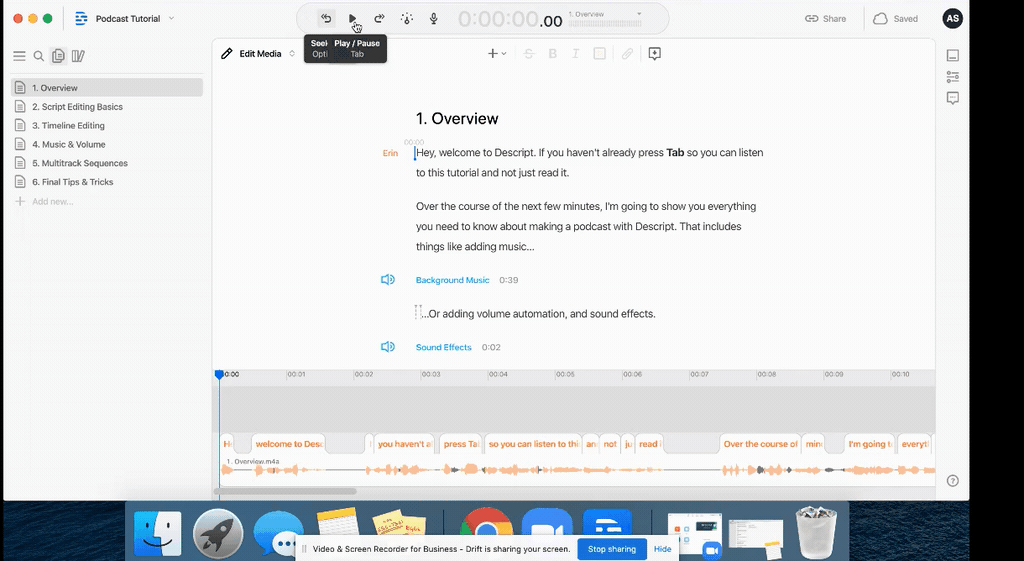
They’re shown how Descript works, but the key here is that users learn by doing. This is far more effective as it enables you to see the value first-hand.
Think about how you can introduce users to your product simply by having them actually use it.
Another example of interactive walkthroughs comes from Platformly:
Platformly provides interactive walkthroughs for every feature. But if a user happens to skip through it, and then gets stuck, they can simply open the walkthrough again for a quick refresher.
Platformly’s self-serve onboarding approach led to completion rates of over 40%, well beyond the industry average of around 30%.
This is a great way of making interactive walkthroughs part of your self-serve onboarding flow.
One of the easiest ways of adding interactive walkthroughs to your product is with Userpilot. It has a unique onboarding element called “Driven Actions”.
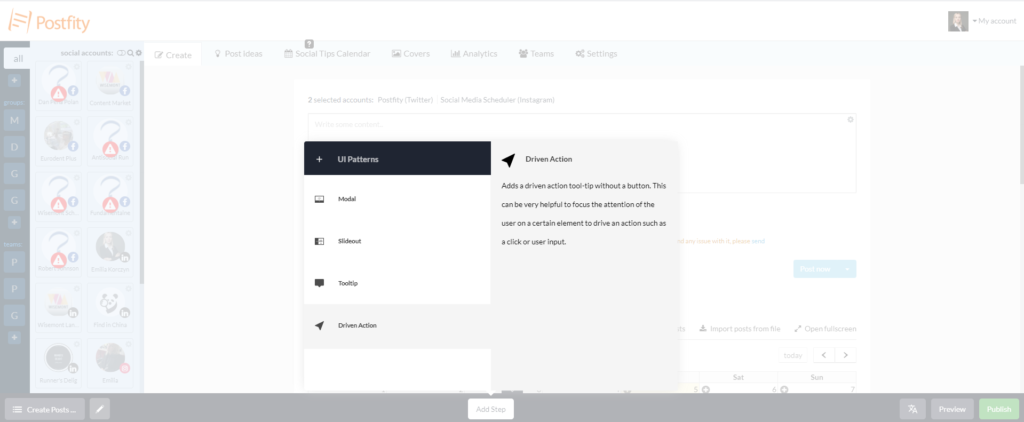
These driven actions essentially force the user to interact with your product, either by clicking, hovering, or even inputting text.
Native Tooltips
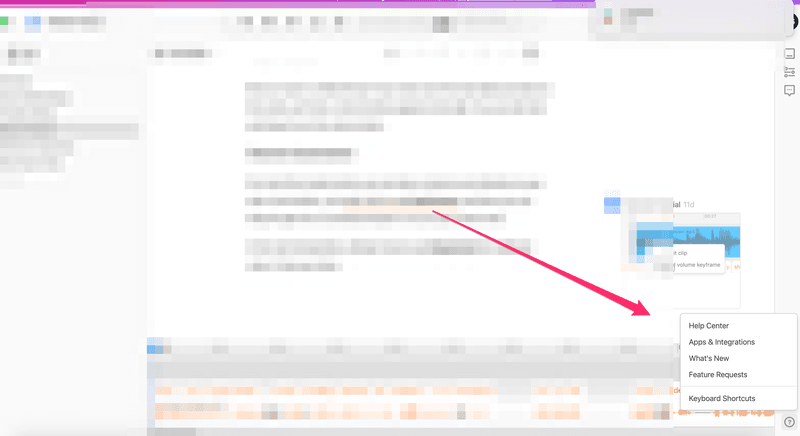
What if you need to explain certain new features to your users but you don’t want to show them another popup?
Native tooltips are the answer. They are a less-intrusive form of in-app messages that show in the form of a small icon (e.g. ‘i’ or ‘?’ as in Userpilot) displayed when the user hovers over or clicks on an element.
Postfity employed native tooltips to explain secondary features of its product such as ‘post ideas’ and ‘social tips calendar’ that help the users come up with content ideas (but are not essential to use the product).
This is a great way to interact with users in a subtle way without forcing them to go into an experience flow.
Help center widget
Your help center or knowledge base is one of your most important tools when it comes to self-serve onboarding. If a user needs help with a particular part of your product, they can look it up in your help docs and find the answer.
Of course, the main issue with help docs is that your users need to leave your product to find them, and it might not always occur to them to do that.
That’s what makes help center widgets so useful.
A help center widget essentially enables you to add your help documentation to your product. Generally, your users can then click on a button to open up the widget.
Some help center widgets are even able to automatically display relevant help docs depending on the page that the user is on.
One of my favorite tools at the moment, Descript, uses a help center widget to improve their self-serve onboarding:
It’s clean and simple, and makes it easy for users to find the information they need.
Here’s another help widget from Heap:
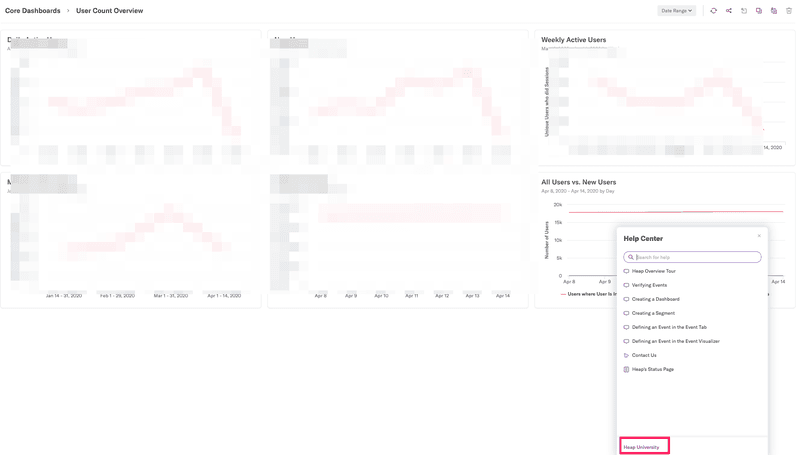
Again, it’s relatively simple, and it doesn’t take up too much of the screen so it isn’t a distraction from the product.
This help center widget also contains links that activate interactive walkthroughs, providing a complete self-serve onboarding approach.
(Also, note the link to Heap University. I’ll get to that in a minute.)
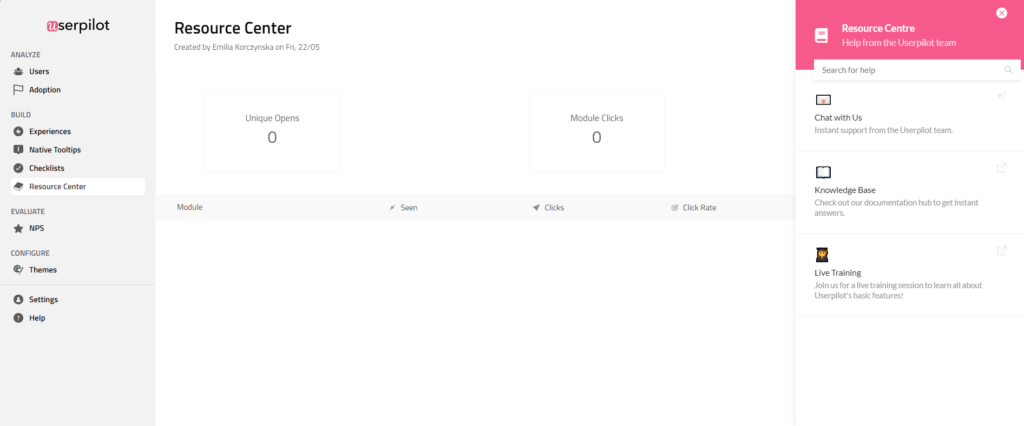
There’s a lot of help center widget tools out there to look at, but if you’re a Userpilot customer then you can use our built-in help center widget, the Resource Center.
Academies
Lots of successful SaaS products come with their own academy (you might know them as schools or universities).
It’s basically a way of turning help docs into a structured course that walks users through your product.
One of the best examples comes from Hubspot:

Hubspot offers a range of different courses, covering all kinds of marketing knowledge. Not only do you learn more about marketing, but you also learn how Hubspot can help you put your new learnings into practice.
Another great example is from Heap. I showed you in the previous section the link that Heap includes in the help center widget.
Here’s the university:
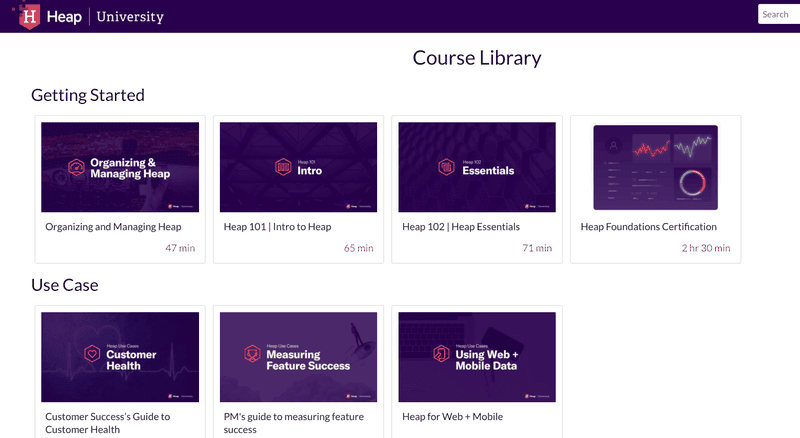
It provides you with all the education you need to get the most value from Heap, and learn valuable new skills at the same time. You can even get Heap certification to show off your skills.
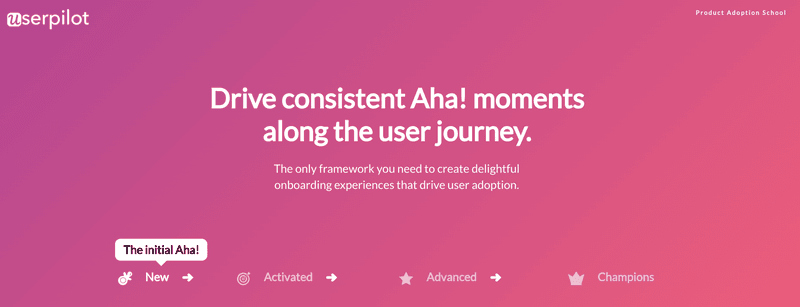
We recently launched our own course at Userpilot. It’s called Product Adoption School, and the aim is to teach people how to improve adoption for their own product.
It means we give extra value to our customers and help them make the most of our product.
Academies are a great way of adding more to your self-serve onboarding. You get the chance to add real improvement to your users’ lives.
Best practices for self-serve onboarding
Below, I’m going to show you some best practices so that your self-serve onboarding can be as effective as possible.
They include:
- Focusing on one key action
- Adding a welcome screen
- Making it contextual
- Using milestones
- Letting users choose their journey
Focusing on one key action
It’s easy to overcomplicate self-serve onboarding. You can end up adding too much of it that it becomes confusing and distracts users from your product. This can end up having the opposite effect.
To avoid this, you should focus on one key action that you want your users to complete.
This key action should be specific. It’s no use saying that your one key action is for your user to “start using a certain feature”. That’s actually made up of lots of different actions.
Think about what your user can actually do to reach the next stage of the user journey. If you need your users to activate, then what does that involve?
I mentioned earlier that Userpilot’s Aha! Moment comes when users build their first onboarding experience.
To get to that point, we need them to install the Chrome extension. So that’s our one key action at that point in the user journey.
We then focus our onboarding on helping them achieve that.

We make installing the extension as quick and painless as possible. That way, users start experiencing value quicker.
Adding a welcome screen
In our State of Product Onboarding research, we discovered something a little concerning. 40% of the SaaS products we looked at didn’t include a welcome screen as part of their onboarding.
Welcome screens are a great way to kick off your self-serve onboarding. Normally, they would be presented as a pop-up modal when a user logs in for the first time.
There’s a lot of different things you can include on your product’s welcome screen.
For starters, introduce them to your product. Remind them why they signed up in the first place. Use the Jobs-to-be-Done framework (like I mentioned above) to give context to your product.
Secondly, offer them direction. Self-serve onboarding is all about helping your users find their own way through your product. But that doesn’t mean you can’t nudge them down the right path.
If you refer back to the user journey fly-wheel…
… you’ll see that Trial to Activation is one of the first steps. It’s also one of the most important. If your trial users don’t activate, they’ll never progress through the journey.
Take the one key action from the point above, and nudge your users towards it. You can either explain how to get there, or even provide them with a button that will do the work for them.
Here’s how we do it:
As you can see, we reiterate the benefits that Userpilot provides, and then provide users with the next step, which is our one key action.
This helps to introduce users to our product, but also gives them the direction they need to get started and see value.
This next example is from Yotpo:
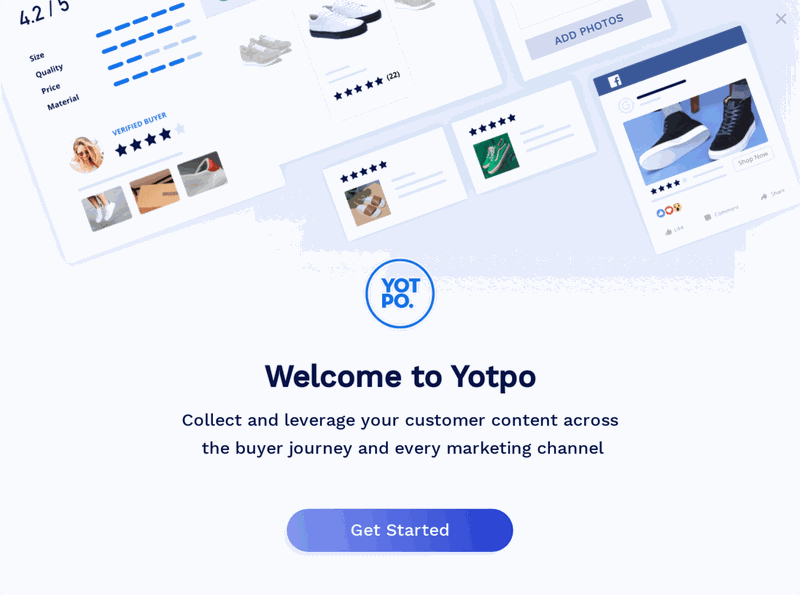
As you can see, Yotpo’s welcome modal starts by briefly explaining the primary value that it provides.
Yotpo also includes a video overview of the product.
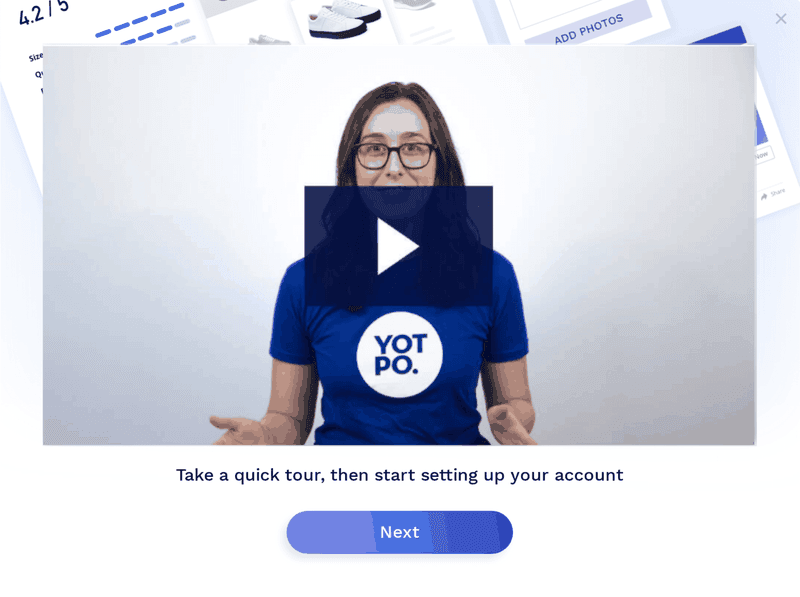
This is a clever way of engaging new users and showing them a glimpse of what’s to come. It helps to set expectations too.
Your welcome screen is a great opportunity to make sure users get the best possible first impression of your product. Don’t waste it.
Making it contextual
The whole point of self-serve onboarding is that your users get help as and when they need it. They aren’t necessarily forced to sit through product tours they aren’t interested in.
That’s why it’s important to make your onboarding flows contextual.
Contextual onboarding means that you show the right message to the right user.
In terms of self-serve onboarding, it means you should look to build optional onboarding flows into your product.
I explained earlier that Platformly’s approach was to place various interactive walkthroughs within their products. Users could then click on these whenever they liked, hence self-serve.
Another example could be to set up custom events to use as triggers for your onboarding flows.
In our research, we saw that only 28% of SaaS companies used some form of custom events. That means you can easily take your product to the next level by using them properly.
A custom event is basically something that a user does when they’re using your product. This is why it’s crucial that you set up your product usage analytics, as I mentioned earlier.
You can set an event, for example, when a user reaches a certain page, and then use that to trigger an onboarding flow.
While this isn’t strictly self-serve, the user’s behavior has triggered a contextual onboarding flow, and so it’s more personalized to them.
Here’s a great example of contextual onboarding in action:
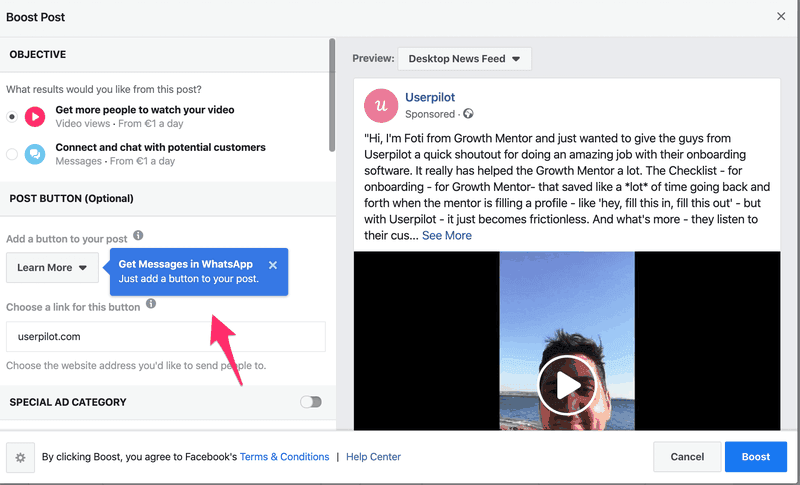
Facebook could have told me about the ability to add a Whatsapp button to my post at any point. But chances are if they’d told me about it earlier I would’ve forgotten all about it.
Instead, they make sure to tell me at the most relevant point: When I’m actually composing a post.
This way I’m more likely to pay attention as it’s relevant to what I’m doing.
Google also uses contextual onboarding to help users get to grips with Google Analytics:
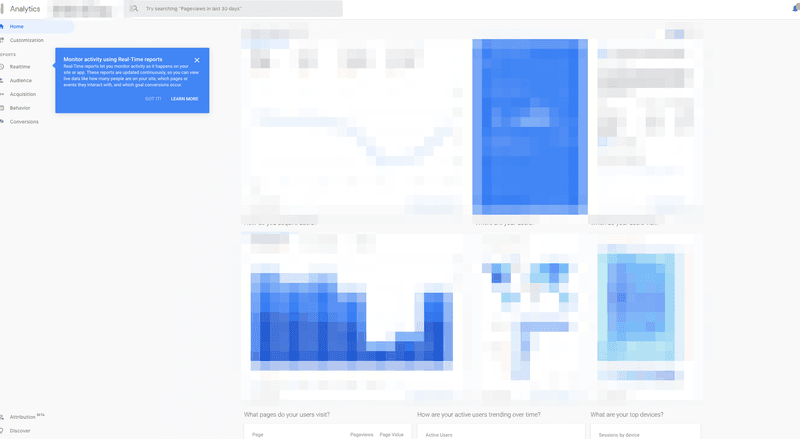
Here, Google showed me this tooltip once they knew that I’d find value in the Real Time reports. There would be no point showing me this if I hadn’t already learned the basics of Google Analytics or set up my site.
Using milestones
Only 17% of SaaS products celebrate a user’s success or progress. That’s way too low.
Using milestones to celebrate and measure how your users are engaging with your product is a really simple thing to do, but it goes a long way in building relationships.
It’s particularly important to do this with self-serve onboarding. Users who self-serve don’t always have a structured onboarding flow. There might not be an obvious start or end.
This can make it difficult for the users to know if they’re on the right track, or whether they’re actually doing anything worthwhile. If a user doesn’t know they’re doing the right thing, they might not carry on doing it.
A simple approach to using milestones could be to map out the various tasks you want your users to complete and then provide them with a checklist.
A checklist is literally a list of things that users can do to get more value from your product.
The great thing about a checklist is that it can simply offer suggestions. You aren’t forcing your users to complete the checklist. You’re just showing them some ideas.
For your self-serve onboarding users, a checklist can provide the roadmap they need to get value from your product.
Here’s a great checklist example from Sked Social:
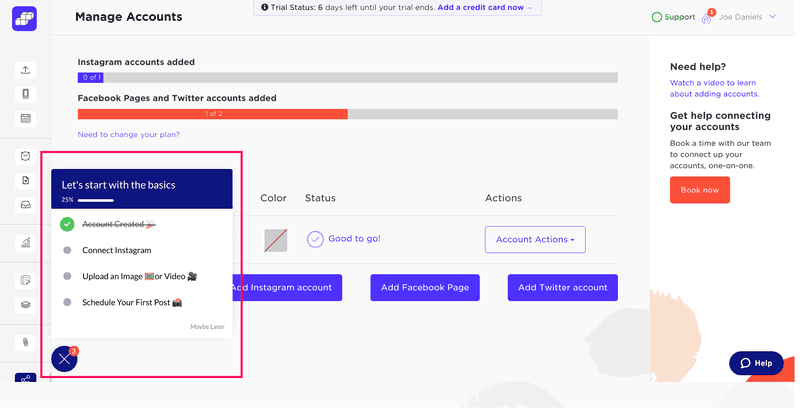
There are a few things I want you to notice about this checklist.
Firstly, it only has four items. This is really important. Too many tasks and you risk overwhelming new users. Too few and it’s pointless. The key is to stick to 3-5 tasks, making sure that they take your user along the user journey each time.
Secondly, it has a progress bar. This goes back to what I was saying about how measuring progress helps to keep users engaged.
Finally, the first item is already checked off for you. This is a psychological trick called “endowed progress”. Essentially, users will feel like they’ve already started making progress, and so they’re more likely to carry on down the list.
That’s why your first to-do list item should always be “Make a to-do list”!
Sked Social used Userpilot to add that checklist to their product. The result? Users who completed the checklist were 3x more likely to convert to paid users.
As for celebrating your users’ success, feel free to get creative. Here’s how Asana does it:
That’s right, they show a unicorn flying across your screen! It’s a nice touch that humanizes the product and shows you that you’re doing the right thing.
Letting users choose their journey
I know I keep saying this but it’s a crucial point: Self-serve onboarding is designed to let your users choose how they’re onboarded. It means you don’t force them down one particular path.
One of the best ways of helping users do that is by letting them choose their own journey.
This sometimes requires a little more work, as it means building a number of different onboarding flows, but the results are more than worth it.
One of the most common and easiest ways of doing this is to use your welcome screen to learn more about your users.
If, for example, you have a product that has different use cases depending on job title, then you could ask your users to select their job title, and then funnel them to the most appropriate onboarding flow.
Some products, like Canva, go a step further and change the entire product experience based on the answers that users provide.
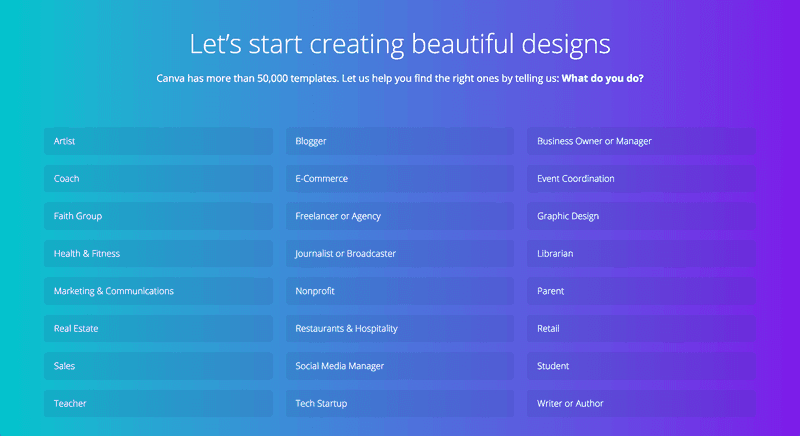
Users select which use case is most relevant to them. They’ll then be shown templates that are more useful for their use case.
Box also uses a welcome screen to let the user choose their journey:
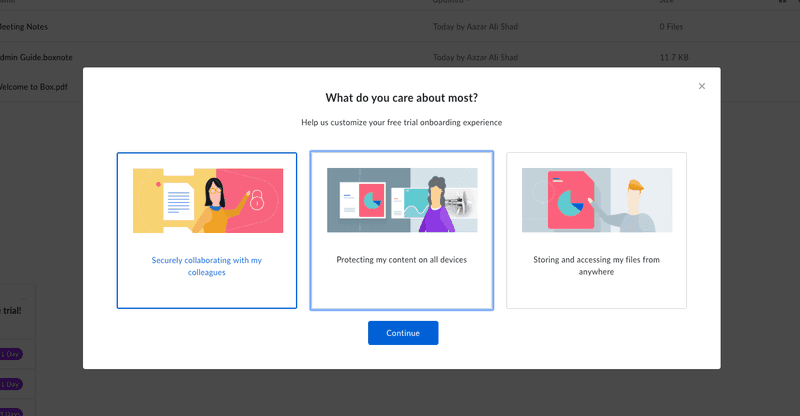
They’re even more transparent about it, explaining that your choices will affect your onboarding. Rather than choosing use cases, you choose from the three main benefits that Box provides. This is a neat way of reminding users about the value they’ll be getting from your product.
Personalizing a user’s experience like this is a big part of self-serve onboarding. It helps to reduce time-to-value and means that users will progress along the user journey quicker.
Key takeaways
- Self-serve onboarding is a way of letting your users onboard themselves. It’s perfect for product-led SaaS companies.
- Self-serve onboarding scales better and is more effective at educating your users.
- Self-serve onboarding is a form of reactive onboarding, as users are able to learn your product on their own terms.
- Before you get started with self-serve onboarding, you need to prepare. This includes: Setting and managing expectations, doing things that don’t scale, understanding your user journey, defining your Jobs-to-be-Done, talking to your users, and setting up product analytics.
- Some best practices for self-serve onboarding are: Focusing on one key action, adding a welcome screen, making it contextual, using milestones, and letting users choose their own journeys.
About the Author

Aazar Ali Shad is the VP of Growth at Userpilot, and has more than 8 years of SaaS Experience. He is currently helping 500+ SaaS companies improve user onboarding and increase product adoption.
About the author