12 Web and Mobile App Onboarding Best Practices to Drive User Retention


Bad user onboarding can be poison to your product. If users don’t quickly understand how to use your app or why it’s valuable, they’ll drop off before ever reaching activation. And once they’re gone, they’re not coming back. I’ve learned this the hard way myself.
That’s why you need not just a good user onboarding experience, but a great one.
In this post, I’ll break down top web and mobile app onboarding best practices, with real examples, so your users can “get it” from day one and keep coming back.
What is app onboarding?
In my experience, app onboarding isn’t just about introducing users to your product. It’s also about showing users value fast and improving user retention from the start. That’s why you need tutorials, walkthroughs, and in-app guidance to help users hit their first milestones quickly.
But onboarding doesn’t stop there. Depending on your onboarding strategy, you might need to keep adding value with self-service support, feature adoption tooltips, and high-touch customer success services.
Web vs mobile app onboarding
Whether users download your app from the store or click the “free trial” button on your website, your onboarding tactics should adapt to their journey. The experience should feel natural for each platform.
Here’s what makes web and mobile app onboarding different:
- Web app onboarding offers more design flexibility, as it can adapt to different screen sizes, layouts, and resolutions. Meanwhile, mobile app onboarding has stricter OS guidelines and layout constraints.
- Web onboarding has more options for user feedback and analytics, and leverages browser features like cookies, pop-ups, and forms. Mobile apps, on the other hand, have fewer options for user feedback and analytics and require user permission to collect data.
- Web users expect apps to be more powerful, complex, and feature-rich than mobile apps. Mobile users expect apps to have an easier, faster and more convenient experience.
- Website visitors tend to have shorter attention spans and higher bounce rates. They can easily switch to another tab or website if they are not engaged or satisfied with the app. Mobile app users might show higher commitment and lower churn rates, as they’ve already invested time and space to download and install the app.
To sum up, web onboarding should focus on grabbing the user’s attention fast. You should highlight your unique value proposition, showcase advanced features, and build credibility as fast as possible.
Meanwhile, mobile app onboarding should focus on user satisfaction and make users see the app’s benefits from the first user interaction.
What are the different types of app onboarding?
Not every onboarding process is created equal. The best approach depends on your app and users. Over the years, I’ve seen three main types that work in different situations:
- Progressive onboarding: Guides users through the app step by step, revealing only the essential information and actions at each stage. It avoids overwhelming the user with too many interfaces and features, while also creating a sense of achievement as users unlock new features throughout the app.
- Function-oriented onboarding: Focuses on teaching users the core features of the app, often through a single product tour. It’s great for simple apps with a clear use case or problem to solve but can feel more repetitive than progressive onboarding processes.
- Benefits-oriented onboarding: Helps users understand why they should use the app by connecting them to a larger goal, social impact, or long-term commitment. This approach highlights the long-term value of the product rather than just its features.
Choosing the right onboarding strategy for your app can make a huge difference. But success isn’t just about the type of onboarding—it’s also about the strategies you use to implement it.
Web and mobile app onboarding best practices for retaining users
I’ve seen too many good products lose users because onboarding couldn’t guide them effectively. A strong onboarding experience isn’t just about getting users in, but also keeping them engaged.
Here are my top recommendations for both web and mobile apps:
#1 Create a frictionless signup process
One of the biggest onboarding mistakes I see often is apps making signups way harder than they need to be. If users hit friction before they even enter the app, they’ll likely drop off.
The fix: simplify the signup flow. Avoid unnecessary form fields, don’t force email verification right away, and definitely don’t ask for a credit card upfront. The goal is to get users inside the app quickly with a well-optimized signup experience.
For mobile app onboarding, this is even more critical. Mobile users expect speed and won’t waste time typing out long forms.
To make mobile signups simpler:
- Enable social logins (SSO): So users can sign up with Google, Apple, or social accounts.
- Offer one-tap signup: To reduce friction completely.
- Delay account creation where possible: Apps like TikTok let users explore first and only ask for signup when it’s necessary.
Figma’s frictionless signup flow
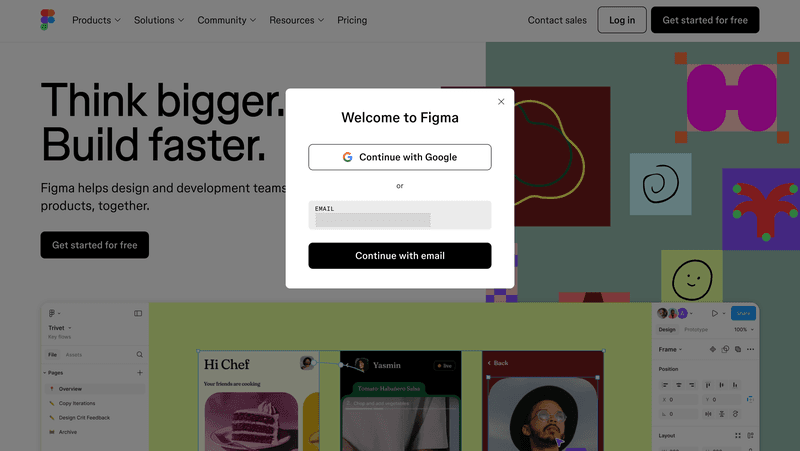
Figma, for example, understands the importance of having an effortless signup process. That’s why you can easily sign up with your Google account, single sign-on (SSO), or an email and password.
They also built their signup page with a clean and eye-appealing design to make the signup experience more pleasant.
TikTok allows content browsing without signing up
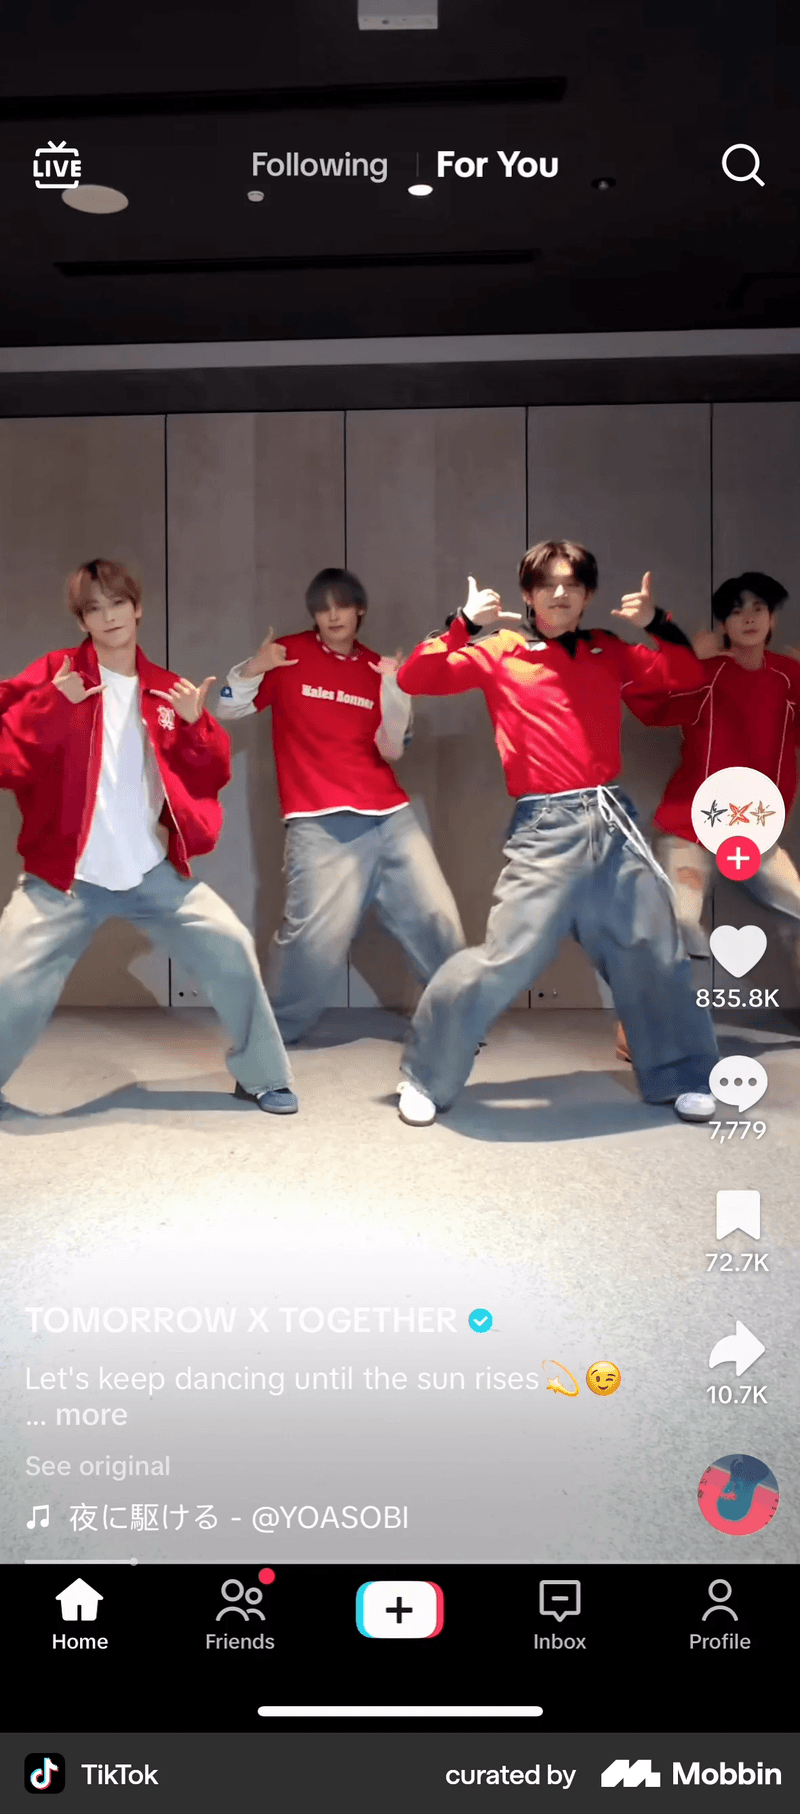
TikTok removes all onboarding barriers by letting users browse content freely without signing up. Users only need to create an account when they want to like, comment, or follow creators.
When signup is necessary, it’s seamless with SSO options like Google and Apple, keeping the process fast and frictionless.

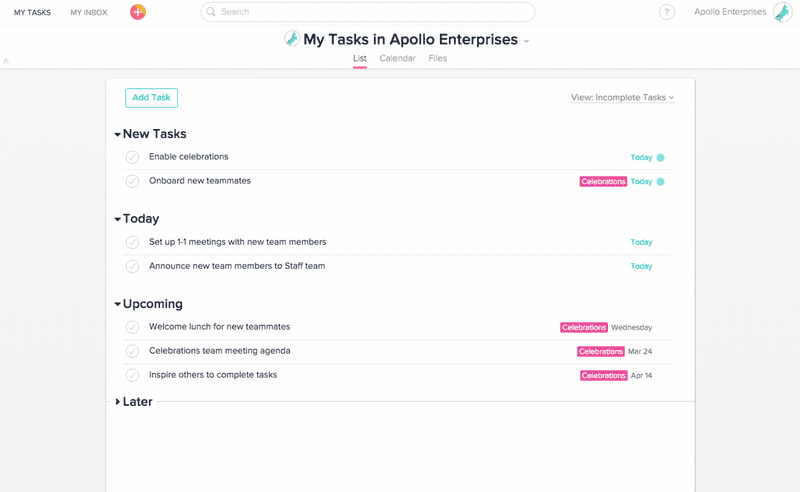
#2 Segment users to personalize the app onboarding process
If your goal is to boost user engagement early, a personalized onboarding experience is key.
I find that the best way to achieve this is to segment users early on. Make the most of welcome surveys to collect data and then segment users based on their needs, in-app behaviors, NPS responses, and product usage.
With that info, you can build a more relevant web or mobile app onboarding flow based on your customer’s use case, job to be done (JTBD), and their stage in the journey.
Kontentino’s welcome survey for personalizing user onboarding flow

Kontetino’s keeps things simple, with their welcome survey asking you two simple questions:
- What’s your goal? (e.g., content approval, scheduling)
- What type of company are you? (e.g., agency, brand)
With just these answers, Kontentino segments users instantly and adjusts the onboarding flow to match their business model and use cases. This ensures that users see only the most relevant features for their job.
Bumble’s signup intention surveys for tailoring the profiles users see
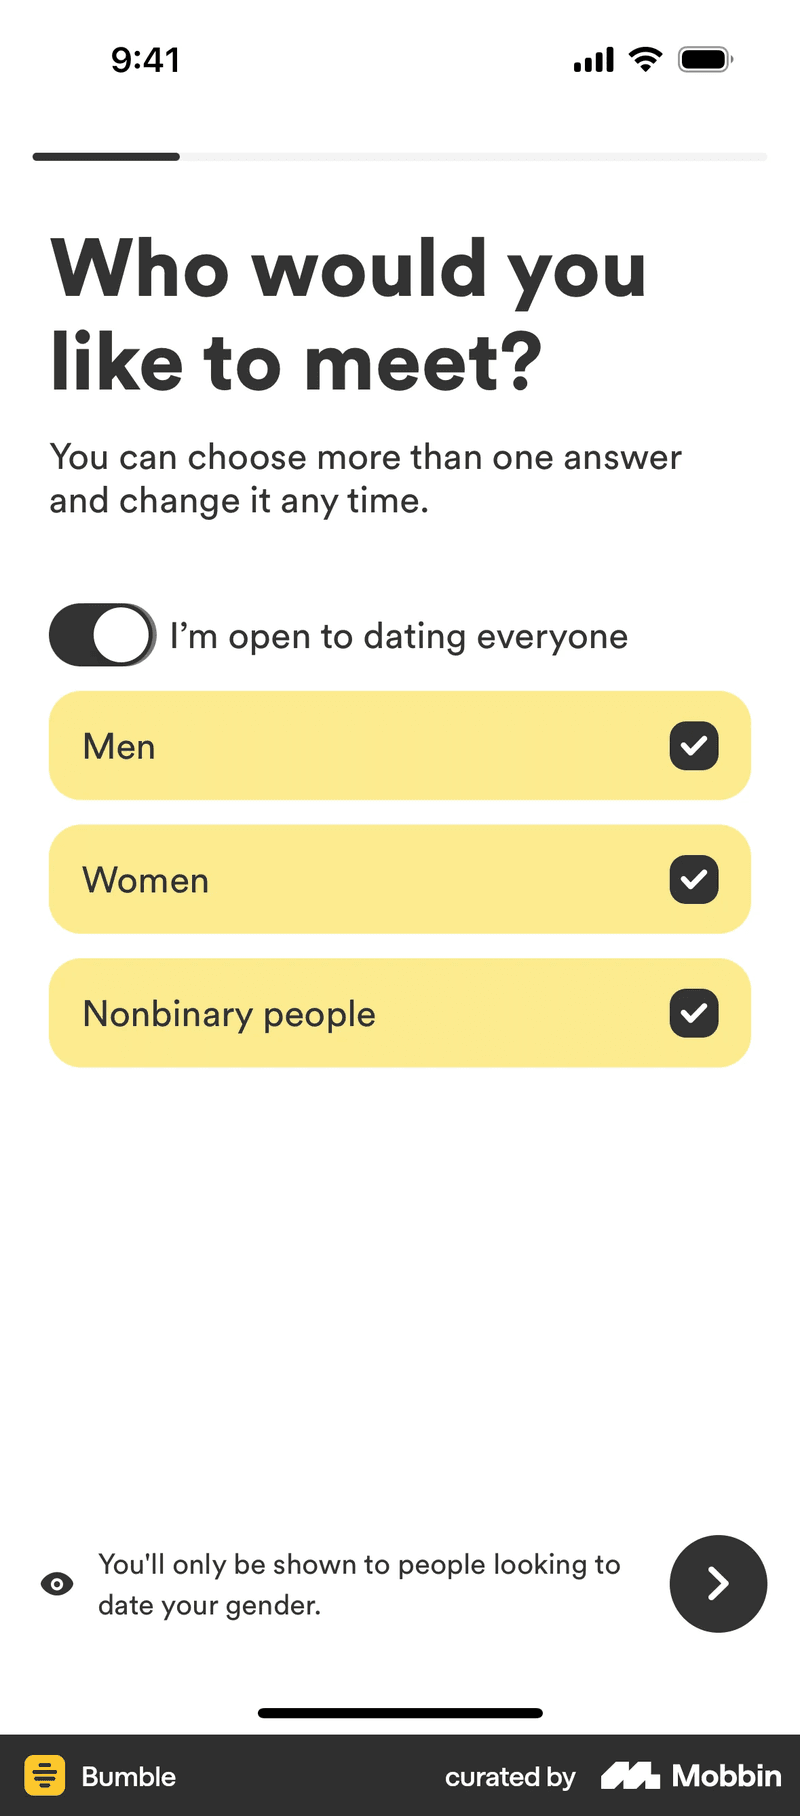
Bumble also simplifies onboarding by getting rid of any unnecessary friction. Instead of making users type out preferences, it lets them tap through quick questions.
New users select what they’re looking for, be it a relationship, something casual, or new friends. Based on this, Bumble adjusts their app experience instantly and shows users only the most relevant profiles.
This is exactly what mobile users expect—quick, frictionless interactions. Using welcome surveys and product personalization can help any app create a more intuitive onboarding experience like this.
#3 Fill the user onboarding screen with relevant data
Once you’ve collected user data during signup, how do you prevent an empty state without overwhelming them?
I recommend personalizing the onboarding screen with the data collected from welcome surveys. For example, you can:
- Show contextual tips based on the user’s expertise and familiarity with the product.
- Highlight key features and benefits that match the user’s goals and pain points.
- Suggest next steps that help the user achieve quick wins and value from the product.
Monday fills onboarding screens with board templates
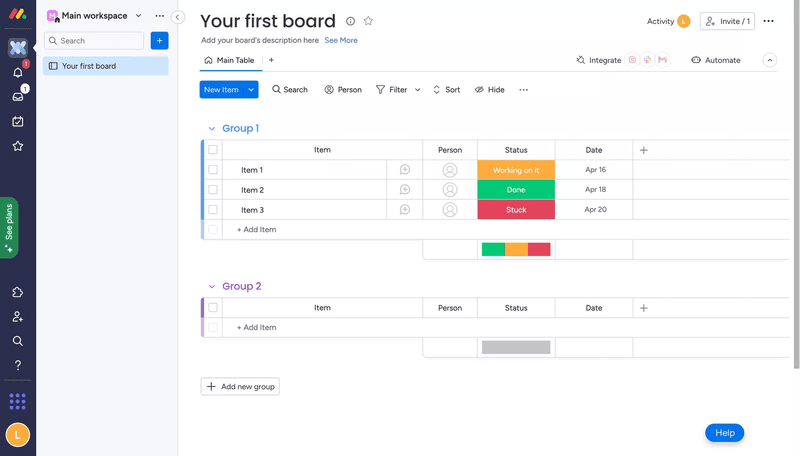
For instance, see how Monday fills the empty state with a basic template called “Your First Board”. It includes a few pre-filled items and formats so users can start working immediately.
YNAB provides sample budget categories and pre-filled example transactions
I also like how YNAB removes the blank slate problem by giving users a head start. Instead of starting from scratch, they see pre-filled budget categories and example transactions. This makes it easier to understand the app’s core features, reducing friction and helping new users take action faster.
#4 Focus on one onboarding task at a time
With so much going on during an app’s onboarding, you risk overwhelming users with too much information. To improve user retention, you should walk users through their first steps before giving them full access to the dashboard. And most importantly, keep their focus on one task at a time.
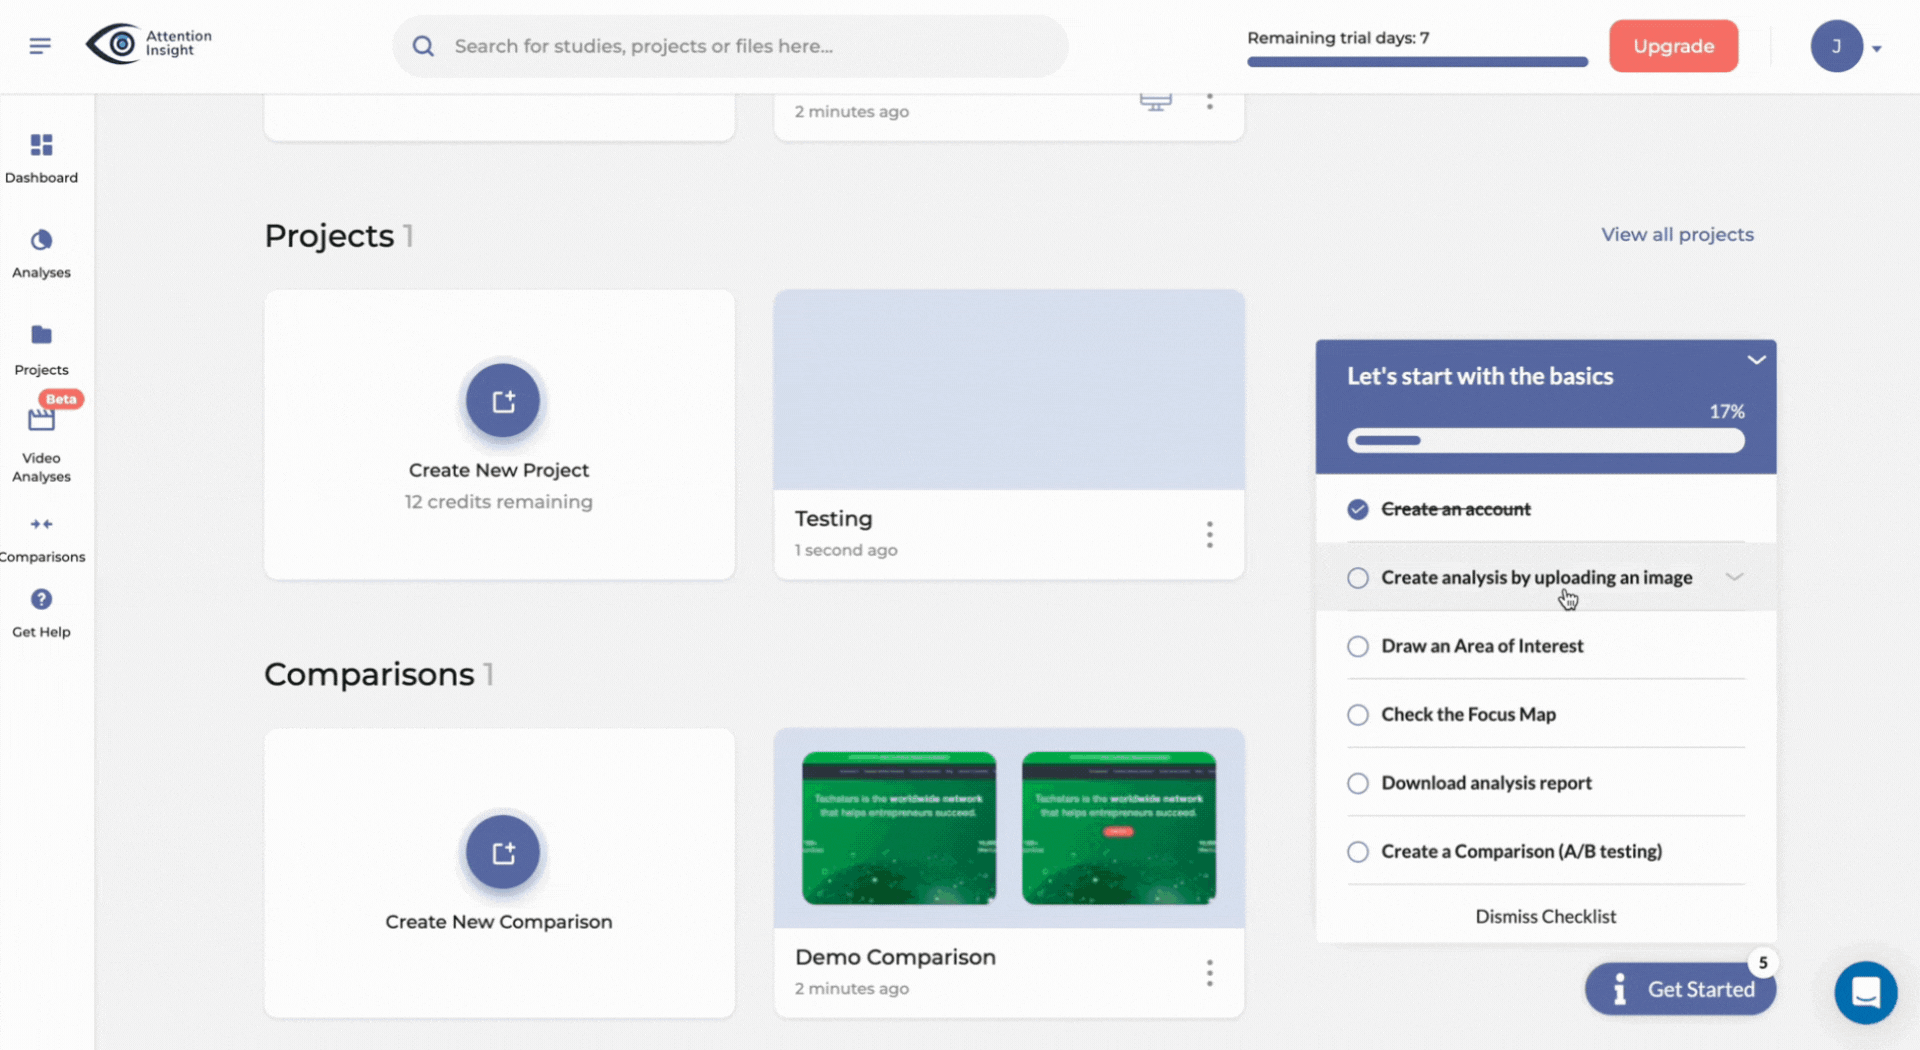
Attention Insights asks users to create a heatmap analysis to get started
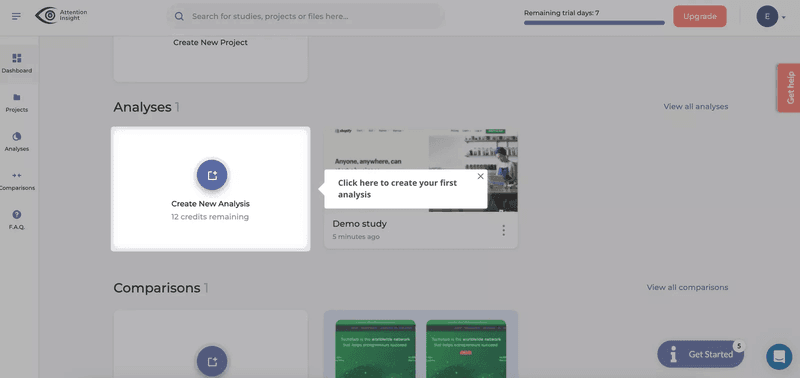
Attention Insights keeps new user onboarding focused on a single, high-value task: creating a heatmap analysis. Since the app is designed to help users analyze website and ad performance before launch, this step immediately showcases its core value.
Previously, getting users to take this first step used to be a big challenge for the company. Attention Insights made it easier for new users to generate their first heatmap, leading to a 47% increase in activation rates in six months!
Calm focuses the onboarding process on starting your first meditation session

As a meditation app, Calm makes the wise choice to avoid cluttering its mobile app onboarding with tutorials or feature walkthroughs. Instead, it guides new users straight into their first meditation session.
Since the app’s goal is to help users relax and build a habit, it starts by letting users select a session and start meditating right away. This approach makes the onboarding flow feel natural while reinforcing the app’s value instantly.
#5 Make the onboarding process contextual
Another tactic I’ve seen work well is using in-app guidance to onboard users contextually. This makes it intuitive for users to understand what they have to do.
One good way to do this is with interactive walkthroughs since they are more engaging and useful in helping users reach the activation stage. Unlike generic product tours, they respond to in-app behavior in real time and trigger contextual help exactly when users need them.
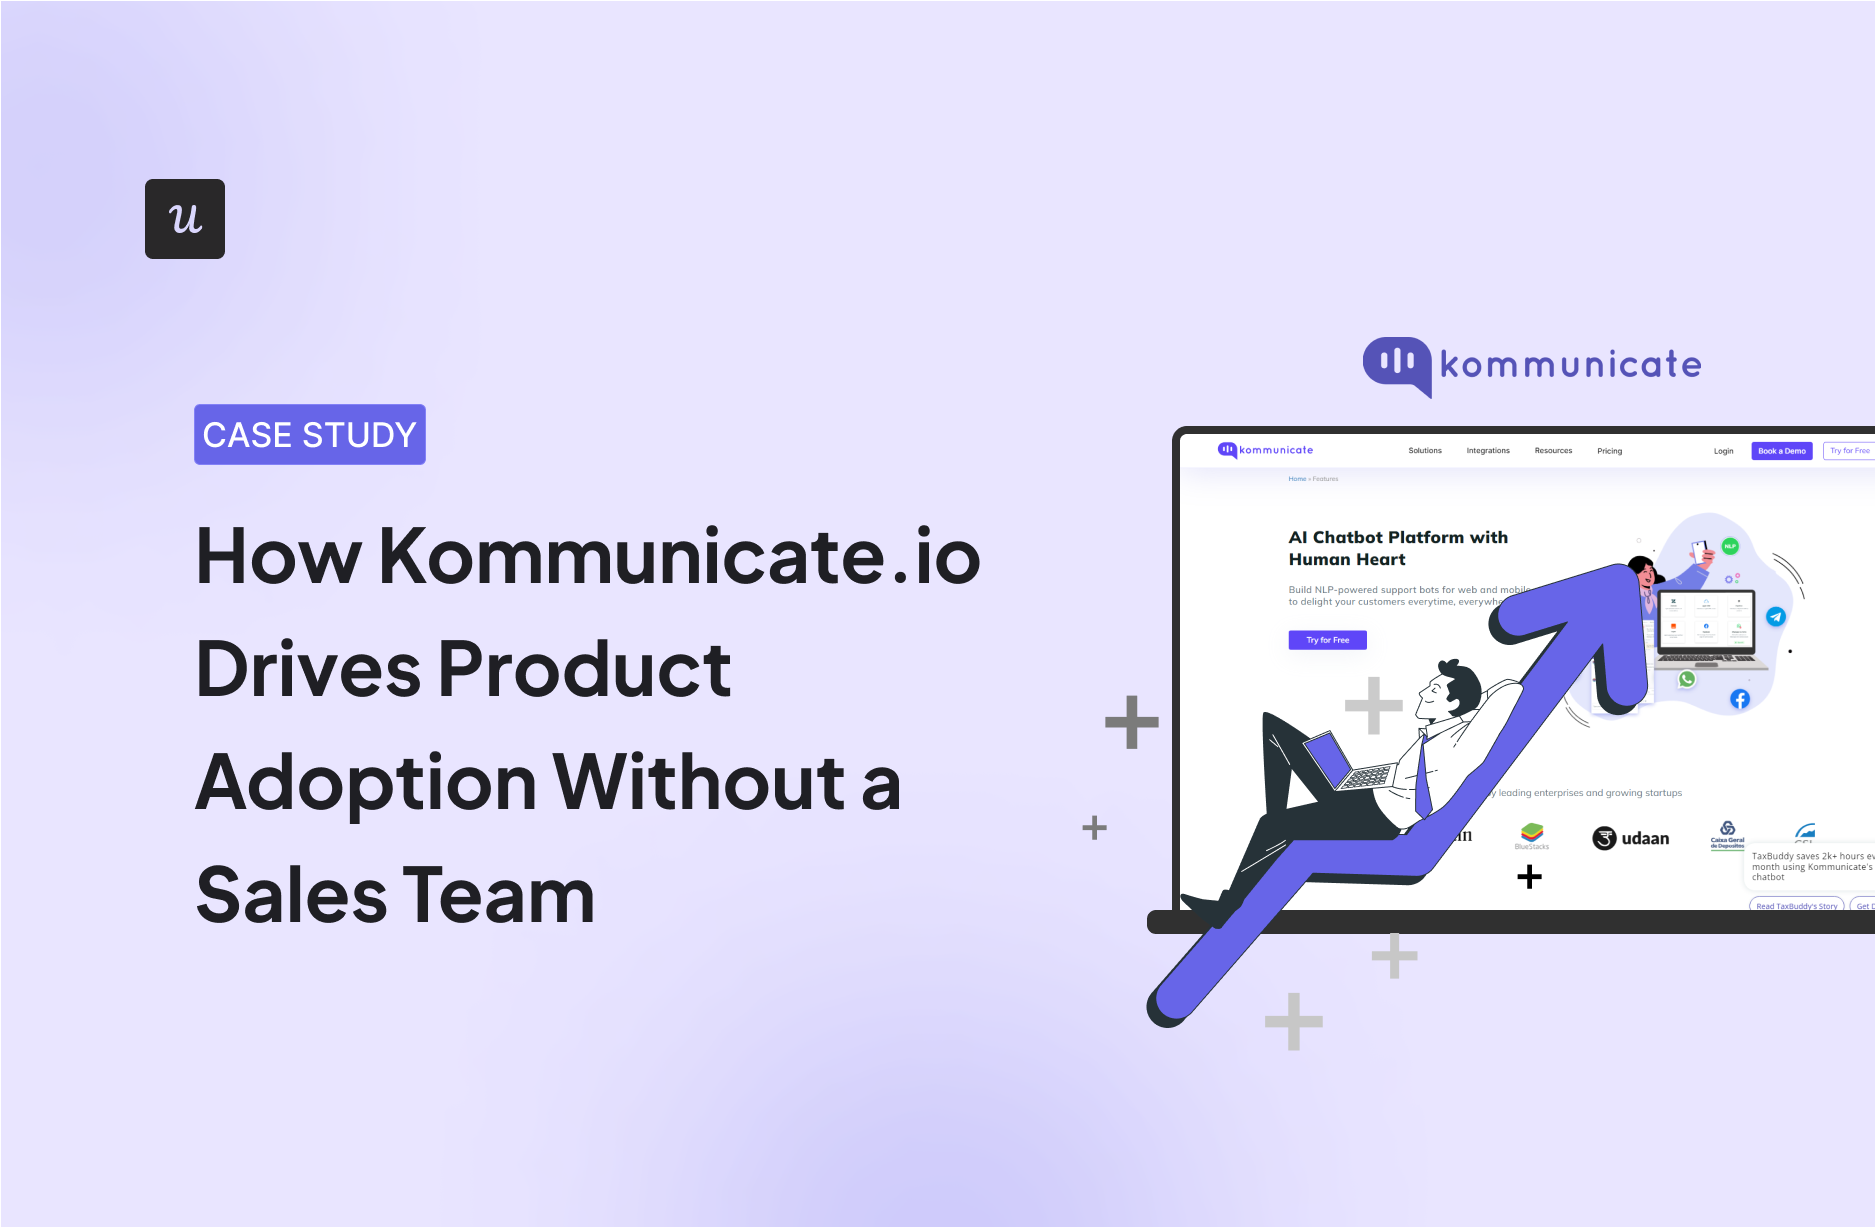
Kommunicate uses interactive walkthroughs to guide users

For example, instead of overwhelming the user with information they won’t retain, Kommunicate implemented interactive walkthroughs to hand-hold users across their app.
It triggers short tooltips as the user interacts with each part of the feature, focusing their attention only on their next step. Which in turn makes them more likely to engage, finish the first phase of the onboarding, and reach activation.
It works because they only trigger one feature at a time, so the user can stay busy (in a productive way) without feeling overwhelmed with information.
Strava encourages you to record your first activity as part of the onboarding

Strava is another example of this kind of contextual customer experience. Instead of going over too many features, the app just nudges users to start their first activity (a run, ride, or workout) right away.
Once users complete an activity, Strava sends personalized push notifications to encourage them to return and build a habit.
#6 Provide users with options to skip
Not everybody learns the same way or starts from scratch. Some users might already be familiar with your product.
I’ve seen this happen often: a well-designed, effective app onboarding flow ends up being triggered… but for the wrong user. That’s why most mobile apps let users skip onboarding steps like tutorials, surveys, or tooltips, so they can jump straight into what they came to do.
ClickUp uses dismissible in-app tutorials to onboard users

ClickUp is one of my favorite mobile app onboarding examples for this. It offers plenty of onboarding resources to help educate users, but never forces it on them. For the in-app tutorials, the “skip video” button is always available, letting users start working on their projects right away without watching unnecessary videos.
Wise allows users to skip parts of the onboarding process
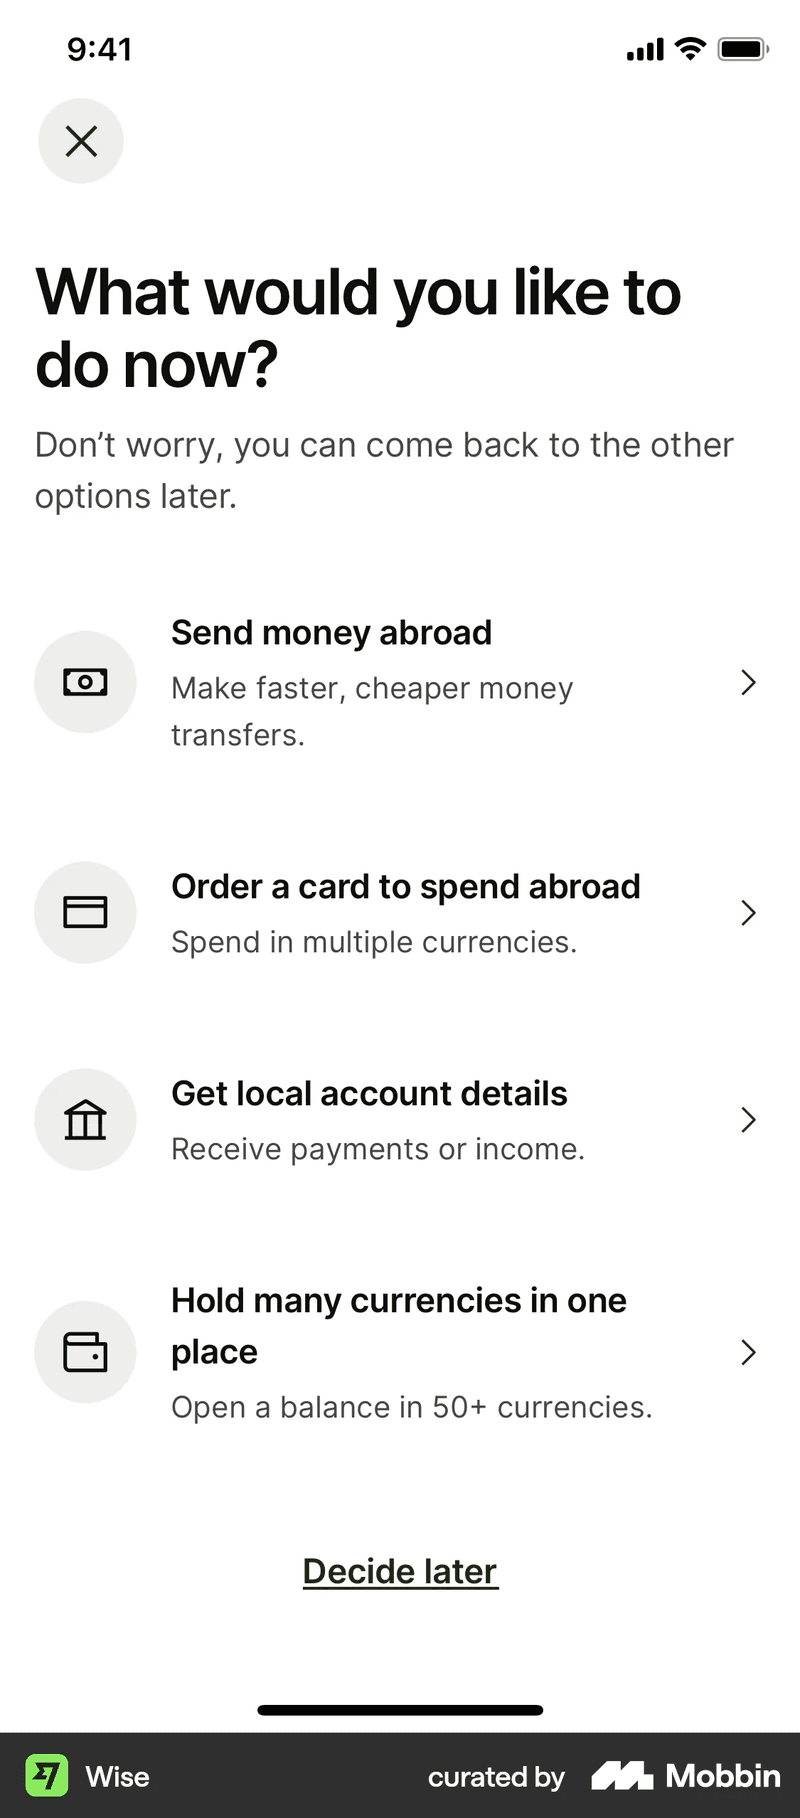
Wise gives users full control over their customer onboarding process by also letting them skip unnecessary steps. Instead of forcing a predefined flow, Wise lets users bypass certain onboarding screens and jump straight to sending or receiving money.
This flexibility ensures that existing users, or those already familiar with the platform, don’t waste time on repetitive steps.
#7 Celebrate user achievement with gamification
I’ve seen how powerful engagement loops can be in keeping users motivated. They encourage users to take action and offer positive reinforcement (like celebrations) that make them want to keep repeating a task.
With onboarding gamification, you can celebrate user milestones by adding elements such as badges, points, and levels for a more engaging user onboarding experience. This builds a positive loop and motivates users to use and solve their JTBD with your product.
Asana uses gamification to celebrate user achievement
For example, Asana adds a fun touch to app onboarding experiences with its unicorn animation, which appears when users complete a task. This reinforces positive behavior with a dopamine hit, encourages repeated engagement with your app, and motivates users to keep going.
Duolingo uses a variety of gamification techniques
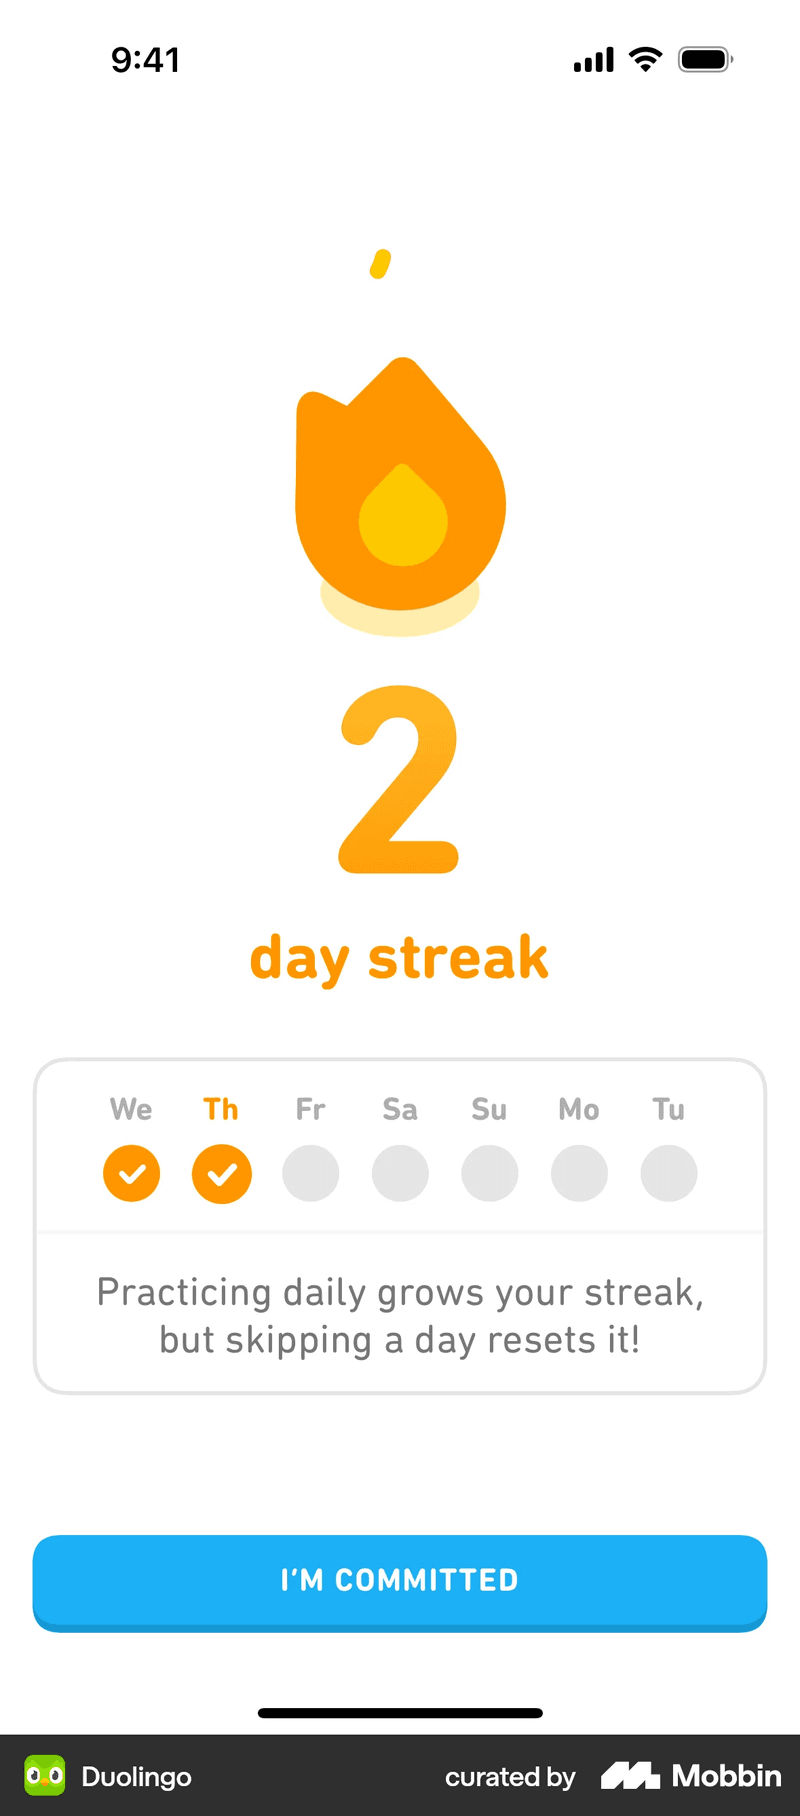
Duolingo makes app onboarding experiences fun and addictive with a mix of gamification strategies. It rewards users with XP for completing lessons and encourages them to keep streaks and climb leaderboards to compete with others.
The app also uses virtual currency to unlock rewards and levels to keep users progressing. All of this is a big part of not just good onboarding but also how Duolingo keeps users hooked and coming back daily.
#8 Make your app onboarding a continual process
I’ve always seen onboarding as more than just getting users to the activation stage. In fact, it’s an ongoing process.
This means that once your users have adopted the core features of your products, you should keep introducing them to secondary and advanced features that can help them succeed and unlock even more value.
One way to do this is by hosting webinars that offer product training and showcase new features that users might not have discovered yet.
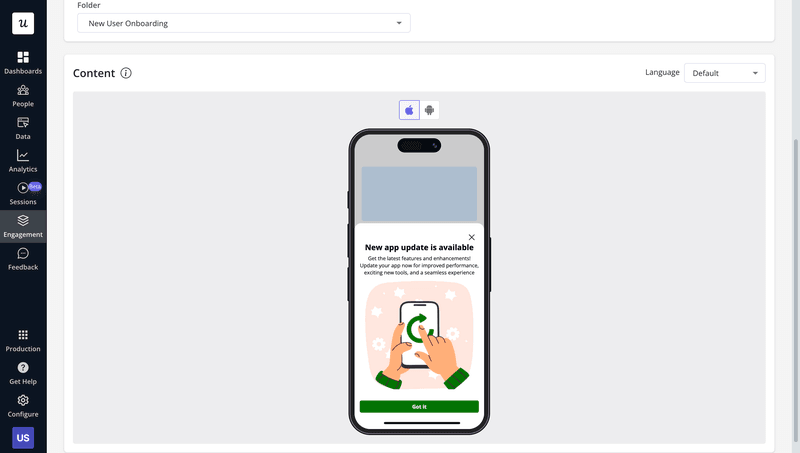
Cuvama uses in-app messages to announce new features

Cuvama keeps users engaged by introducing new features directly inside the app. Instead of relying on emails or external updates, they use in-app messages to highlight new app functionalities where users are already active.
To do this, Cuvama used Userpilot to build a no-code, in-app messaging system that delivers contextual feature announcements. This way, users don’t just see updates but also understand why they matter and how to use them. That’s what drives higher adoption rates.

Line uses in-app slideouts to announce new features

LINE keeps users informed with in-app slideouts that highlight new features without interrupting their experience. These pop-ups appear naturally in the interface, making sure updates get noticed.
For mobile apps, slideouts are an easy way to boost feature adoption without being intrusive.
#9 Collect explicit feedback throughout the onboarding process
Great app onboarding experiences aren’t just about guiding users. They’re about listening to them, too. Gathering real-time feedback helps identify friction points and optimize the experience.
For example, if you notice low completion rates in your onboarding flow, you can trigger an onboarding experience survey to understand why users are dropping off.
This means that instead of guessing, you’ll get direct insights from users to know what to fix. Using customer feedback surveys like this is key to making sure you’re always fine-tuning onboarding and improving retention.
RecruitNow measures onboarding flow performance with CSAT surveys
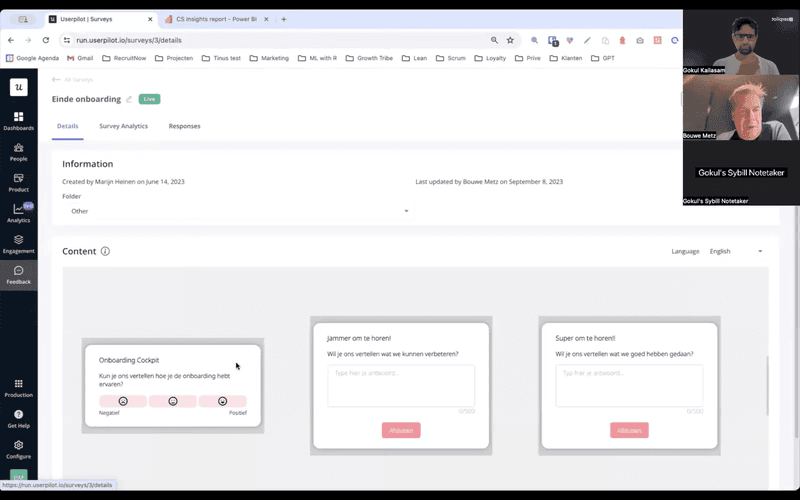
For instance, RecruitNow uses CSAT surveys to track how well their new user onboarding flow works. Instead of waiting for complaints, they proactively collect feedback right inside the app.
RecruitNow was able to do this by improving their in-app onboarding flow. It is now incredibly helpful for them to trigger action-based surveys at key moments and enables users to provide insights when their experience is fresh.
Revolut asks users after customer support experience
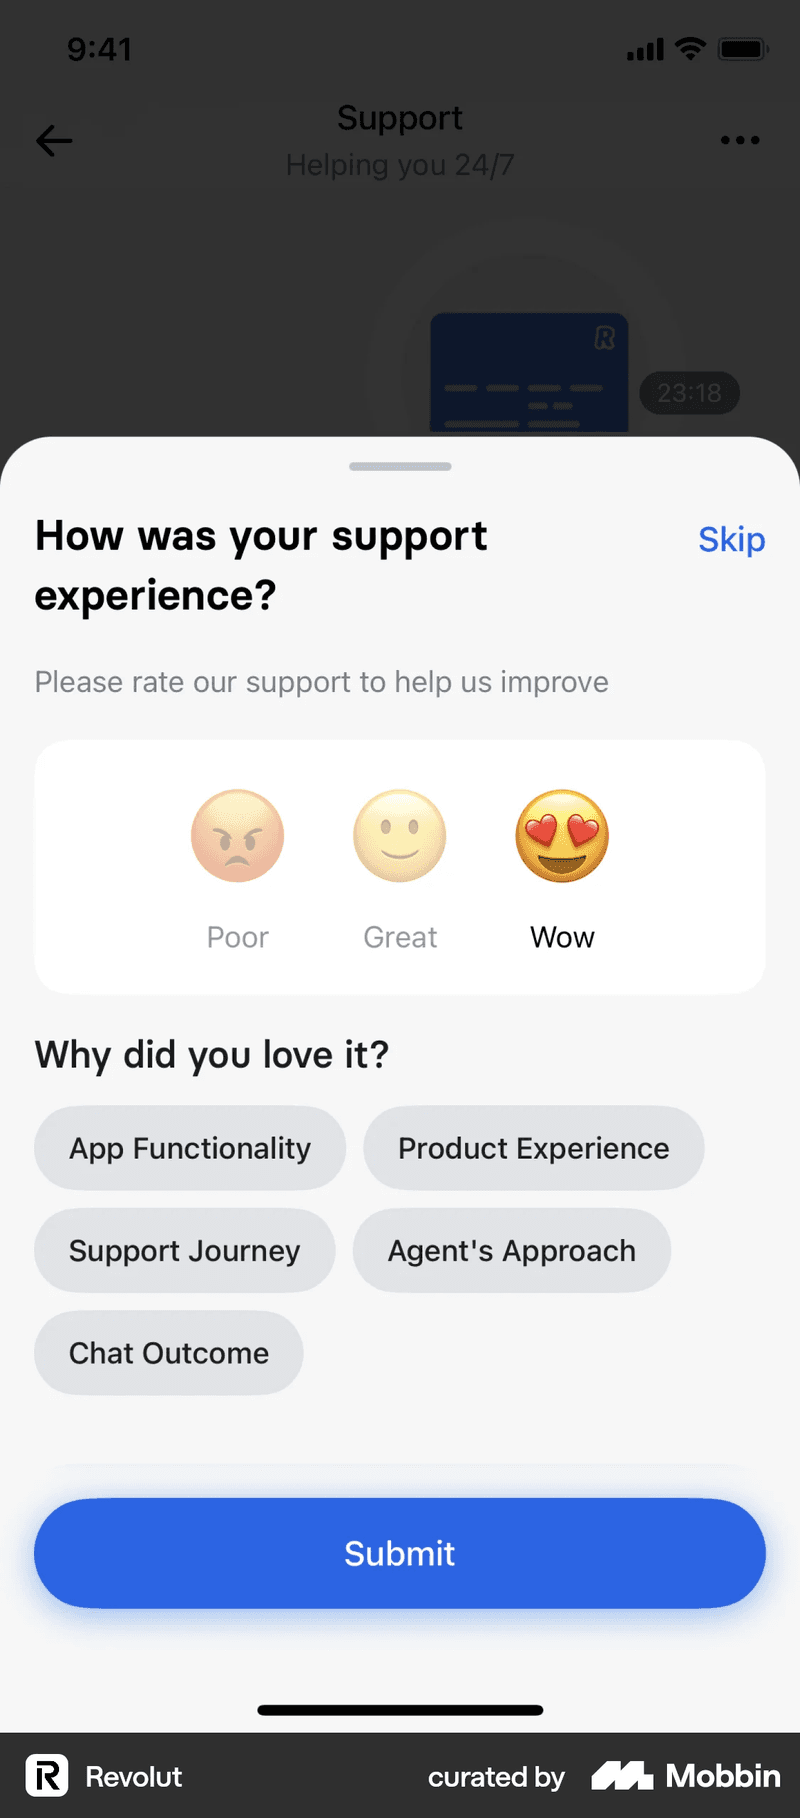
Another example, Revolut, makes its feedback collection effective by asking users about their customer support experience right after an interaction. By collecting input at the right time, they can quickly address issues and improve support quality.
With mobile surveys teams are able to collect real-time feedback inside mobile apps, helping improve both onboarding and customer support in one go.
Additional onboarding best practices for web applications
While those are some of my favorite tips for improving onboarding, there’s still more you can do—especially for web apps. Here are a few extra simple strategies that can make a big impact:
#10 Help users reach activation with an onboarding checklist
Getting users to activation, where they experience the app’s real value, is one of the biggest hurdles in onboarding. But in my opinion, an easy onboarding checklist can help make all the difference.
A checklist lays out the key steps users need to take and guides them through the most important features. Instead of leaving them to figure things out on their own, a checklist lays out what they need to do next, making it easier to reach activation.
Onboarding checklists are also widely used in web applications because they’re great for driving engagement and reducing drop-offs.
Attention Insights’ onboarding checklist for user activation
Attention Insights makes use of a step-by-step checklist in their onboarding that walks users through essential tasks. Tutorials can often be overwhelming. So instead, each checklist item triggers an interactive walkthrough. This lets users get hands-on guidance exactly when they need it and keeps them focused on high-impact tasks.
#11 Offer in-app self-service resources for 24/7 support
Users don’t always want to reach out for help—they want quick answers, right when they need them. That’s why in-app self-service resources come in.
A well-structured in-app resource center gives users instant access to knowledge base articles, tutorials, videos, and support tickets, all within the product. They get solutions on demand instead of waiting or searching around. Plus, it takes the pressure off your support team.
Groupize offers in-app guides with help content in various formats
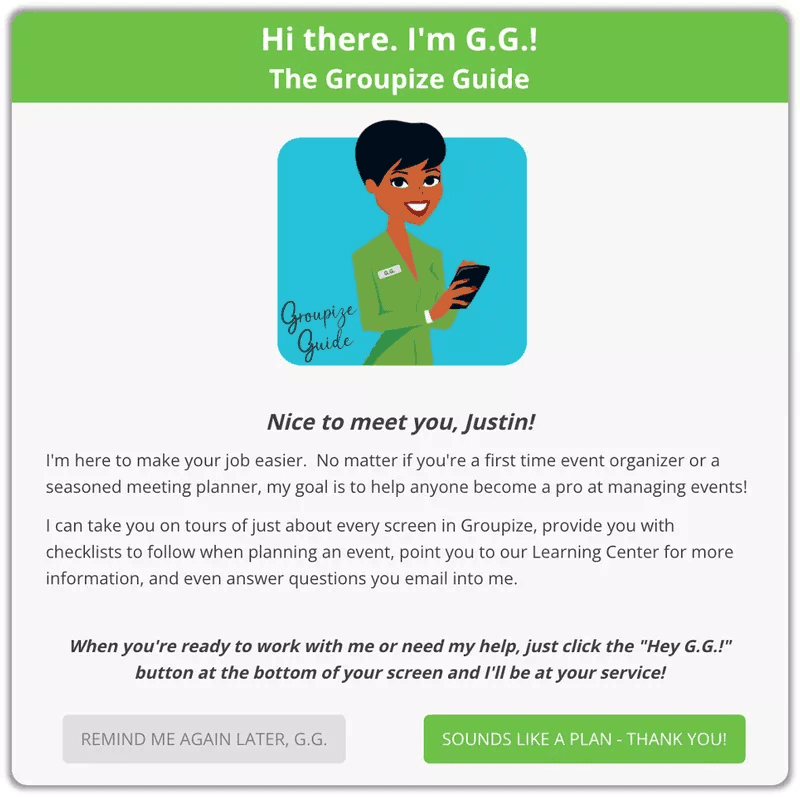
Groupize is a good example of this. They offer self-service help content in different formats, from an interactive gamified assistant to a full help center.
Groupize was quickly able to build and customize these in-app guides without engineering support. Users can find answers, watch tutorials, or submit support tickets, all without ever leaving the app.
#12 Use existing data to optimize the onboarding process
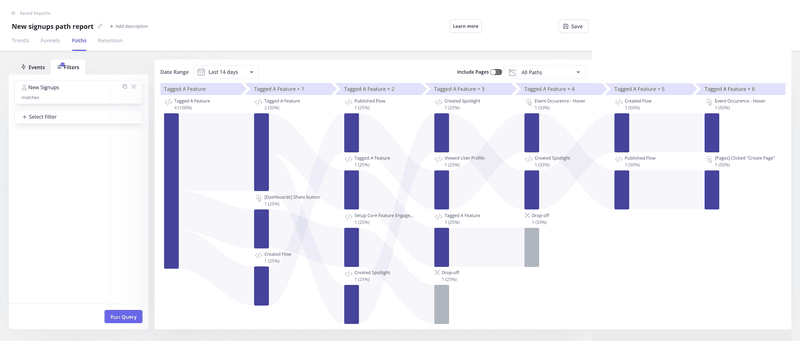
I find that onboarding is most effective when it’s grounded in actual user behavior data.
The best way to achieve this is with user path analysis. It lets you track how users move through onboarding, see which steps lead to activation, and spot where they drop off. This lets you identify bottlenecks and opportunities to make the user experience smoother.
Small tweaks based on this data, like adjusting guidance or removing unnecessary steps, can make a huge difference in activation rates.
About the author